amateur developer, basf employee & Pirat from Dormagen, Germany
103 stories
·
1 follower

Dozens of antiquities seized in Crete smuggling raid, 6 arrests

1 Share

Authorities in Greece have arrested six people on the island of Crete in connection with an alleged antiquities smuggling ring that was attempting to sell dozens of ancient artifacts, police said Thursday. The arrests came after a sting operation on Wednesday, during which the suspects were reportedly trying to sell a collection of antiquities to […]

The post Dozens of antiquities seized in Crete smuggling raid, 6 arrests appeared first on Keep Talking Greece.

Read the whole story
ortwin
18 days ago
reply
Germany, Düsseldorf
Share this story
Delete

Ollama

1 Comment and 2 Shares

“Only Apple can do this” Variously attributed to Tim Cook

Apple introduced Apple Intelligence at WWDC 2024. After waiting almost a year for Apple to, in Craig Federighi’s words, “get it right”, its promise of “AI for the rest of us” feels just as distant as ever.

While we wait for Apple Intelligence to arrive on our devices, something remarkable is already running on our Macs. Think of it as a locavore approach to artificial intelligence: homegrown, sustainable, and available year-round.

This week on NSHipster, we’ll look at how you can use Ollama to run LLMs locally on your Mac — both as an end-user and as a developer.


What is Ollama?

Ollama is the easiest way to run large language models on your Mac. You can think of it as “Docker for LLMs” - a way to pull, run, and manage AI models as easily as containers.

Download Ollama with Homebrew or directly from their website. Then pull and run llama3.2 (2GB).

$ brew install --cask ollama
        $ ollama run llama3.2
        >>> Tell me a joke about Swift programming.
        What's a Apple developer's favorite drink? 
        The Kool-Aid.
        

Under the hood, Ollama is powered by llama.cpp. But where llama.cpp provides the engine, Ollama gives you a vehicle you’d actually want to drive — handling all the complexity of model management, optimization, and inference.

Similar to how Dockerfiles define container images, Ollama uses Modelfiles to configure model behavior:

FROM mistral:latest
        PARAMETER temperature 0.7
        TEMPLATE """
        You are a helpful assistant.
        User: 
        Assistant: """
        

Ollama uses the Open Container Initiative (OCI) standard to distribute models. Each model is split into layers and described by a manifest, the same approach used by Docker containers:

{
        "mediaType": "application/vnd.oci.image.manifest.v1+json",
        "config": {
        "mediaType": "application/vnd.ollama.image.config.v1+json",
        "digest": "sha256:..."
        },
        "layers": [
        {
        "mediaType": "application/vnd.ollama.image.layer.v1+json",
        "digest": "sha256:...",
        "size": 4019248935
        }
        ]
        }
        

Overall, Ollama’s approach is thoughtful and well-engineered. And best of all, it just works.

What’s the big deal about running models locally?

Jevons paradox states that, as something becomes more efficient, we tend to use more of it, not less.

Having AI on your own device changes everything. When computation becomes essentially free, you start to see intelligence differently.

While frontier models like GPT-4 and Claude are undeniably miraculous, there’s something to be said for the small miracle of running open models locally.

  • Privacy: Your data never leaves your device. Essential for working with sensitive information.
  • Cost: Run 24/7 without usage meters ticking. No more rationing prompts like ’90s cell phone minutes. Just a fixed, up-front cost for unlimited inference.
  • Latency: No network round-trips means faster responses. Your /M\d Mac((Book( Pro| Air)?)|Mini|Studio)/ can easily generate dozens of tokens per second. (Try to keep up!)
  • Control: No black-box RLHF or censorship. The AI works for you, not the other way around.
  • Reliability: No outages or API quota limits. 100% uptime for your exocortex. Like having Wikipedia on a thumb drive.

Building macOS Apps with Ollama

Ollama also exposes an HTTP API on port 11431 (leetspeak for llama 🦙). This makes it easy to integrate with any programming language or tool.

To that end, we’ve created the Ollama Swift package to help developers integrate Ollama into their apps.

Text Completions

The simplest way to use a language model is to generate text from a prompt:

import Ollama
        let client = Client.default
        let response = try await client.generate(
        model: "llama3.2",
        prompt: "Tell me a joke about Swift programming.",
        options: ["temperature": 0.7]
        )
        print(response.response)
        // How many Apple engineers does it take to document an API? 
        // None - that's what WWDC videos are for.
        

Chat Completions

For more structured interactions, you can use the chat API to maintain a conversation with multiple messages and different roles:

let initialResponse = try await client.chat(
        model: "llama3.2",
        messages: [
        .system("You are a helpful assistant."),
        .user("What city is Apple located in?")
        ]
        )
        print(initialResponse.message.content)
        // Apple's headquarters, known as the Apple Park campus, is located in Cupertino, California.
        // The company was originally founded in Los Altos, California, and later moved to Cupertino in 1997.
        let followUp = try await client.chat(
        model: "llama3.2",
        messages: [
        .system("You are a helpful assistant."),
        .user("What city is Apple located in?"),
        .assistant(initialResponse.message.content),
        .user("Please summarize in a single word")
        ]
        )
        print(followUp.message.content)
        // Cupertino
        

Generating text embeddings

Embeddings convert text into high-dimensional vectors that capture semantic meaning. These vectors can be used to find similar content or perform semantic search.

For example, if you wanted to find documents similar to a user’s query:

let documents: [String] = 
        // Convert text into vectors we can compare for similarity
        let embeddings = try await client.embeddings(
        model: "nomic-embed-text", 
        texts: documents
        )
        /// Finds relevant documents
        func findRelevantDocuments(
        for query: String, 
        threshold: Float = 0.7, // cutoff for matching, tunable
        limit: Int = 5
        ) async throws -> [String] {
        // Get embedding for the query
        let [queryEmbedding] = try await client.embeddings(
        model: "llama3.2",
        texts: [query]
        )
        // See: https://en.wikipedia.org/wiki/Cosine_similarity
        func cosineSimilarity(_ a: [Float], _ b: [Float]) -> Float {
        let dotProduct = zip(a, b).map(*).reduce(0, +)
        let magnitude = { sqrt($0.map { $0 * $0 }.reduce(0, +)) }
        return dotProduct / (magnitude(a) * magnitude(b))
        }
        // Find documents above similarity threshold
        let rankedDocuments = zip(embeddings, documents)
        .map { embedding, document in
        (similarity: cosineSimilarity(embedding, queryEmbedding),
        document: document)
        }
        .filter { $0.similarity >= threshold }
        .sorted { $0.similarity > $1.similarity }
        .prefix(limit)
        return rankedDocuments.map(\.document)
        }
        

Building a RAG System

Embeddings really shine when combined with text generation in a RAG (Retrieval Augmented Generation) workflow. Instead of asking the model to generate information from its training data, we can ground its responses in our own documents by:

  1. Converting documents into embeddings
  2. Finding relevant documents based on the query
  3. Using those documents as context for generation

Here’s a simple example:

let query = "What were AAPL's earnings in Q3 2024?"
        let relevantDocs = try await findRelevantDocuments(query: query)
        let context = """
        Use the following documents to answer the question. 
        If the answer isn't contained in the documents, say so.
        Documents:
        \(relevantDocs.joined(separator: "\n---\n"))
        Question: \(query)
        """
        let response = try await client.generate(
        model: "llama3.2",
        prompt: context
        )
        

To summarize: Different models have different capabilities.

  • Models like llama3.2 and deepseek-r1 generate text.
    • Some text models have “base” or “instruct” variants, suitable for fine-tuning or chat completion, respectively.
    • Some text models are tuned to support tool use, which let them perform more complex tasks and interact with the outside world.
  • Models like llama3.2-vision can take images along with text as inputs.

  • Models like nomic-embed-text create numerical vectors that capture semantic meaning.

With Ollama, you get unlimited access to a wealth of these and many more open-source language models.


So, what can you build with all of this?
Here’s just one example:

Nominate.app

Nominate is a macOS app that uses Ollama to intelligently rename PDF files based on their contents.

Like many of us striving for a paperless lifestyle, you might find yourself scanning documents only to end up with cryptically-named PDFs like Scan2025-02-03_123456.pdf. Nominate solves this by combining AI with traditional NLP techniques to automatically generate descriptive filenames based on document contents.


The app leverages several technologies we’ve discussed:

  • Ollama’s API for content analysis via the ollama-swift package
  • Apple’s PDFKit for OCR
  • The Natural Language framework for text processing
  • Foundation’s DateFormatter for parsing dates

Looking Ahead

“The future is already here – it’s just not evenly distributed yet.” William Gibson

Think about the timelines:

  • Apple Intelligence was announced last year.
  • Swift came out 10 years ago.
  • SwiftUI 6 years ago.

If you wait for Apple to deliver on its promises, you’re going to miss out on the most important technological shift in a generation.

The future is here today. You don’t have to wait. With Ollama, you can start building the next generation of AI-powered apps right now.

Read the whole story
· · · · · · · · · · · ·
ortwin
84 days ago
reply
Ollama
Germany, Düsseldorf
Share this story
Delete

50 New macOS Sequoia Features and Changes Worth Checking Out

1 Comment
Apple on September 16 released macOS Sequoia, the latest version of the company's Mac operating system. ‌macOS Sequoia introduces interactive iPhone Mirroring, easier window tiling, a new Passwords app, and updated capabilities across the platform.


In this article, we've selected 50 new features and lesser-known changes that are worth checking out if you're upgrading. What do you think of ‌macOS Sequoia so far? Let us know in the comments.

1. Distraction Control


If you are tired of pop-ups and banners interrupting your web browsing experience, it's worth getting to know Distraction Control, a new Safari feature that helps you focus on the content that matters by minimizing intrusive elements on webpages. While it's not designed as an ad blocker, Distraction Control can significantly improve your reading experience by hiding static distractions.

safari
To nix a distracting item on a webpage, click the Page menu icon in the address bar and select Hide Distracting Items. Then simply hover your pointer over the item in question, whereupon it will be auto-selected for removal. With another click, the distraction will disintegrate before your eyes. When you're finished, click Done in the address bar. If you're on a webpage where you've hidden items, a crossed out eye icon will appear in the address bar, indicating that you can make them visible again by revisiting the Page menu and selecting Show Hidden Items.

2. Window Tiling


With macOS Sequoia, Apple has introduced a new window tiling management feature that aims to make it easy to arrange open windows into a layout that works best for you. When you drag a window to the edge of the screen, ‌macOS Sequoia‌ suggests a tiled position by displaying a frame, and you release the window to drop it right into place. This way, you can quickly arrange two app windows side by side, or place four windows in corners to keep several apps in view at once. When a window has been dragged to tile on one side or the other, dragging it back immediately resizes it to its original width and height.


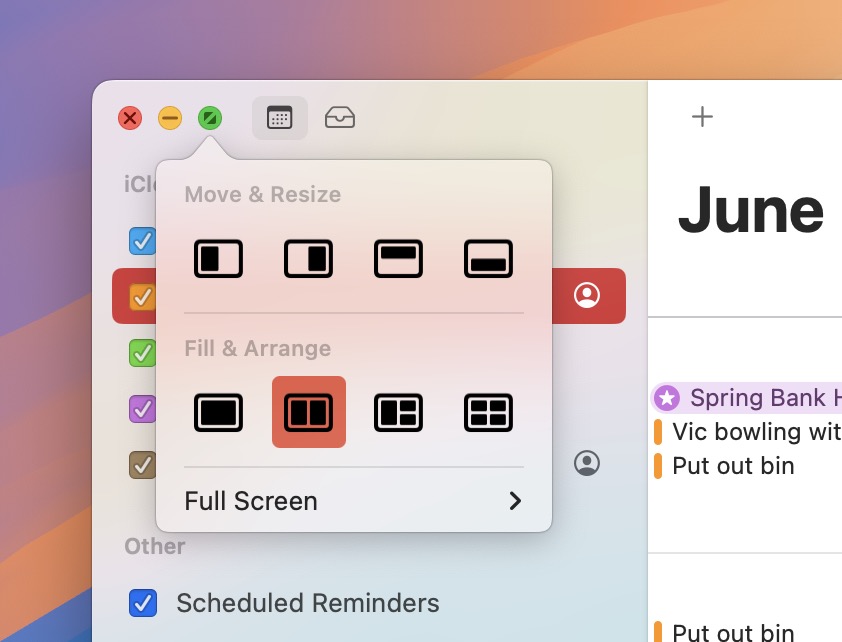
macOS 15 also adds new tiling options to the green traffic light in the top corner of windows. Hover your pointer over the green button, and a menu appears with options to move and resize or fill and arrange all open windows.

3. Adjust AirPods Adaptive Audio


Apple's second-generation AirPods Pro have an Adaptive Audio feature that includes Adaptive Noise Control, Personalized Volume, and Conversation Awareness, which are all features that adjust sound and Active Noise Cancellation in response to the environment around you.

settings
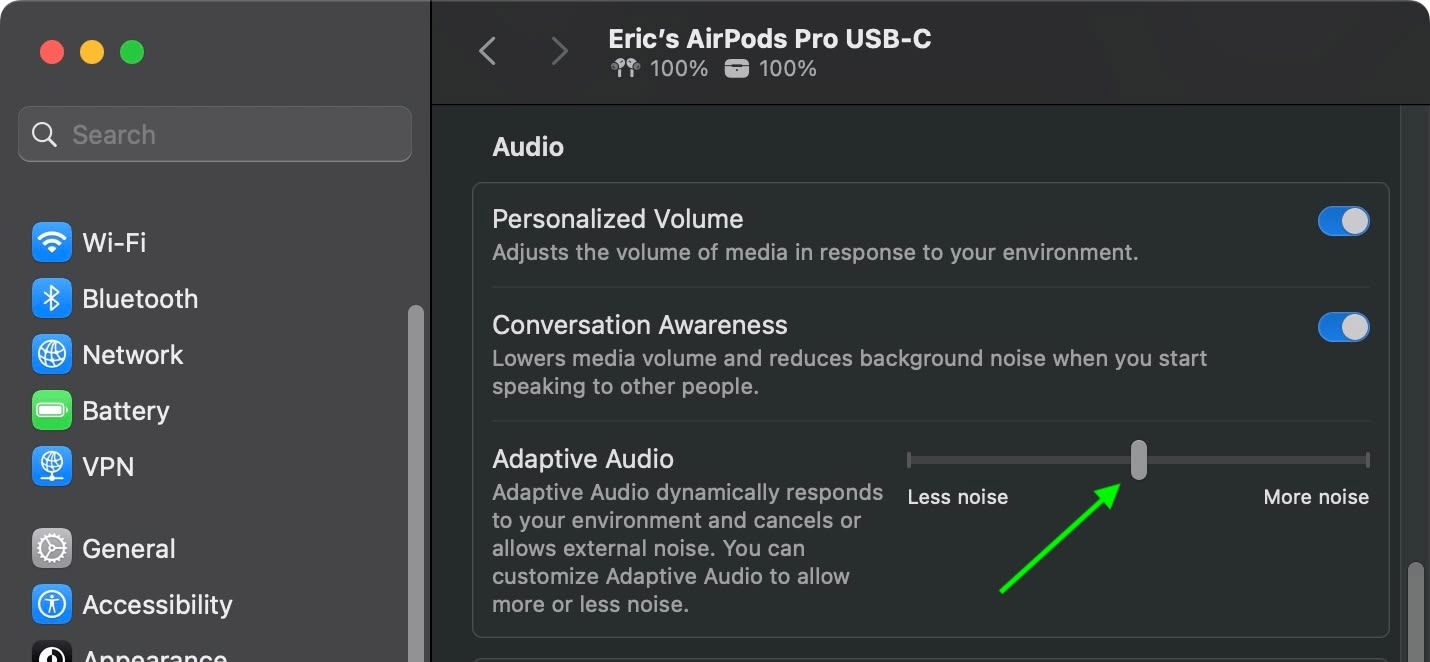
Previously, Adaptive Audio was an all or nothing setting, but that's changed in macOS Sequoia. Apple has added a "Customize Adaptive Audio" menu that lets you adjust the setting to allow for more or less noise.

4. AirPods Pro Head Gestures


With the new head gesture features, users can control Siri on the ‌AirPods Pro‌ with a shake or a nod of the head. If you get a phone call, for example, you can shake your head no if you don't want to answer it, or nod to accept the call. ‌Siri‌ interactions can be used for responding to incoming messages, calls, and notifications.

settings
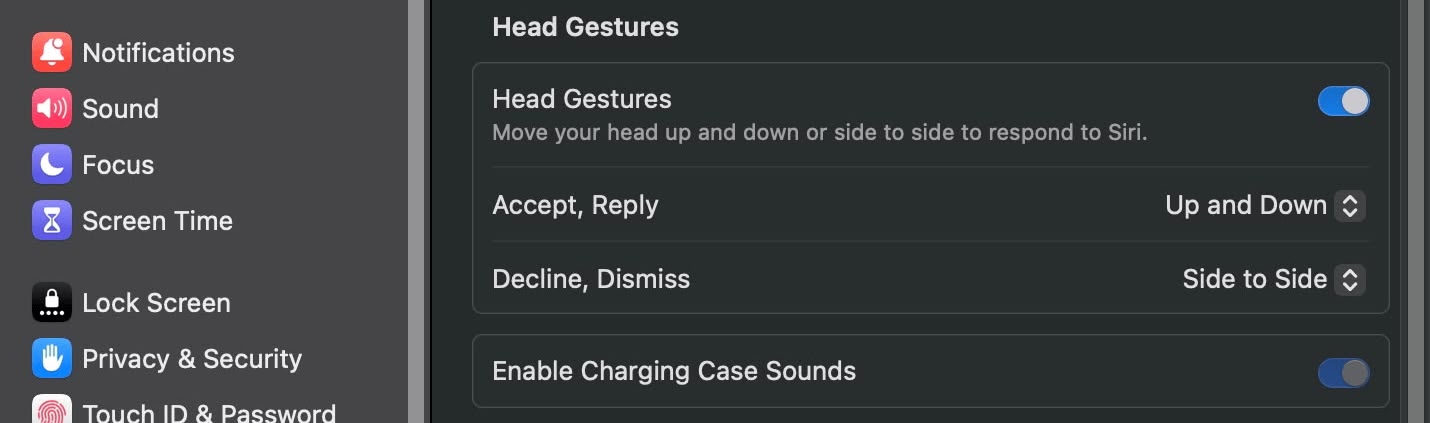
In Sequoia, Apple has added a section to the AirPods Pro menu in System Settings, enabling you to turn the gestures on and off.

5. Game Porting Toolkit 2


games
Apple's Game Porting Toolkit 2 allows developers to run unmodified Windows executables on Apple silicon Macs using the evaluation environment for Windows PC games, but end users can use it to run games too. The latest version supports an even larger set of game technologies, improved graphics and compute compatibility, ray tracing, the AVX2 instruction set, and increased performance.

6. New Dynamic Wallpapers


Sequoia features several new wallpapers, including dynamic versions. The wallpapers feature the sequoia trees that ‌macOS Sequoia‌ is named for. The imagery likely comes from Sequoia National Park, located in the southern Sierra Nevada mountains of California. There are three separate versions of the wallpaper for different times of day: Sequoia Sunrise, Sequoia Morning, and Sequoia Night.

settings
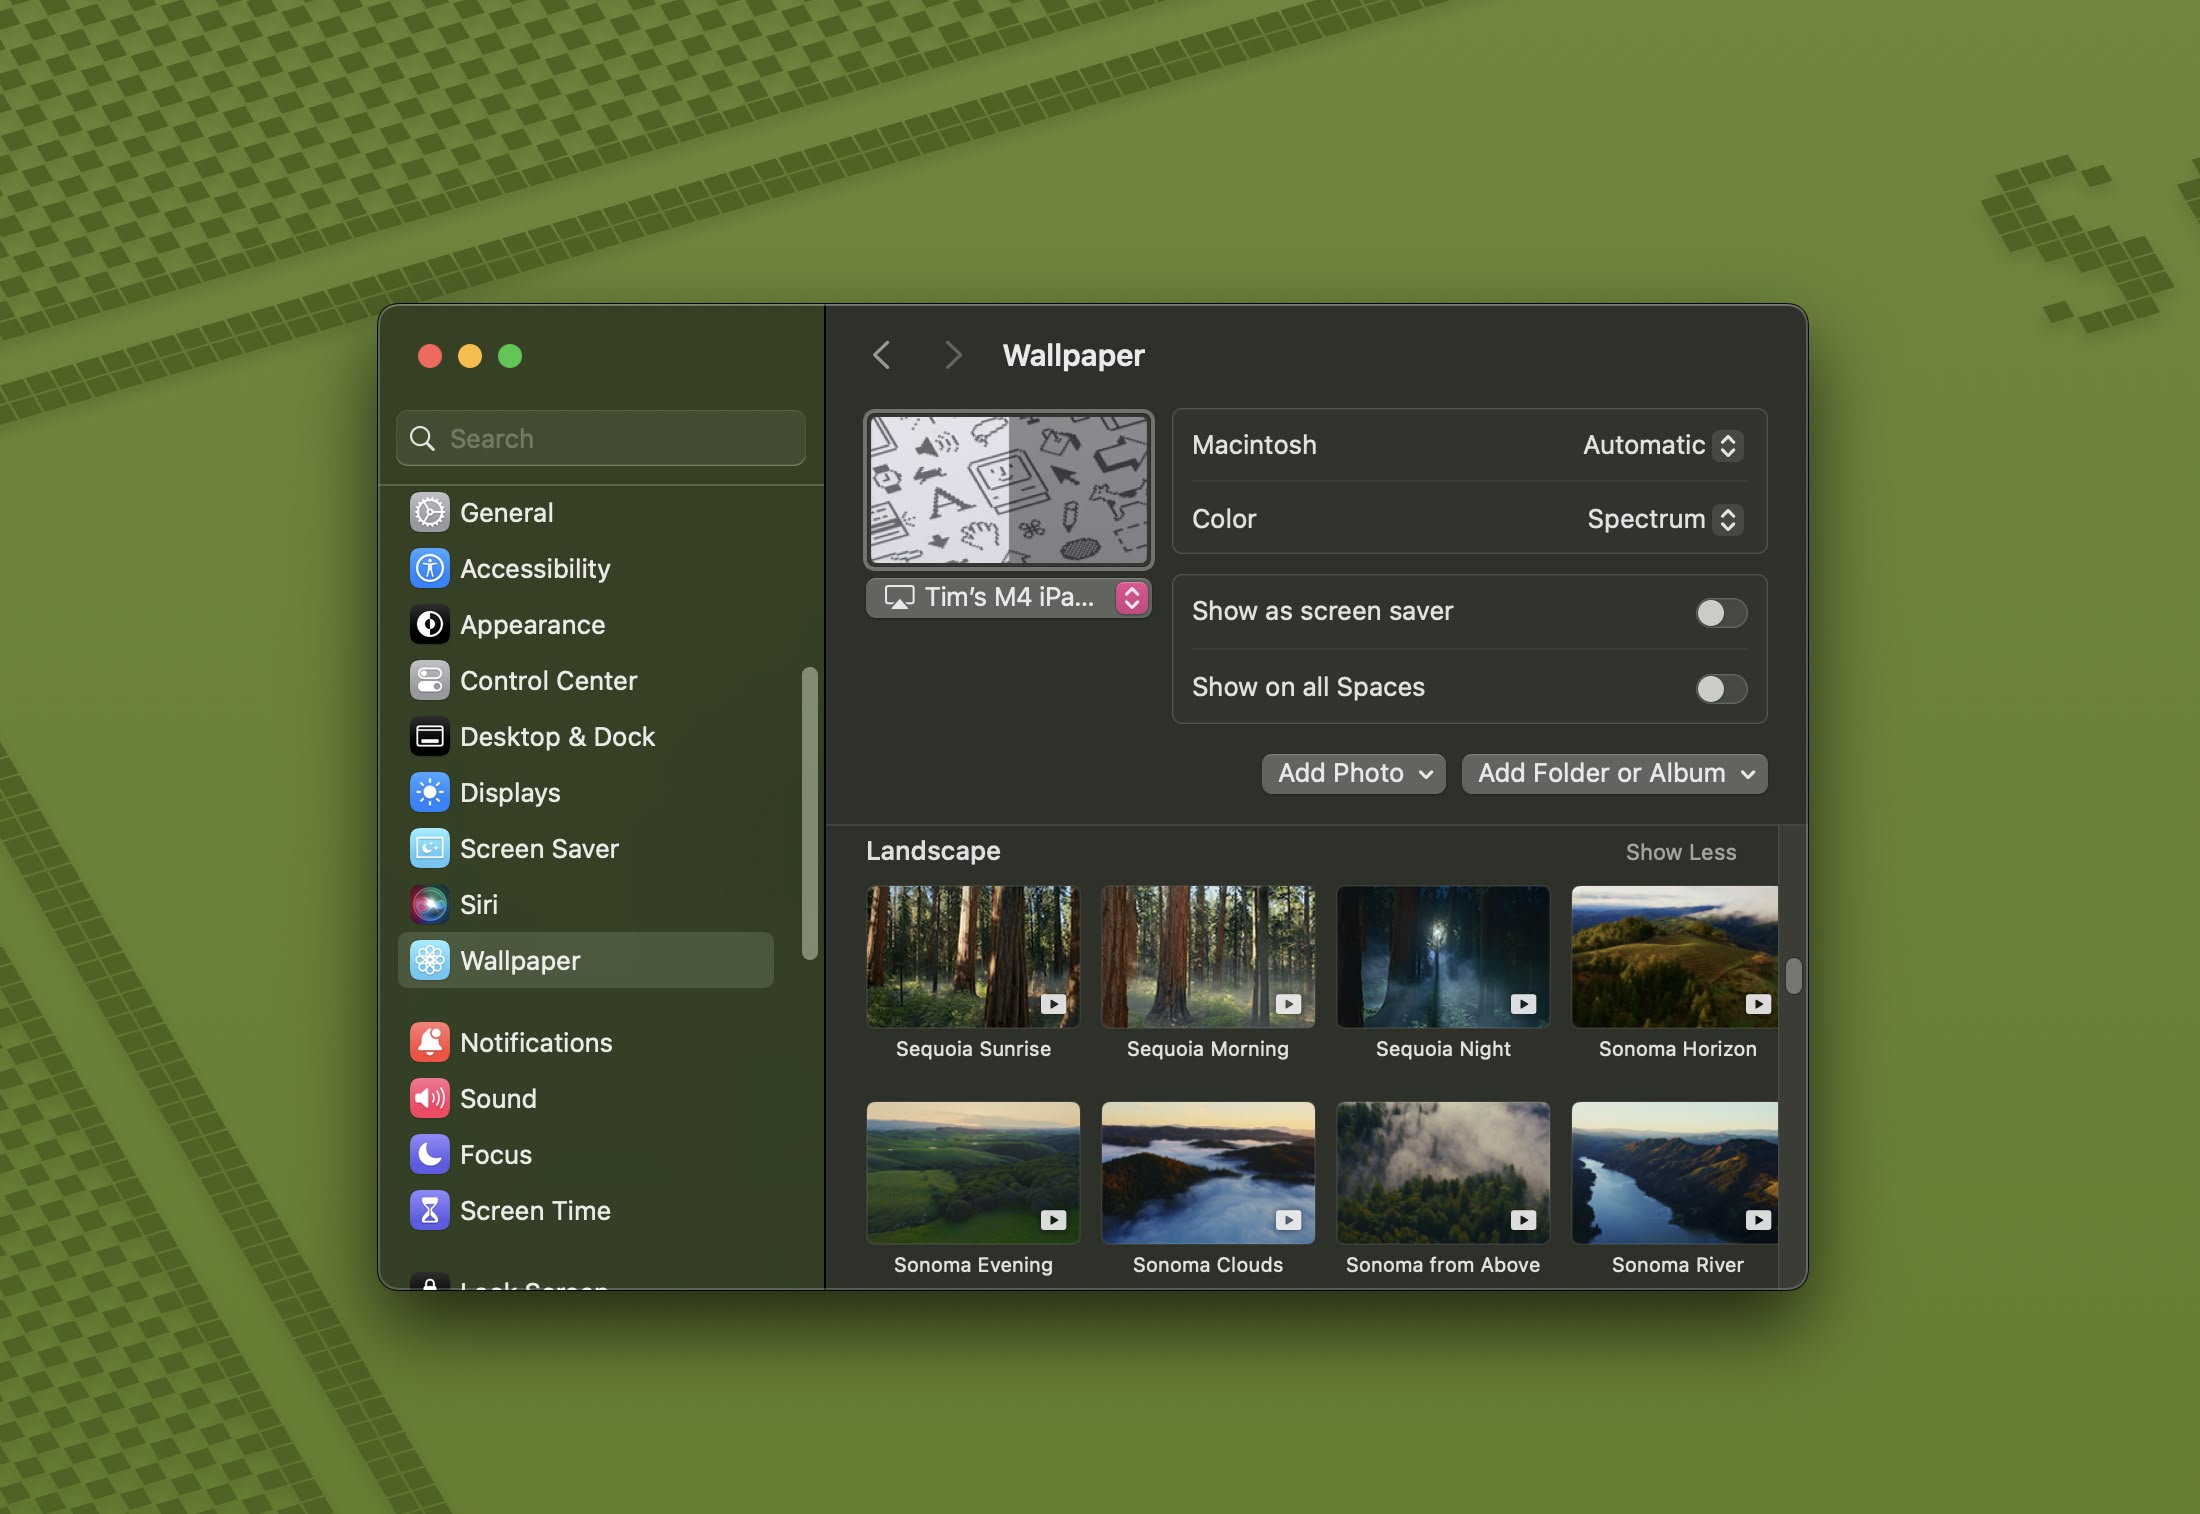
Each wallpaper is animated and will shift slightly at the Lock Screen when you unlock your Mac, plus there is an option to set it as a screen saver. There's also a fun new Macintosh dynamic wallpaper and screensaver combination that highlights classic Mac icons.

7. New Chess Graphics


chess
Apple has significantly updated the built-in Chess app in macOS Sequoia, marking its first major overhaul since macOS 10.3 in 2003. While not typically frequently used, the Chess app has received a substantial visual upgrade. It now boasts improved textures, lighting effects, and rendering for both the board and pieces. Users can also enjoy new aesthetic options with wood, metal, and marble skins for the game elements. Despite these enhancements, Apple has ensured backwards compatibility allowing users to access and continue their previously saved games in the new version.

8. Safari Video Viewer


safari
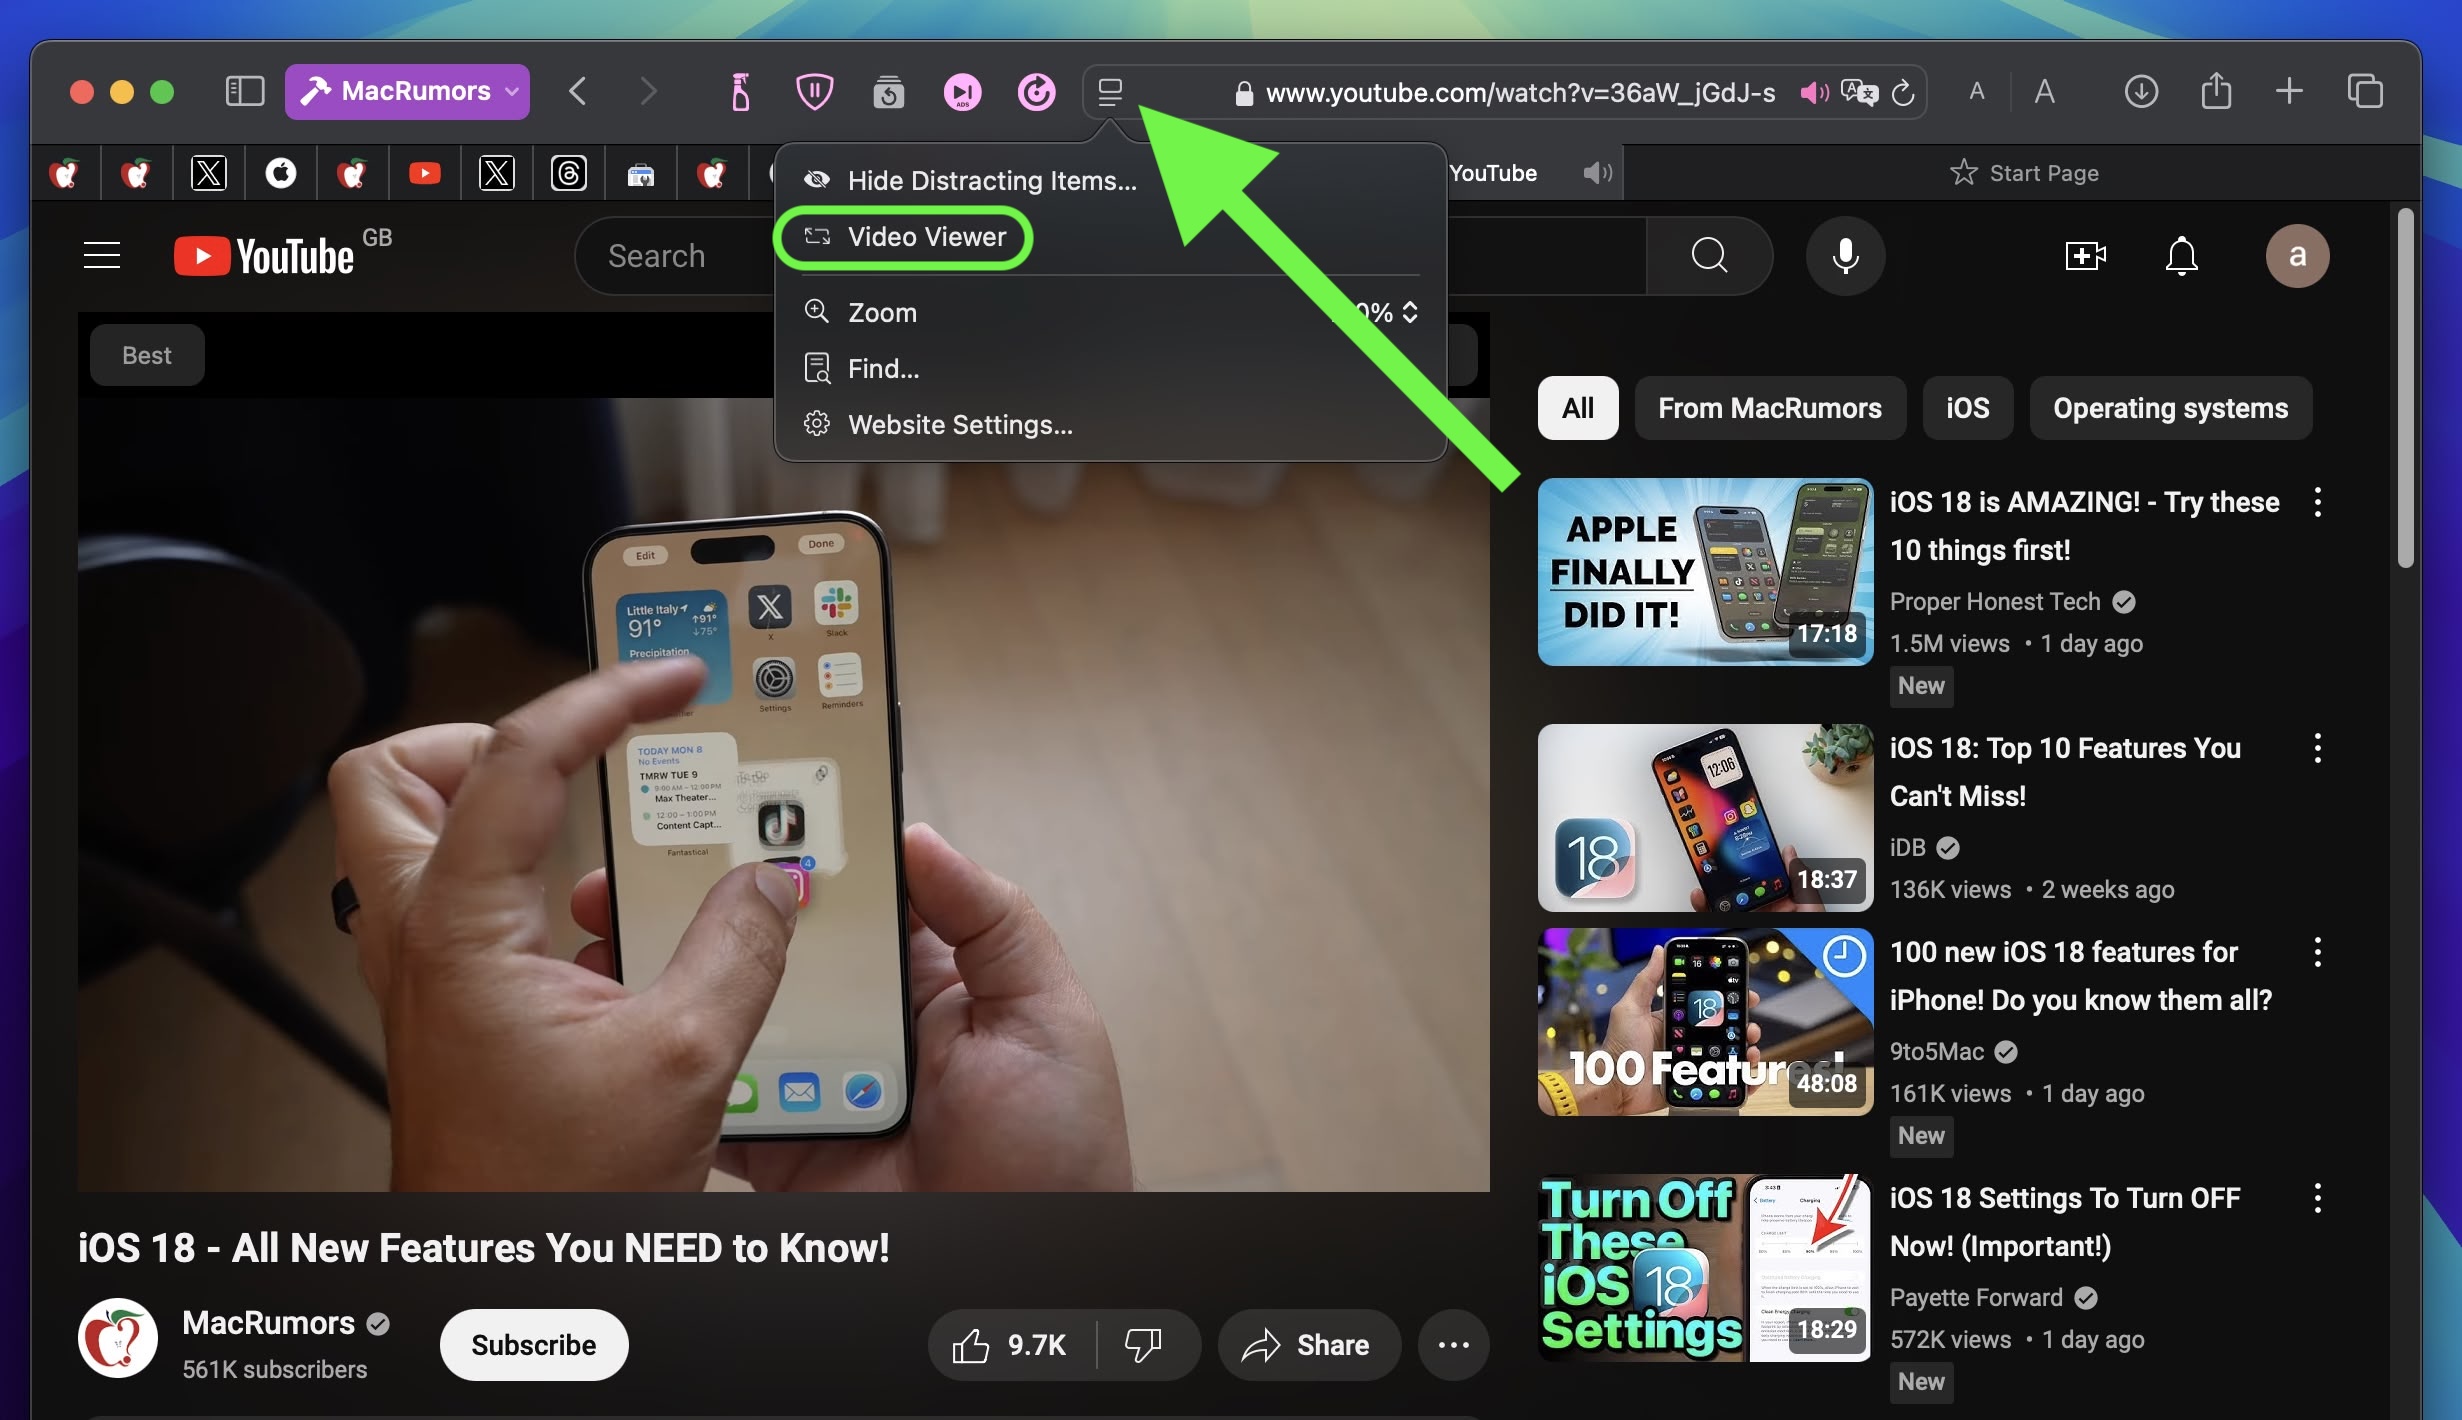
When watching a video in Safari, click the menu icon in the left-hand side of the address bar and select the new Video Viewer option. This makes the playing video expand within the Safari window into a kind of theater mode that blurs everything out behind it, bringing the content front and center.

safari
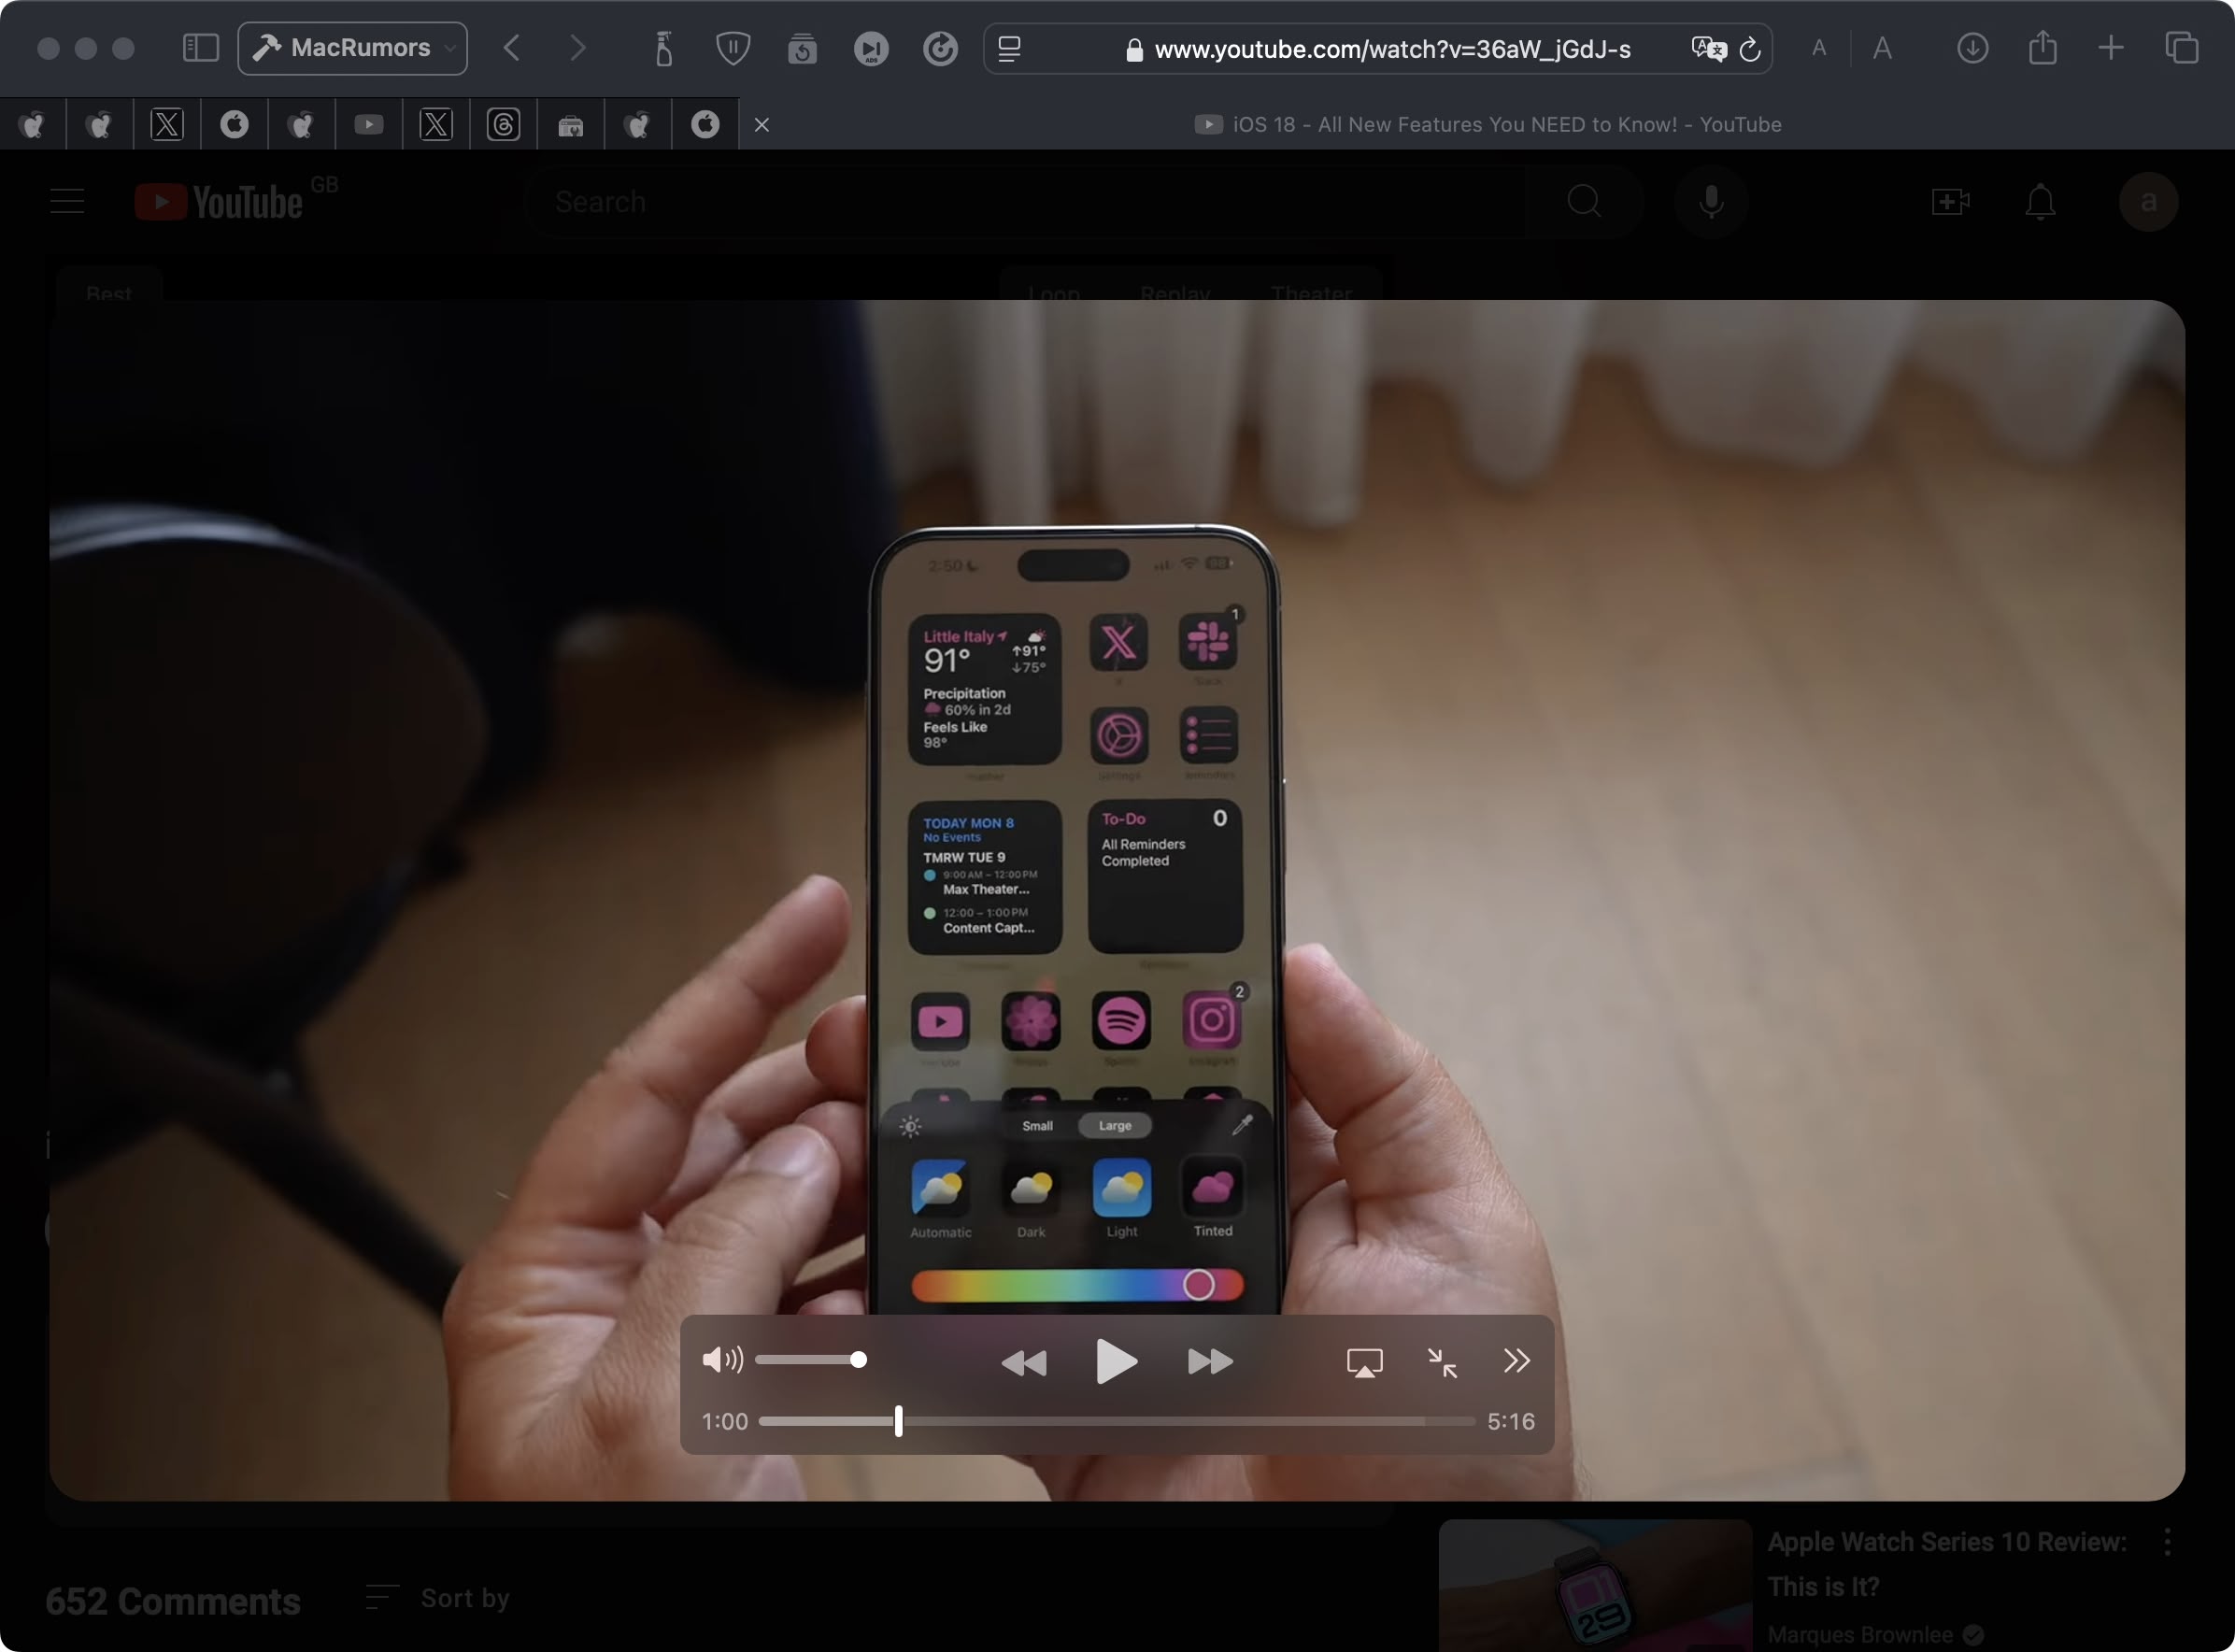
It also includes a native playback controls interface that replaces YouTube's – or the UI of whatever video you are playing. Options include AirPlay, volume, Picture in Picture, and playback speed.

9. Move & Resize Windows Controls


macos
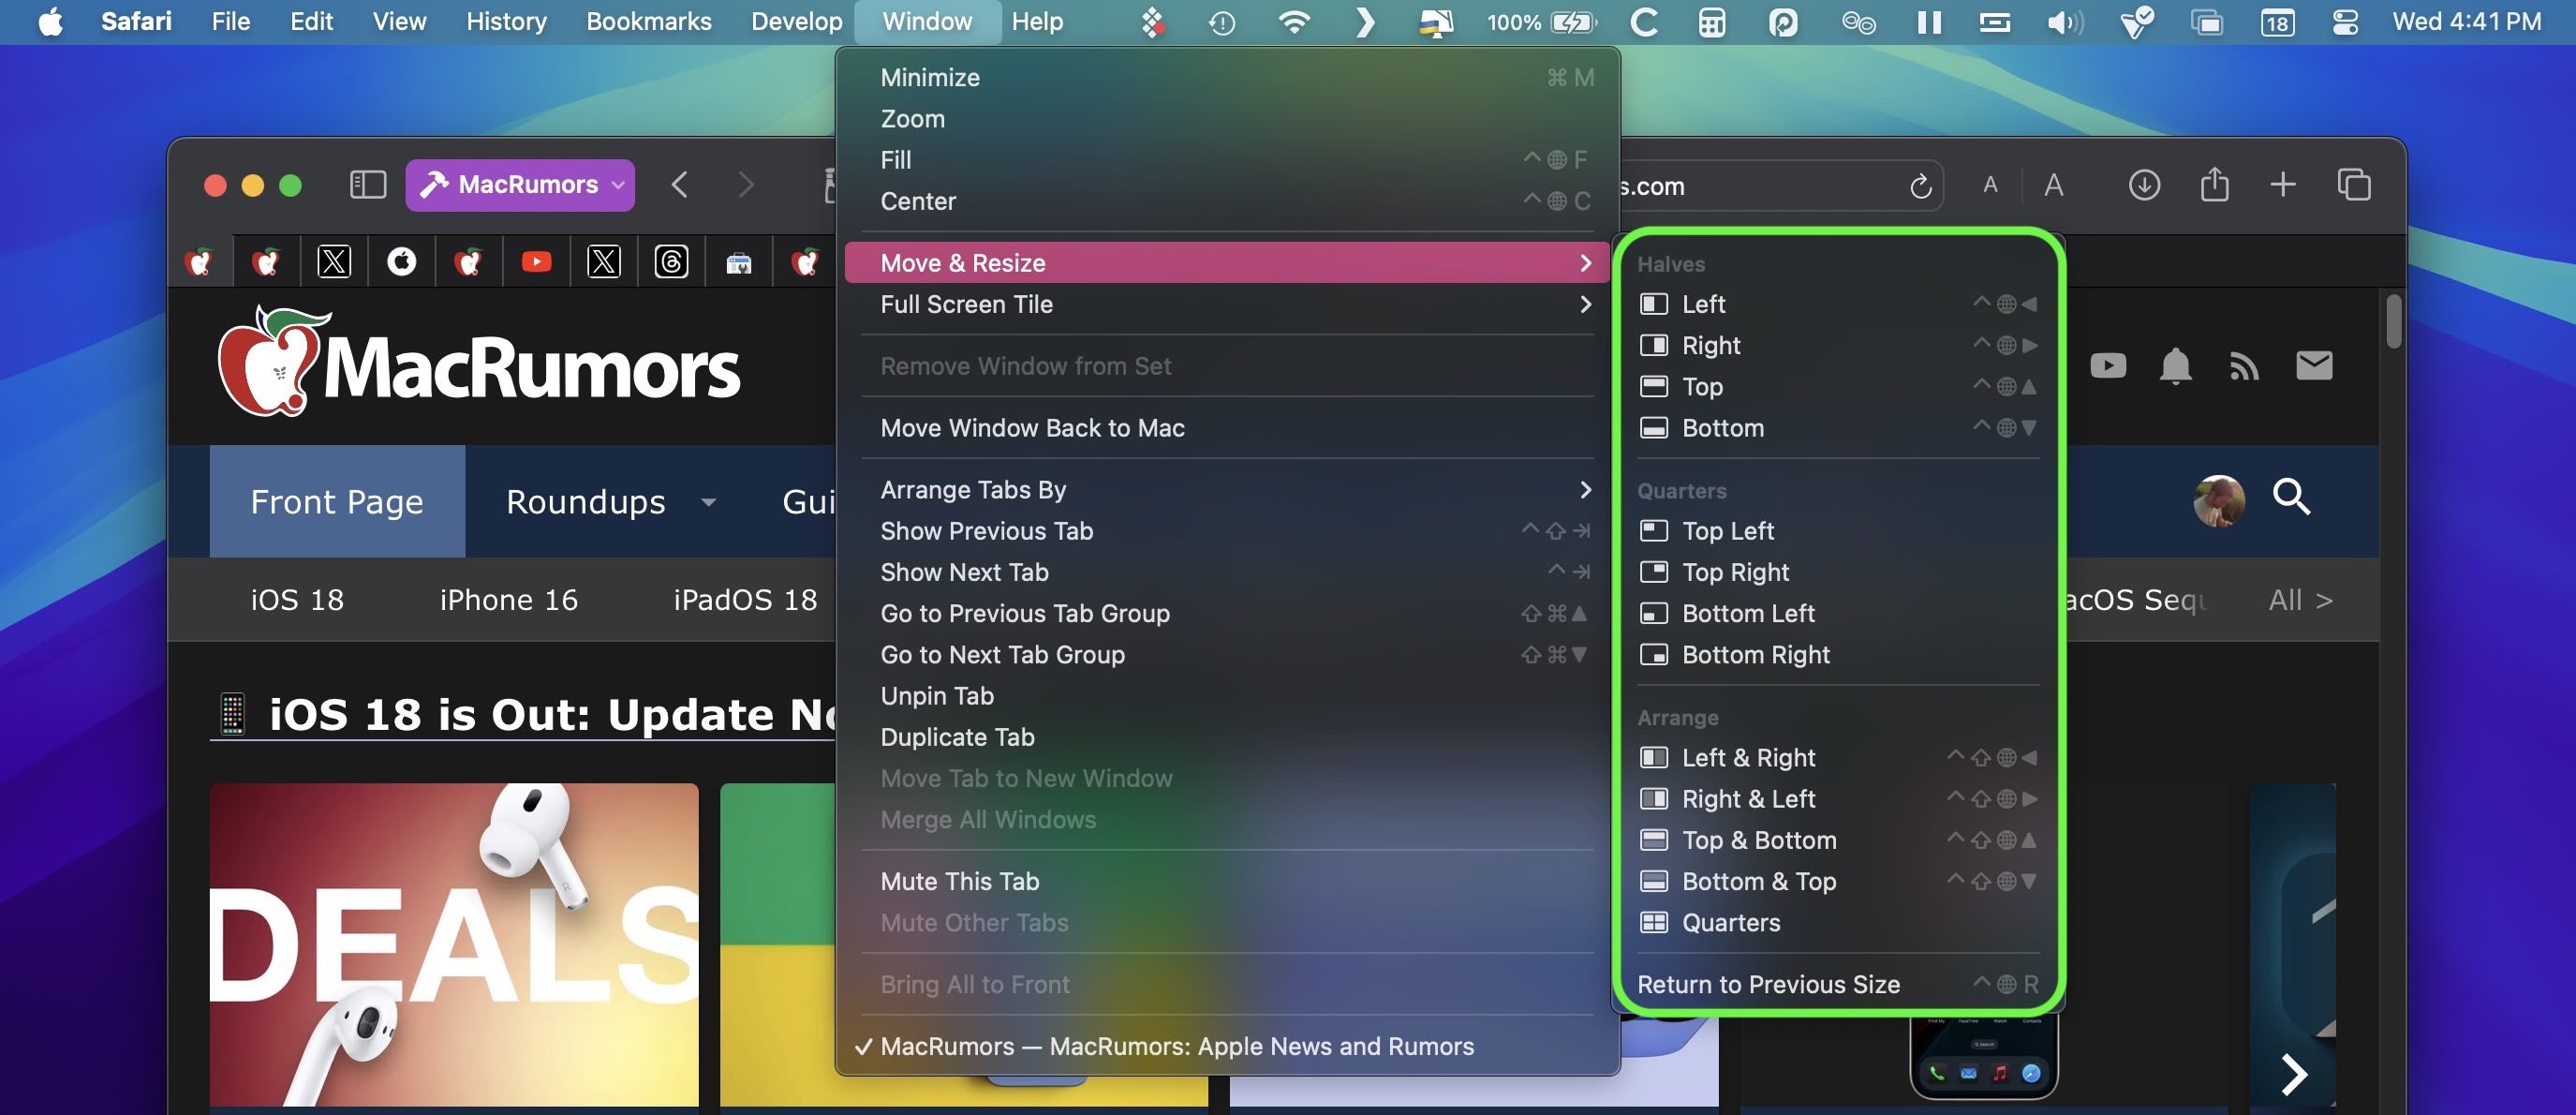
Accessed from the menu bar, a new "Move & Resize" option in the Window menu allows you to easily manage and arrange windows on your screen by offering various tiling and resizing options. You can move a window to the top, bottom, left, or right half of the screen, or position it into one of the four corners if you prefer a quarter-screen layout.

macOS also provides more flexible arrangements, such as splitting the screen horizontally or vertically, where you can tile windows side by side or one above the other. For even more control, there's a feature to quickly return a window to its previous size and position, making it easy to undo any changes.

10. Set Scenes in Freeform


freeform
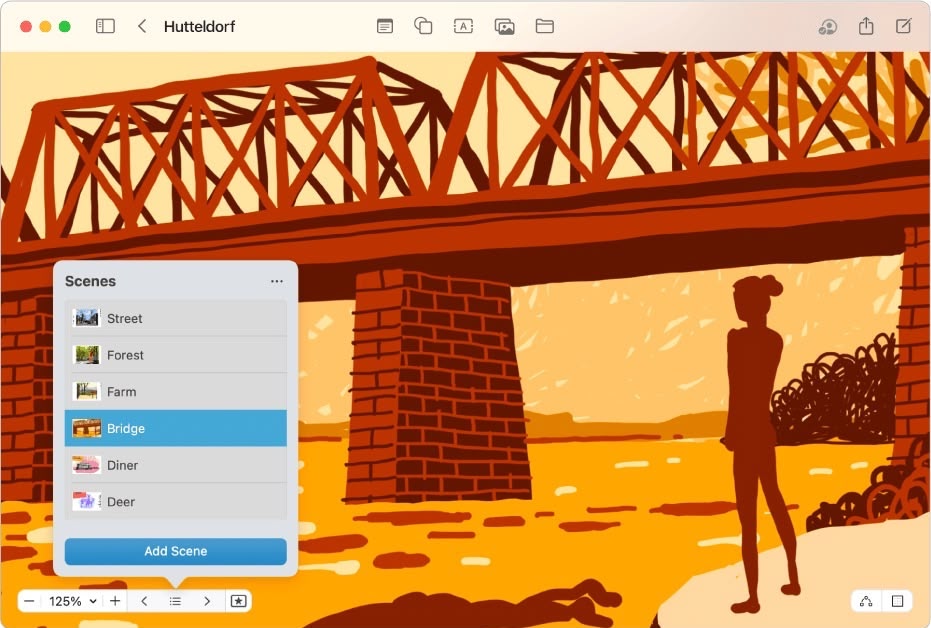
In the Freeform app, Apple has introduced "scenes" to make it easier to navigate and present Freeform boards. Scenes are saved views of specific sections of your board, offering a versatile way to organize and present your work. By creating scenes, you can divide your board into distinct, labeled sections, making it easier to navigate through complex content.

To create a scene, open a board with content, then zoom and scroll until you frame the part of your board you want on the screen for your first scene. Then click the three bullets icon and click Add Scene. Simply repeat these steps until you capture all the scenes you want.

11. Collapse Sections in Notes


notes
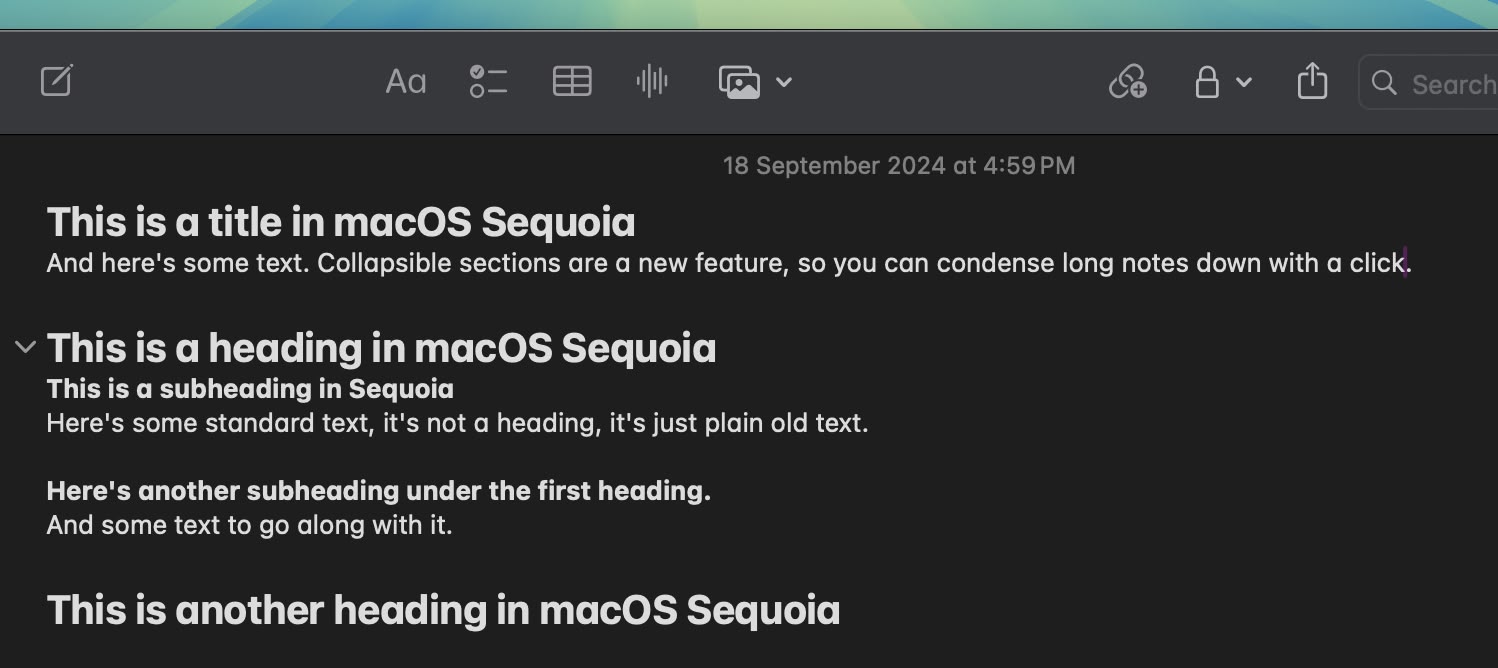
In the Notes app, if you have long notes with multiple headings, you can now collapse those headings down to create a more compact note.

notes
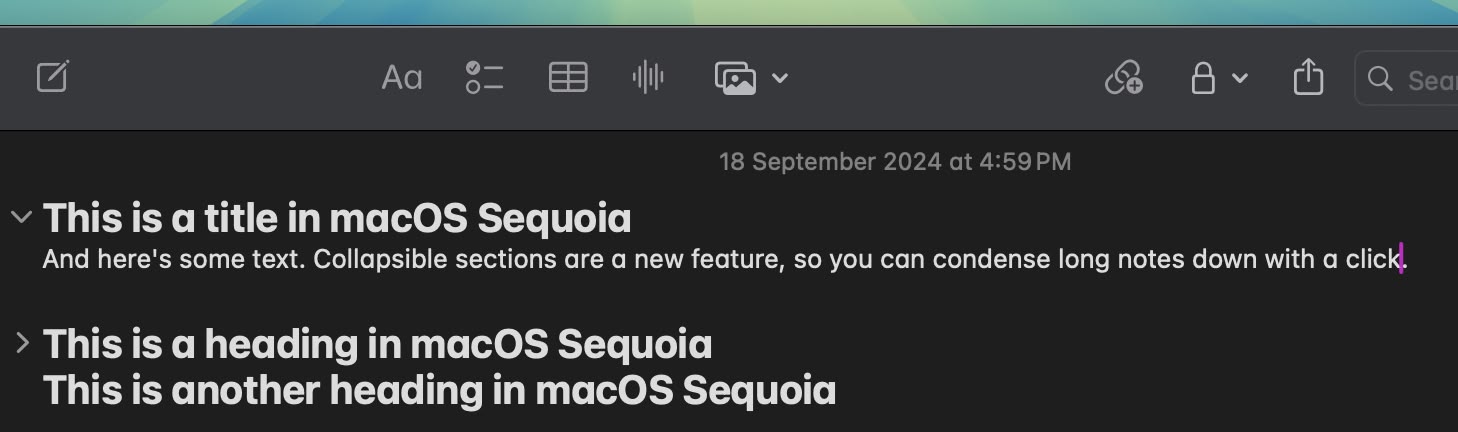
Any section header can be collapsed, including headings, subheadings, and titles. Just click on a heading and then click on the down arrow to collapse it. Click the arrow again to open it up.

12. New Passwords App


passwords
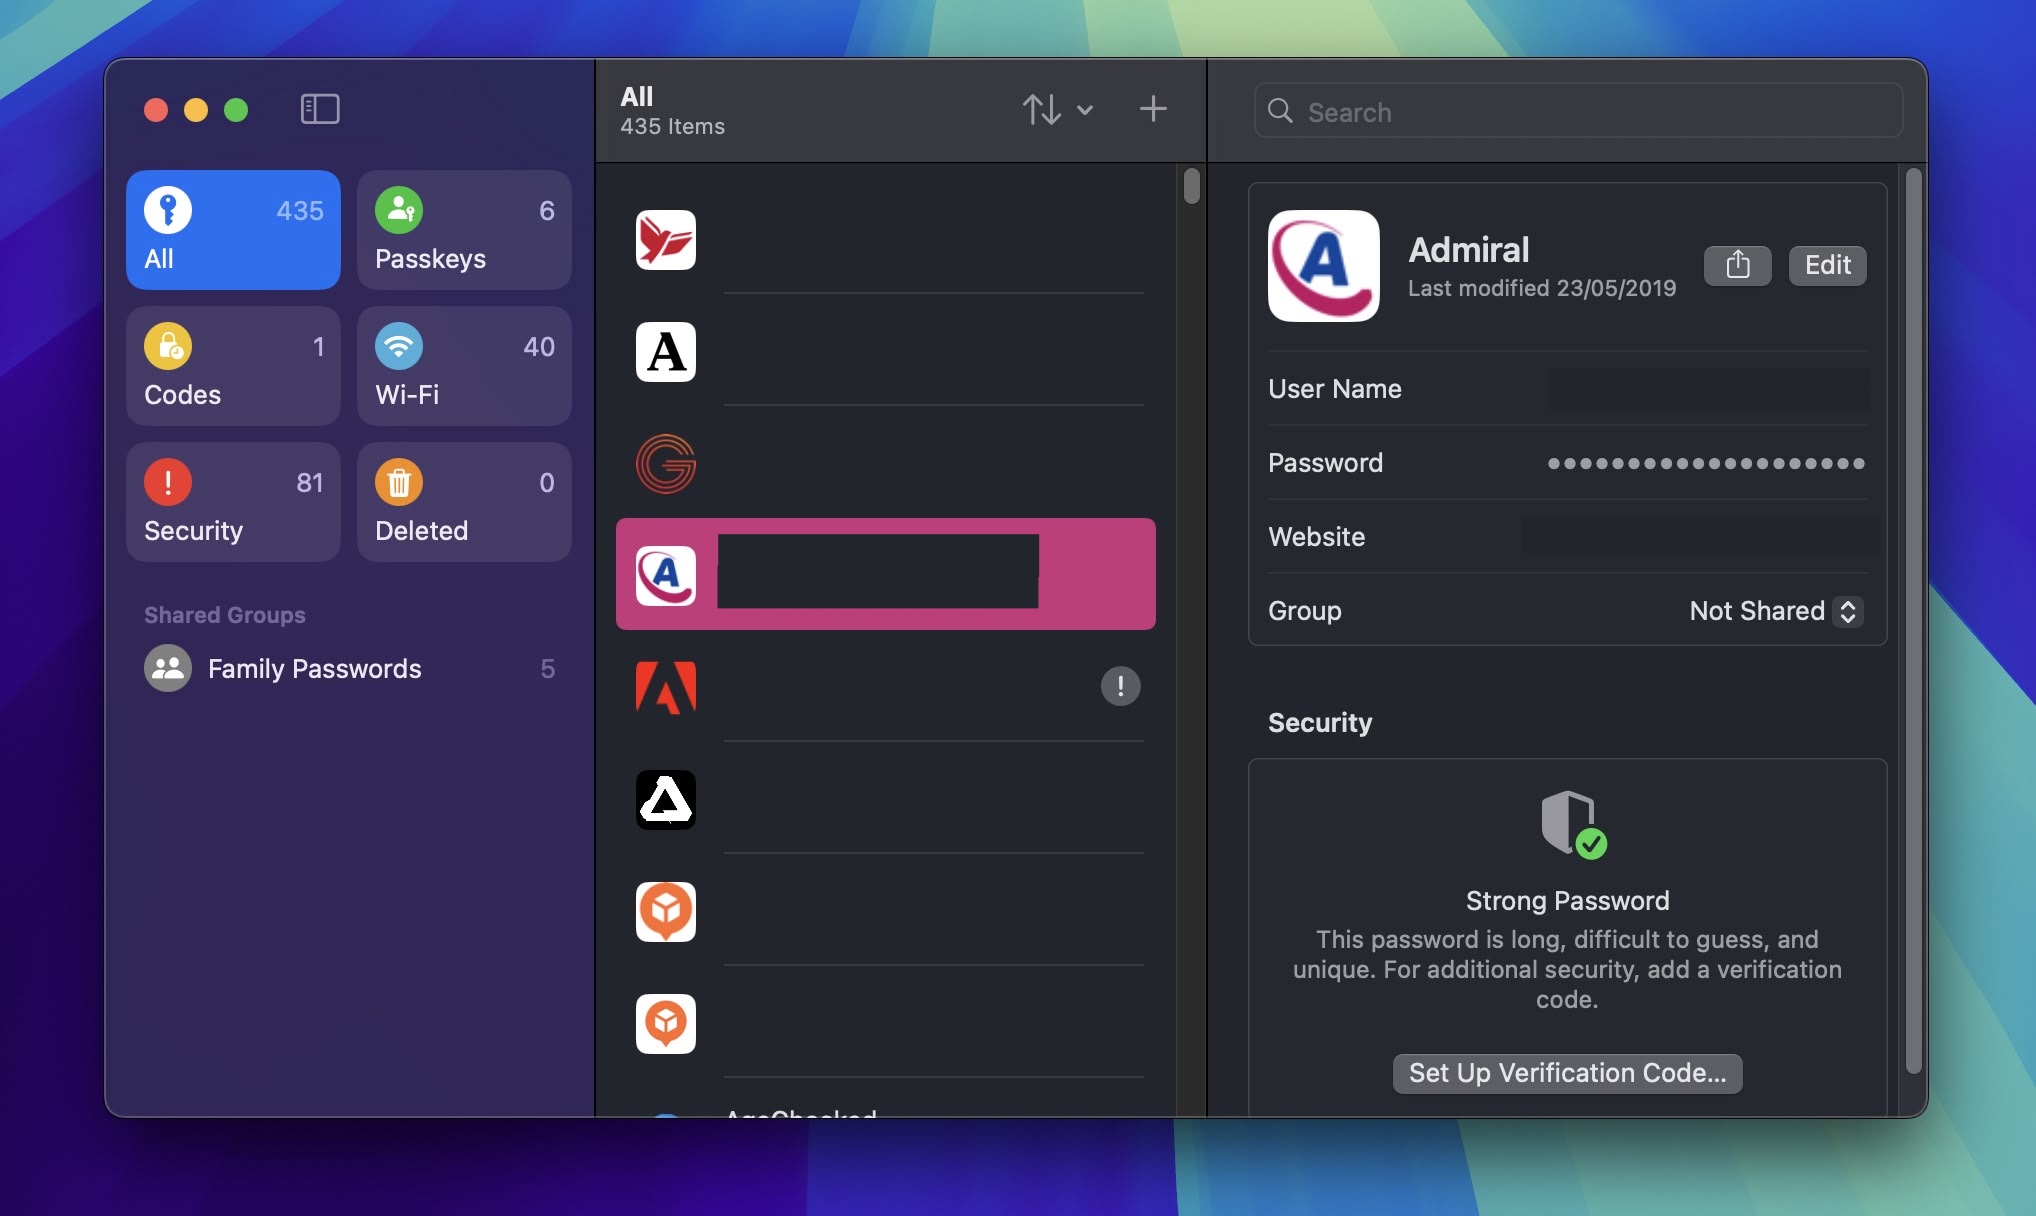
Apple added a dedicated Passwords app in macOS Sequoia‌, where logins and passwords stored in iCloud Keychain can be accessed. It's essentially the Passwords section that used to be located in Safari's settings, but in a dedicated app that makes it easier to find your stored login information.

The app has a simple layout with a search bar in the top-right of the window, so you can look up the information that you're looking for. If you've already used the ‌iCloud‌ Keychain feature, all of your saved logins and passwords are ready to go as soon as you authenticate with Touch ID or your Mac password. There are separate sections for passwords and logins (under All), Passkeys, two-factor authentication codes, Wi-Fi passwords, security warnings, and logins that have been deleted.

You can click in to any of the sections to see what's listed there, and selecting an individual entry shows the login and password. Each entry has fields for site or app name, username, login, verification code, websites where the login is used, and notes. There's also an option for changing your password for any given entry.

13. iPhone Mirroring


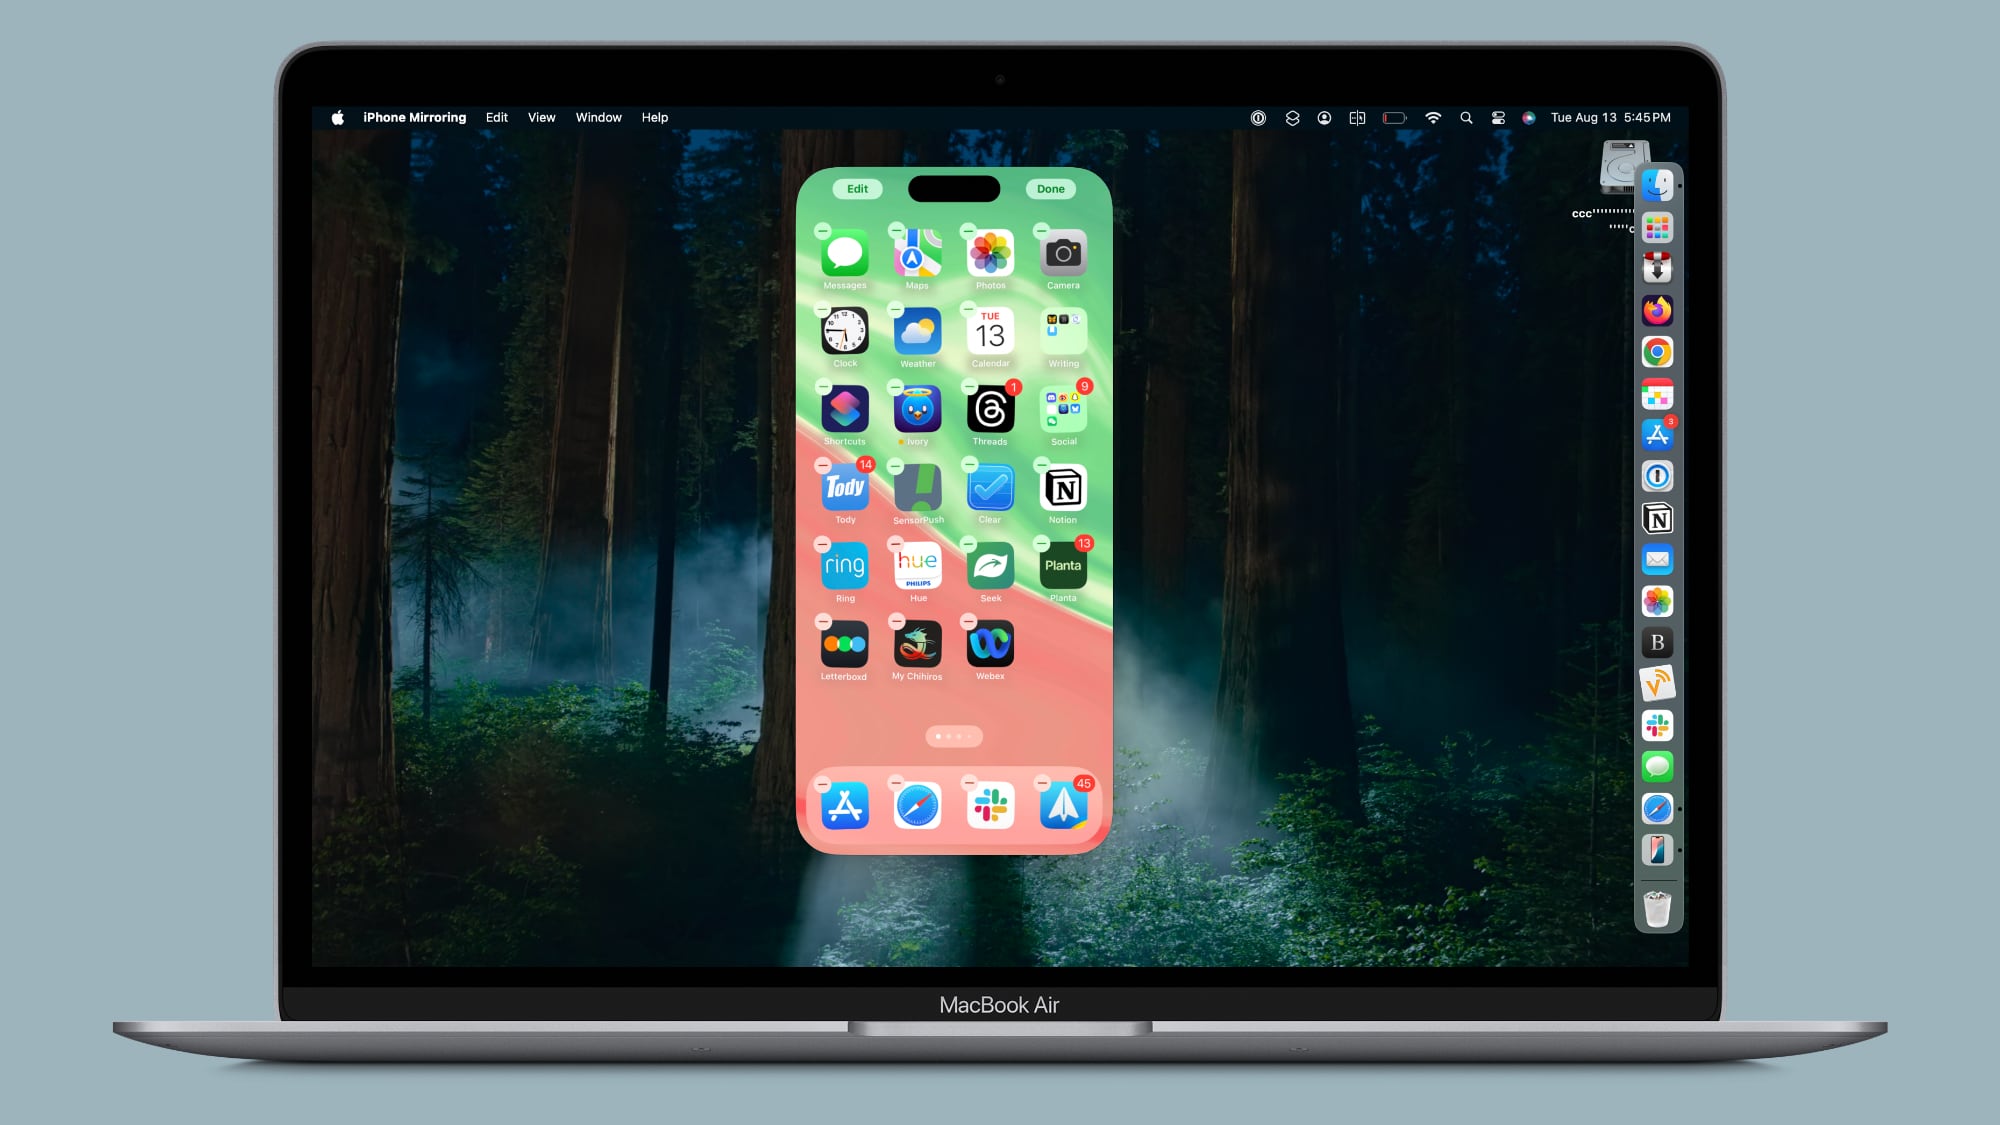
Apple has added support for iPhone Mirroring, one of the main updates coming to the Mac. ‌iPhone‌ Mirroring is a Continuity feature that lets you control your ‌iPhone‌ from your Mac. When you're signed in to the same Apple Account on a Mac and an ‌iPhone‌, you can use ‌iPhone‌ Mirroring to interact with your ‌iPhone‌ even when the ‌iPhone‌ is locked. You can open up and use apps, deal with notifications, send messages, and more.


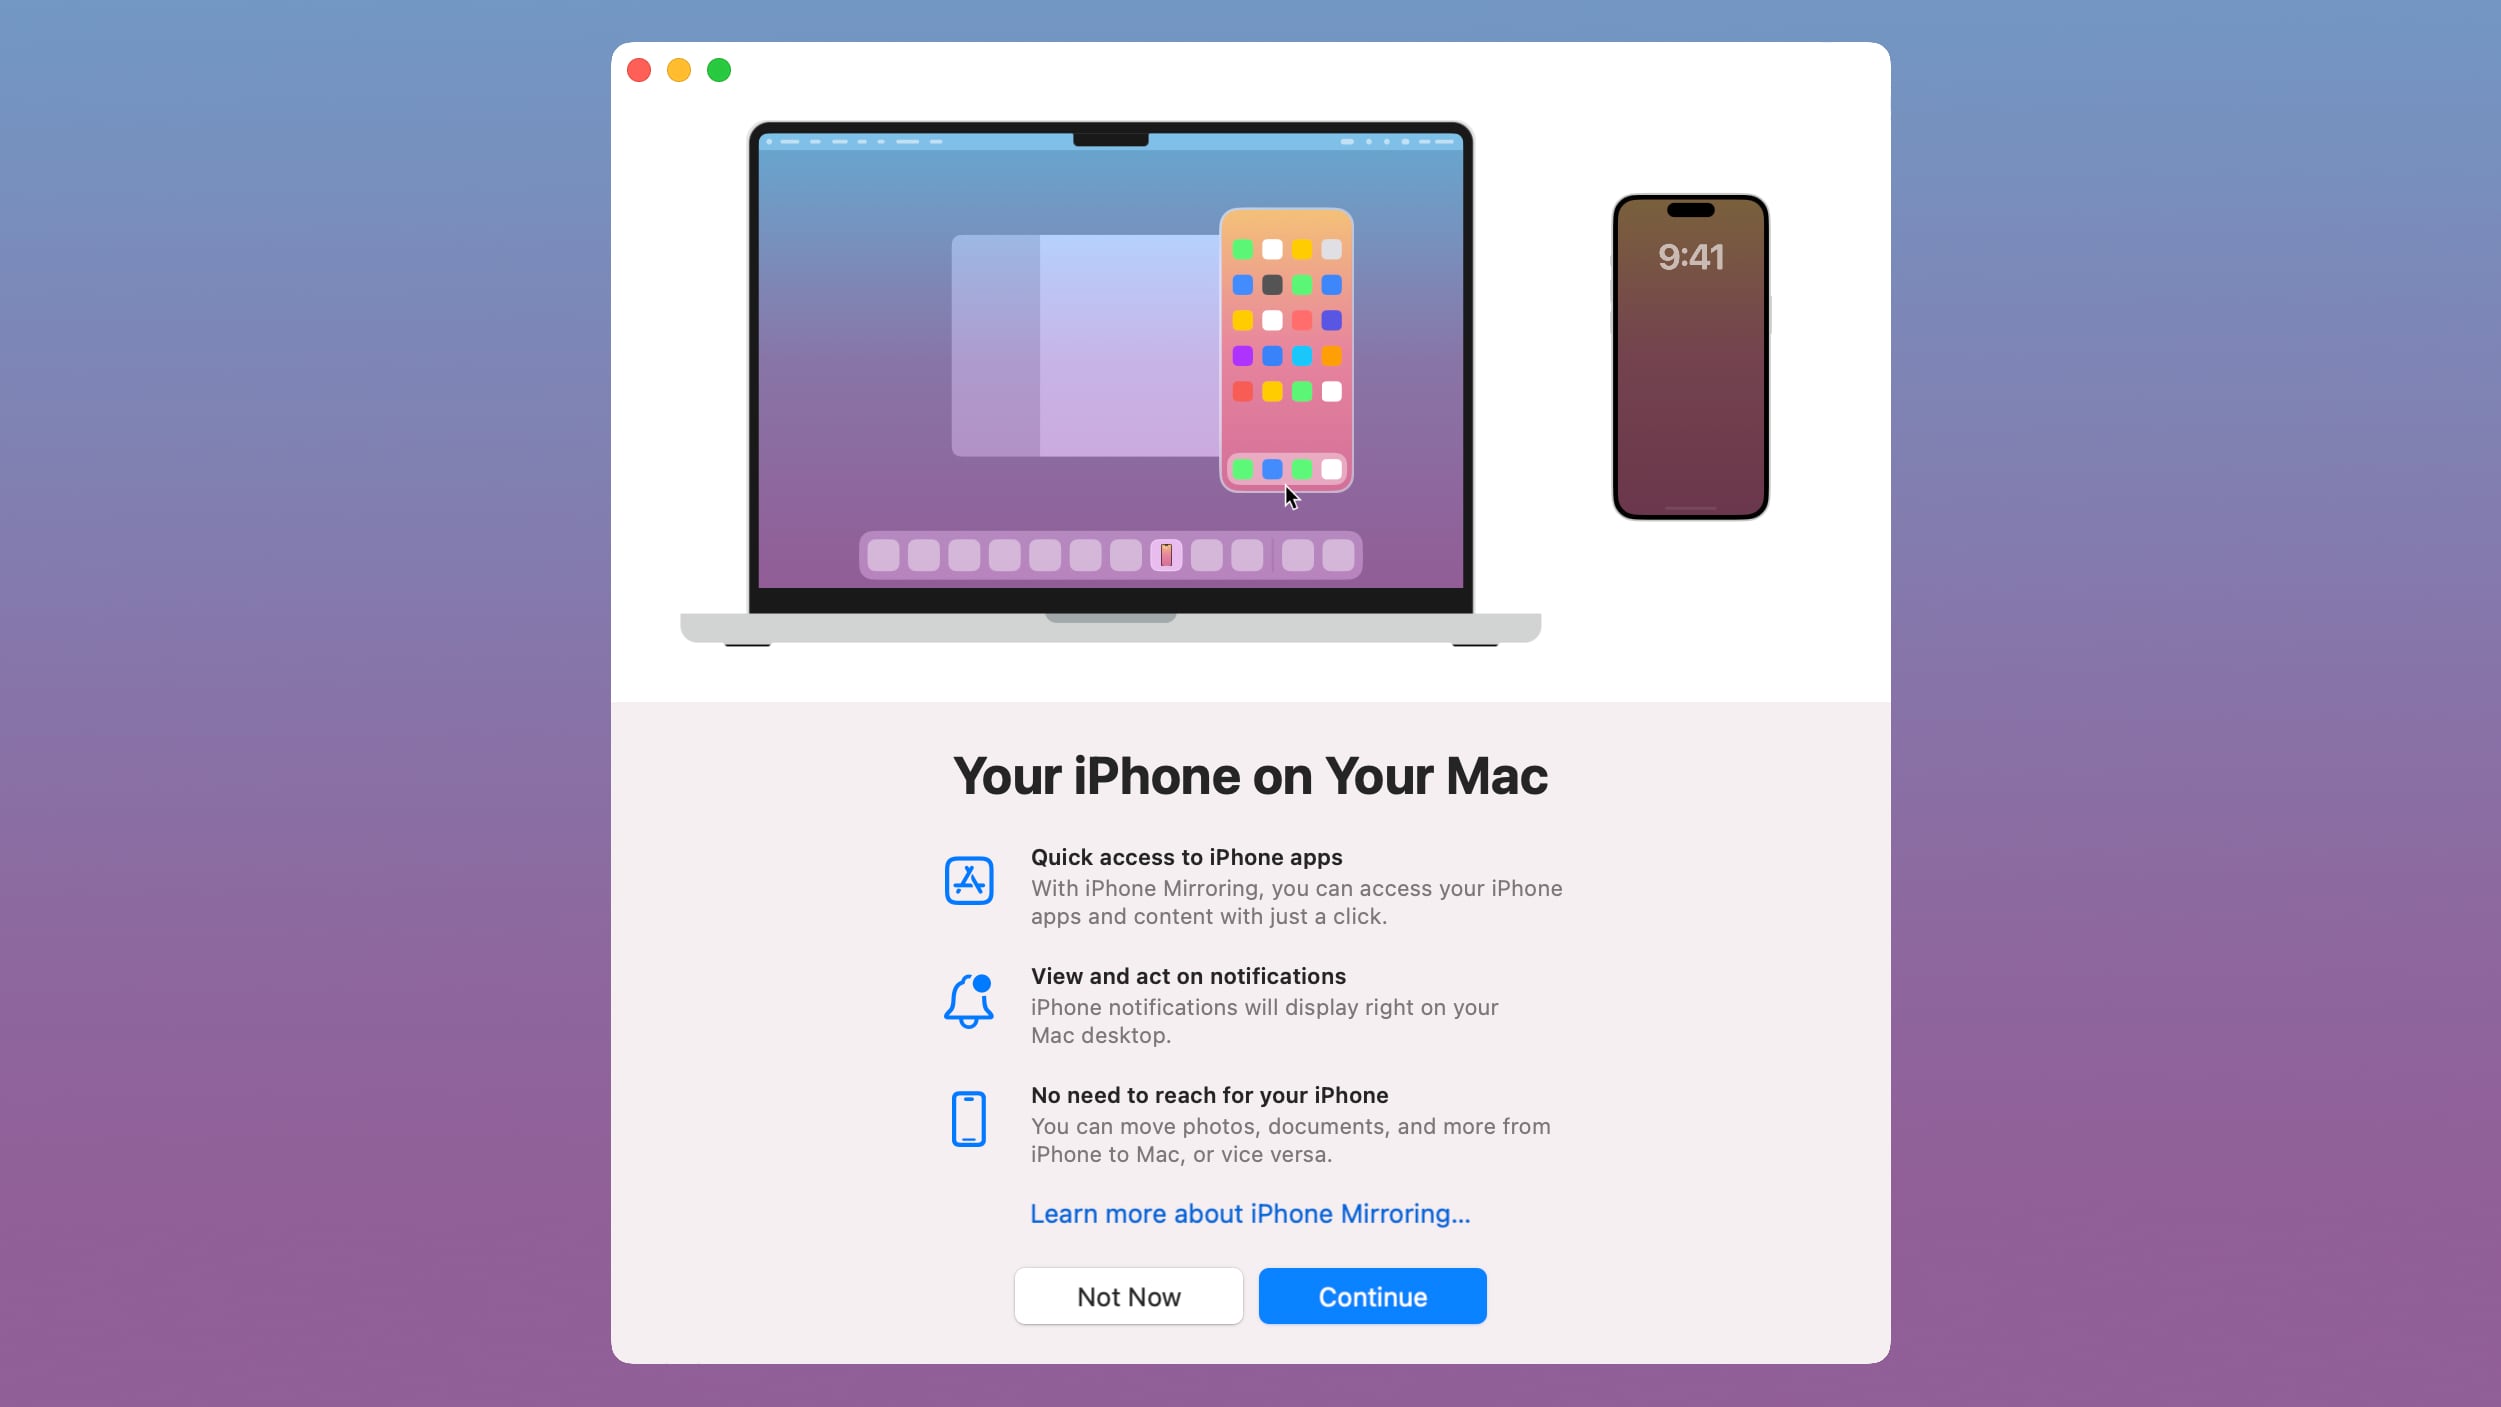
You can use your Mac keyboard, trackpad, or mouse with your ‌iPhone‌, which is useful for typing up long emails and other documents on the ‌iPhone‌, and it provides an easy way to keep up with your ‌iPhone‌ notifications without having to pull out your device and check it. When you click on a notification on your Mac when using ‌iPhone‌ Mirroring, it is supposed to open up right into the app on your ‌iPhone‌.

In a future update, ‌iPhone‌ Mirroring will allow files, photos, and videos to be dragged and dropped between your ‌iPhone‌ and Mac and vice versa.

14. Screen Recording Permissions


permissions
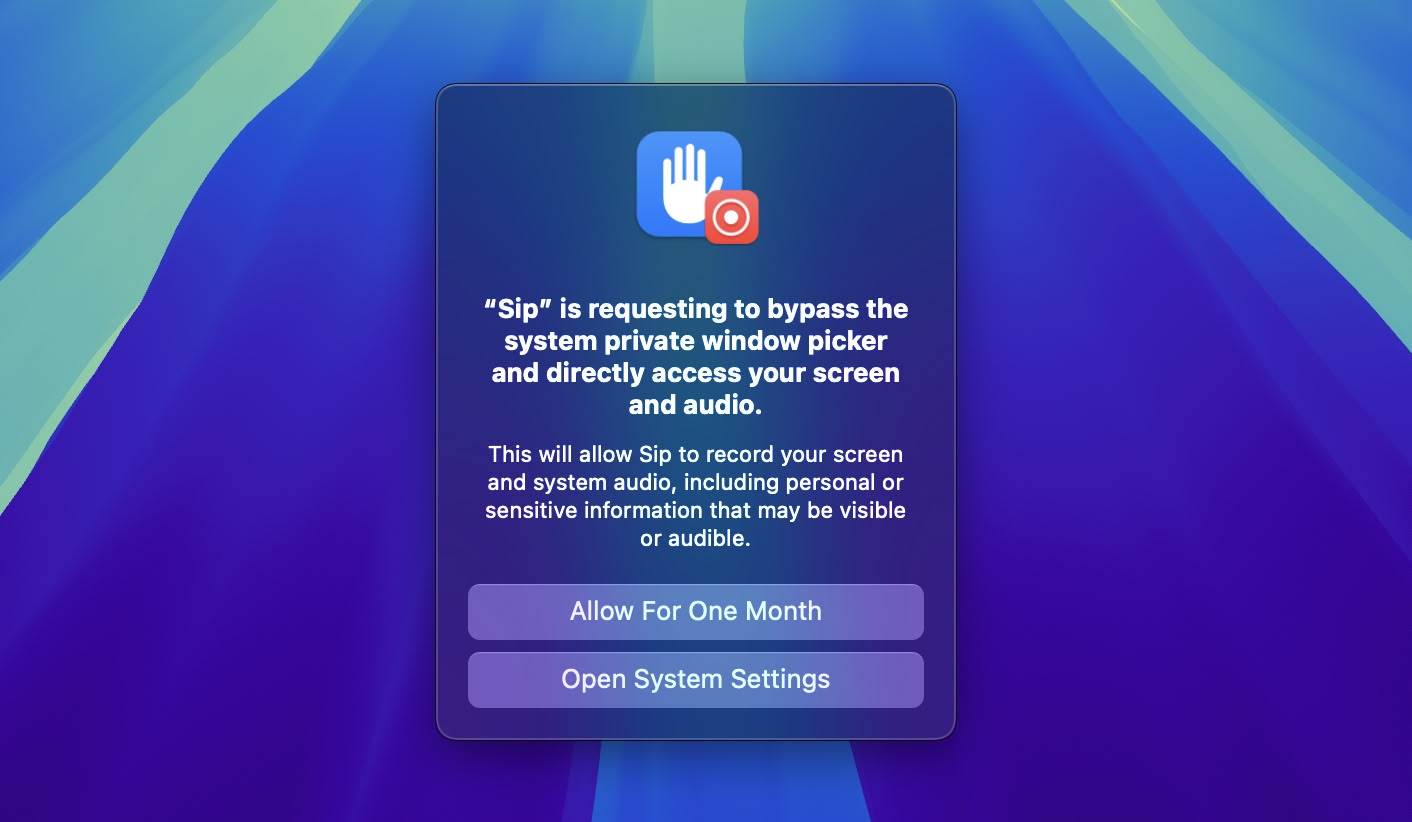
If you use an app that can record or share your screen, a new permissions popup will appear that allows you to permit access for one month. You'll encounter the same popup for the same app on a monthly basis, as part of Apple's efforts to improve macOS security measures.

15. iPhone Notifications


settings
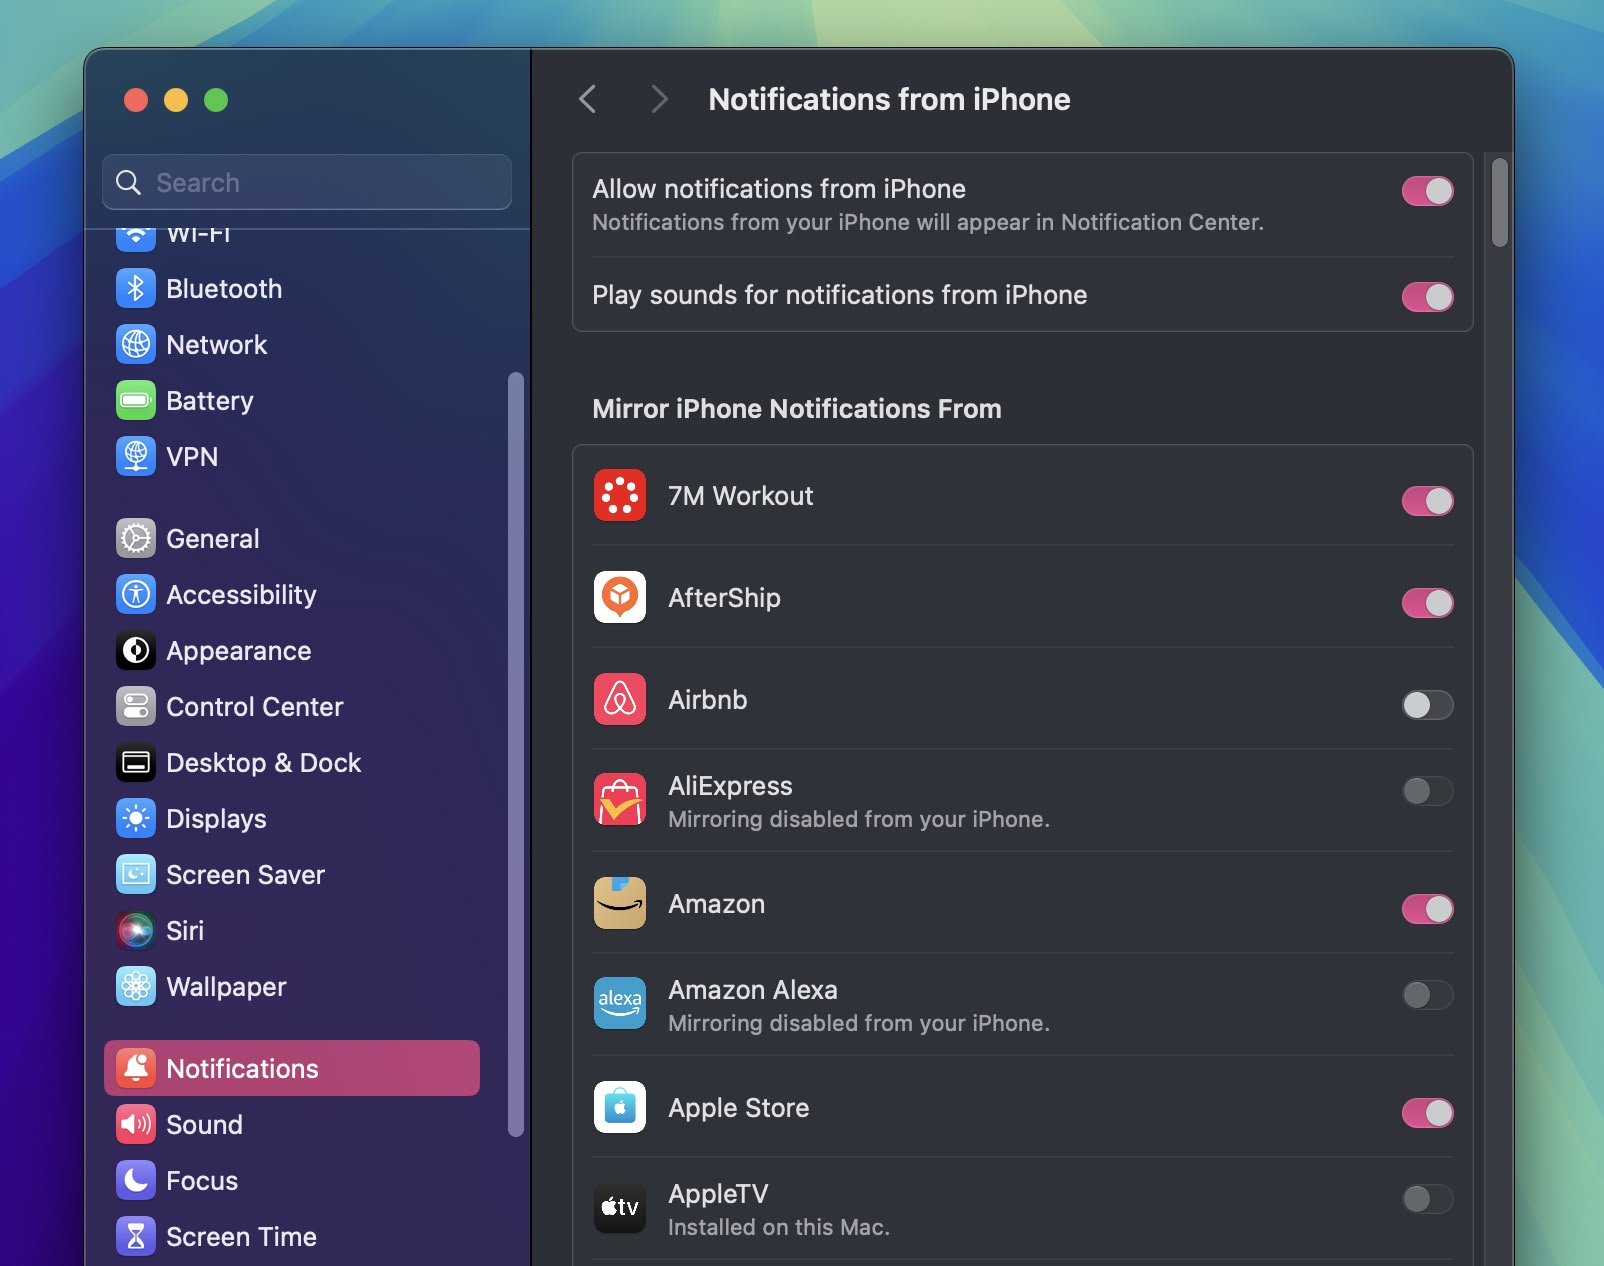
In System Settings ➝ Notifications, there's an "Allow notifications from iPhone" menu that gives you several options. These include options to enable or disable sounds for notifications from iPhone, select which specific app notifications to mirror, and turn the entire feature on and off.

16. Show Passwords in Menu Bar


passwords
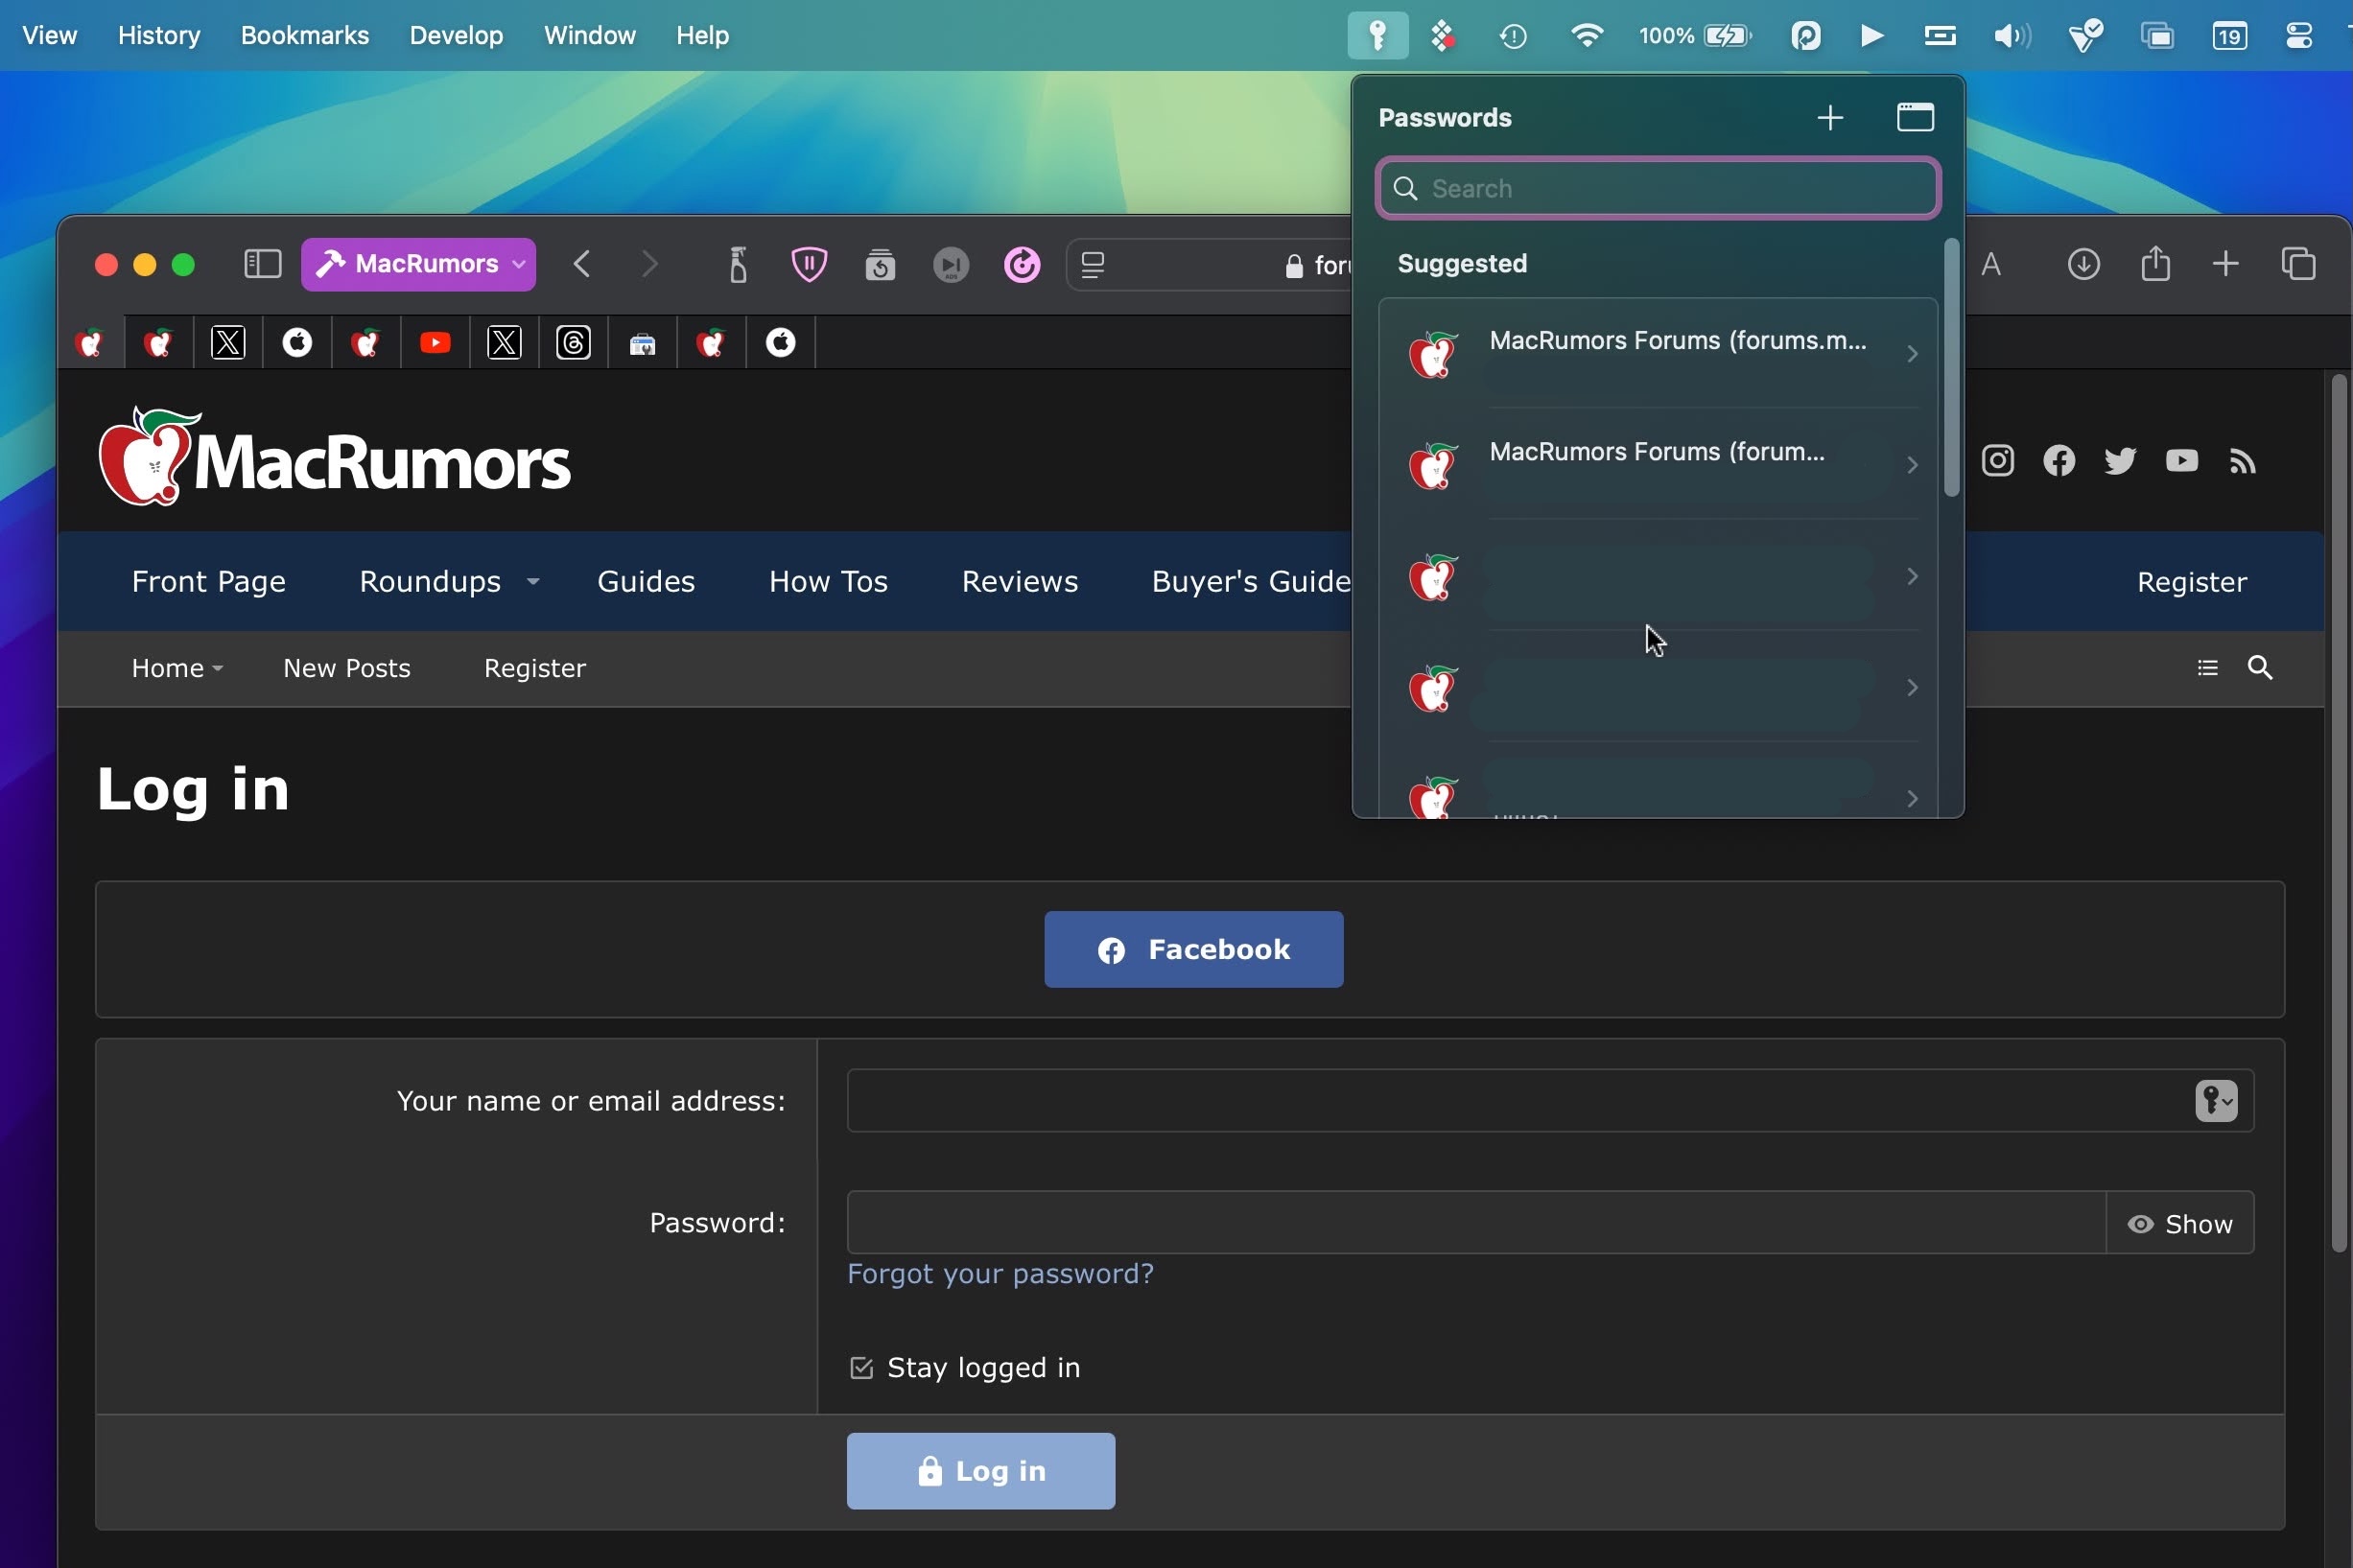
If you want to make access to the new Passwords app a lot more convenient, go to Passwords ➝ Settings... and check the box next to "Show Passwords in Menu Bar." When you're next on a website in Safari that you have login credentials for, click the key icon in the menu bar, and you'll see the dropdown menu automatically detect which login details you're looking for, ready for you to select. This also works with other browsers that have the iCloud Passwords browser extension installed.

17. Highlight Text in Notes


notes
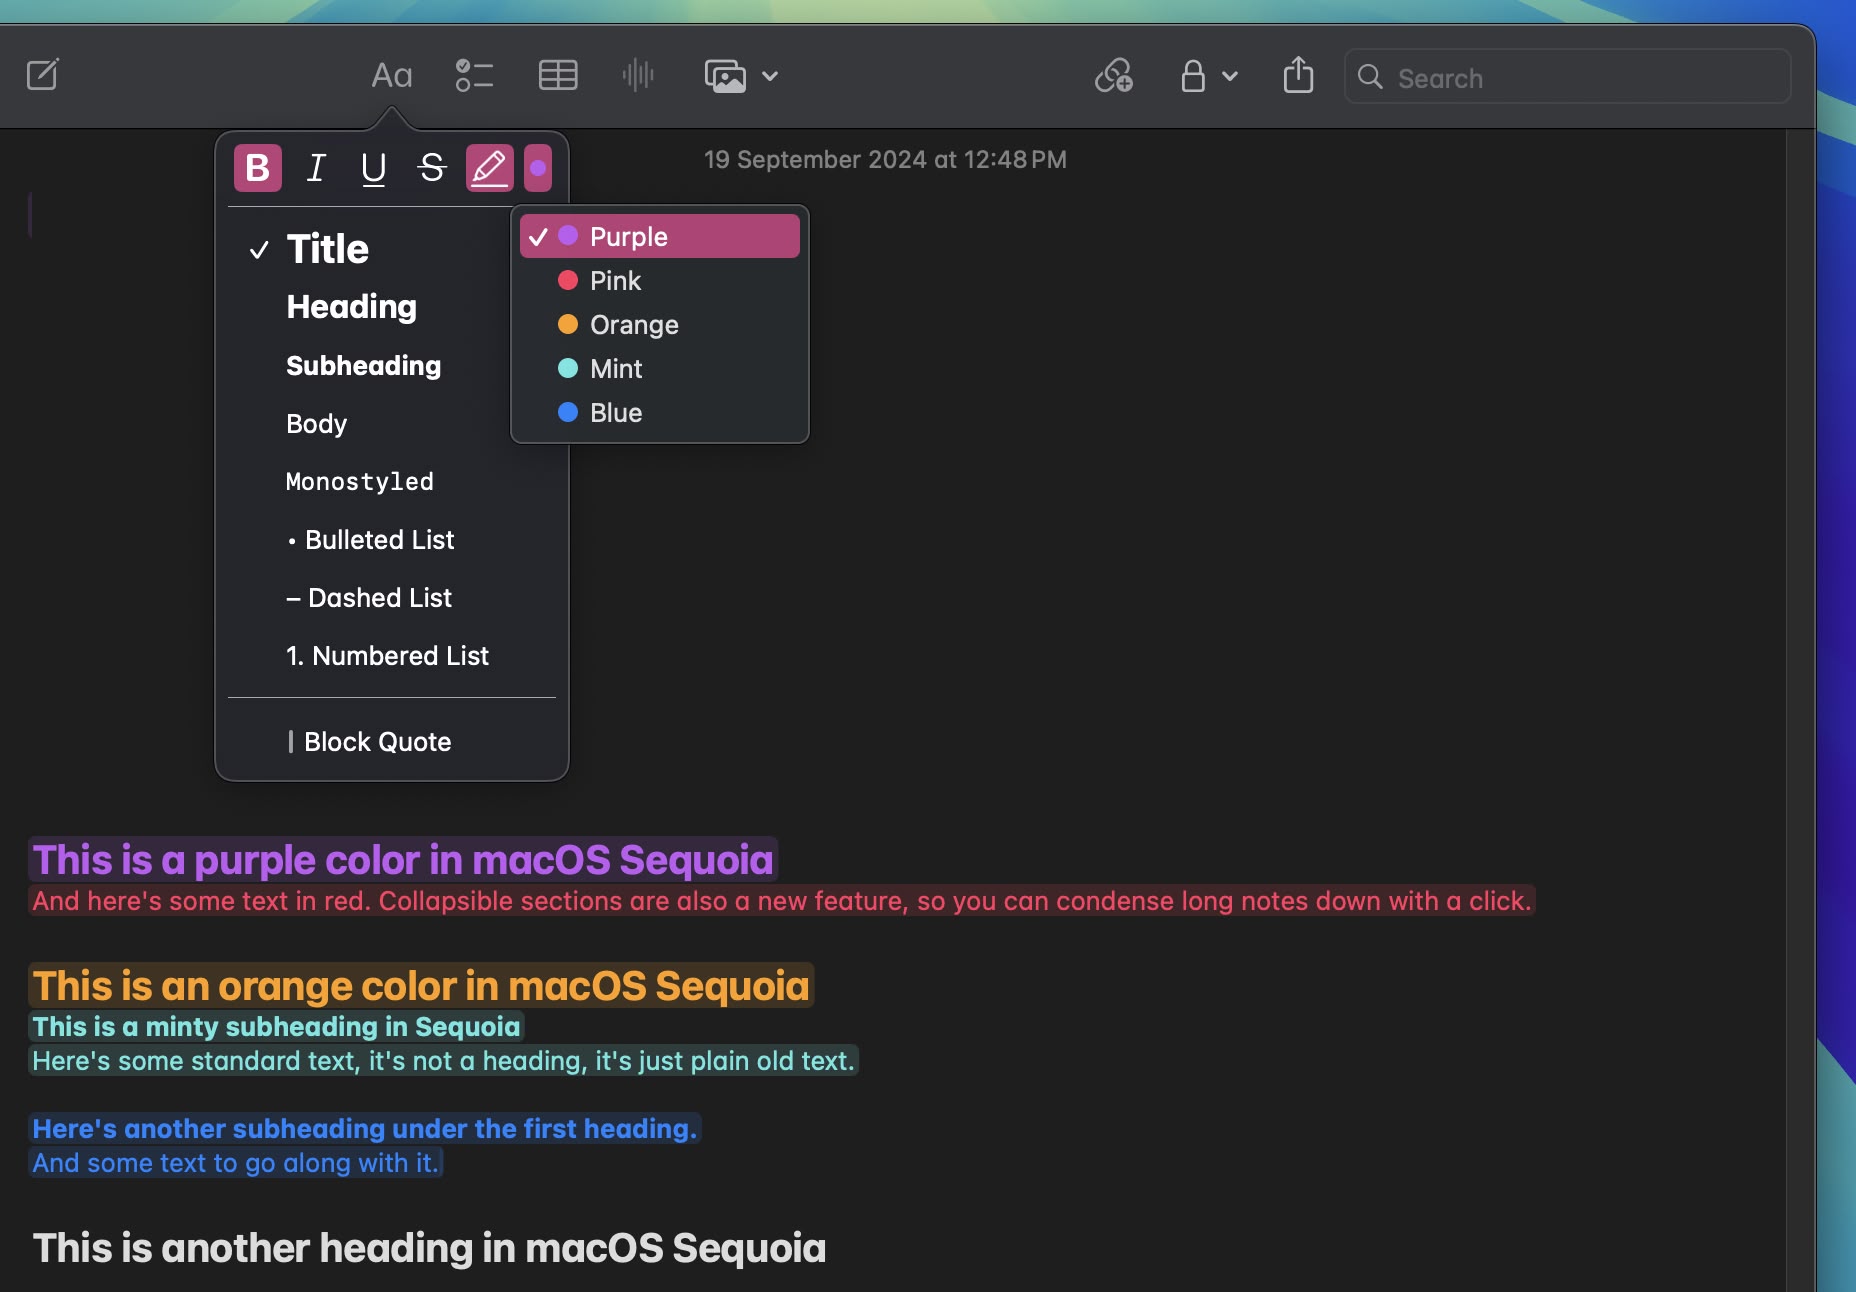
The Notes app now supports colors for typed text, allowing for highlighting. Apple added five colors, including pink, purple, orange, mint, and blue, with the colors able to be added through the formatting interface. Simply click on the Aa button to get to the color options when a word or phrase is selected.

18. Change Which iPhone to Mirror


settings
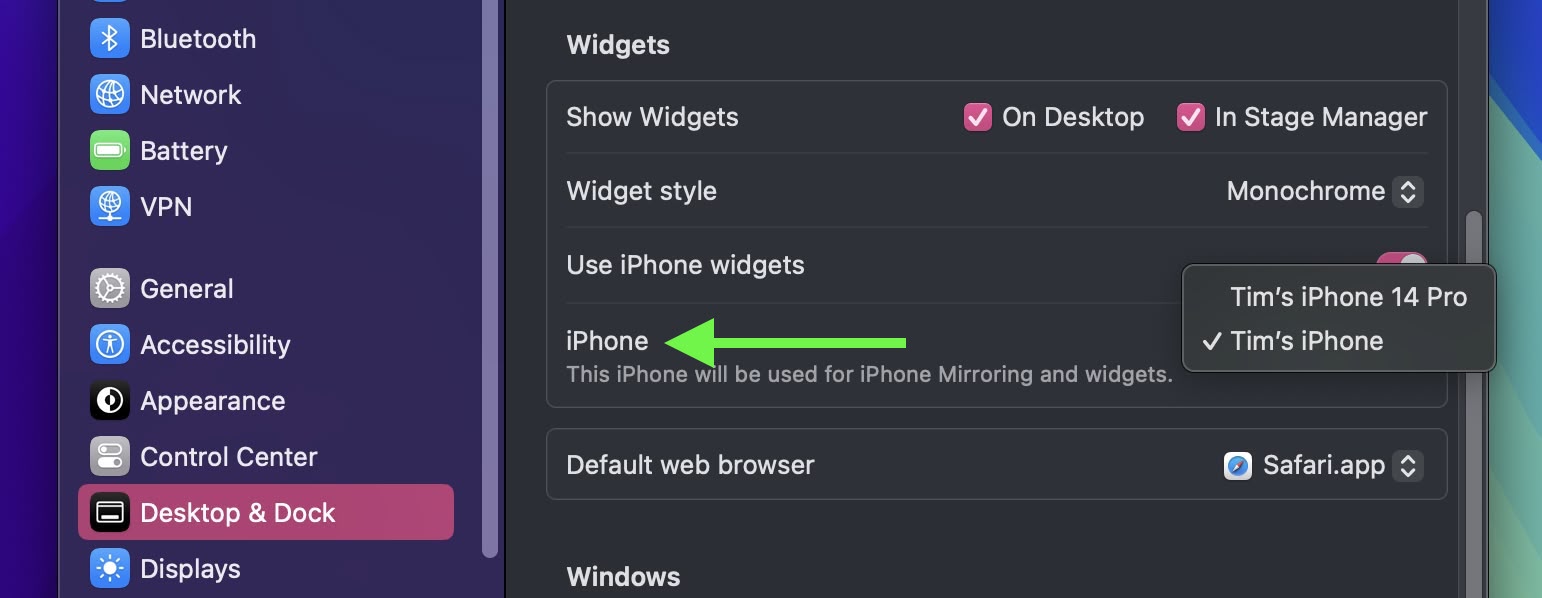
In the event that you own more than one iPhone, in System Settings ➝ Desktop & Dock, under "Widgets," there's a new iPhone option that lets you choose which iPhone to mirror on your desktop.

19. Safari Highlights


safari
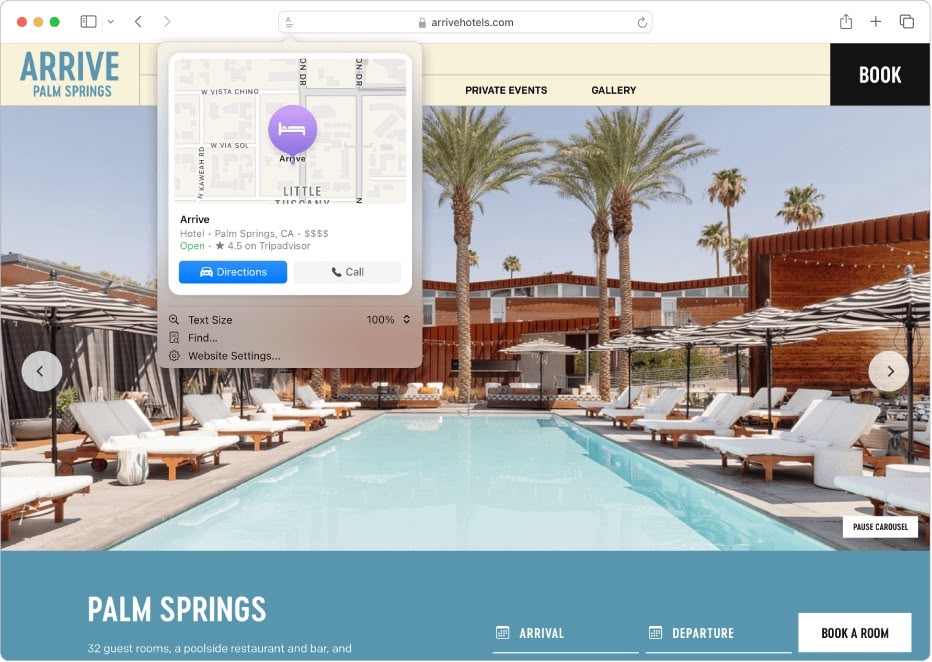
When you're browsing in Safari, look for a purple sparkle over the tool icon in the browser bar. This indicates Highlights are available. Think of Highlights as a kind of smart assistant within Safari, saving you time and effort by eliminating the need to manually search through lengthy web content.

Click the sparkle to open the Highlights window. This can display address details and operating hours for businesses, and give you quick access to directions. When browsing pages about people, it might show brief biographical information, and for entertainment content it can offer direct links to play songs or summarize reviews for movies and TV shows.

20. Remove Margins From Tiled Windows


settings
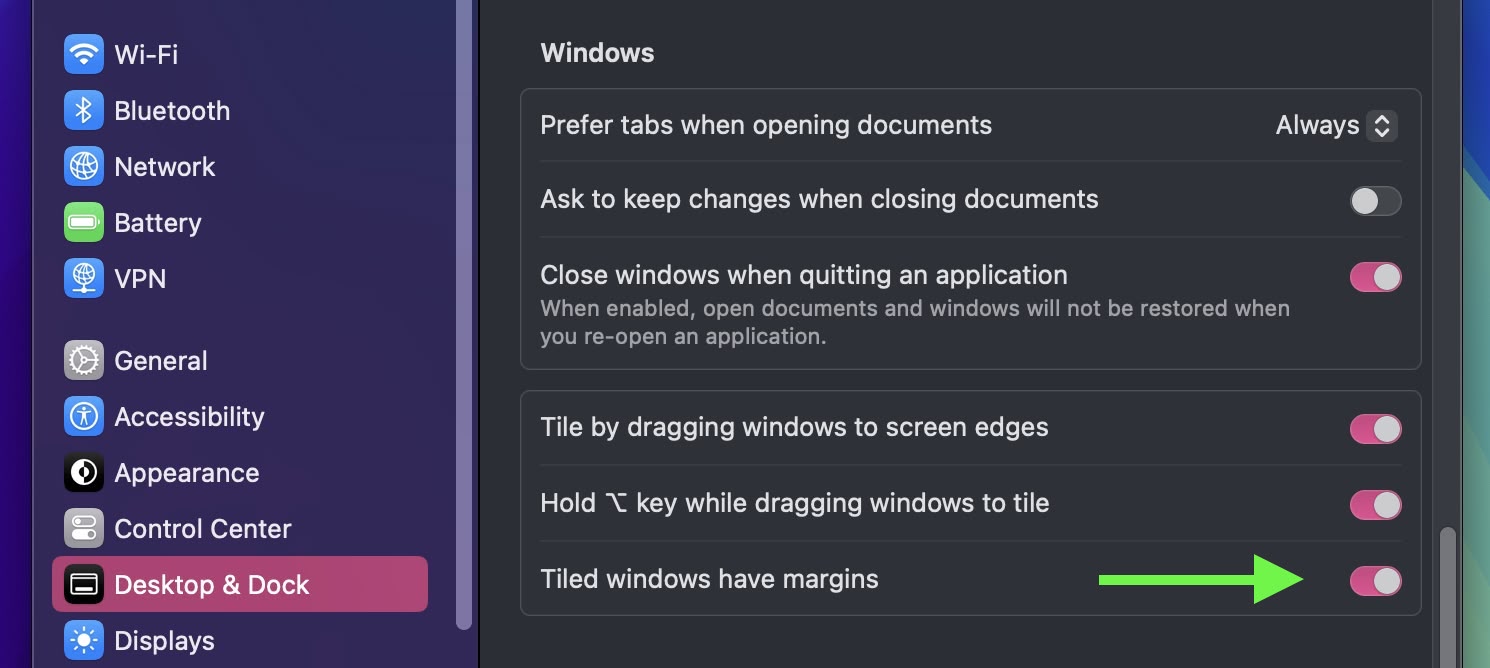
If you're not a fan of the spaces between tiled windows and don't like how the desktop seeps through the margins, there's a new option in System Settings ➝ Desktop & Dock that lets you remove them. Under the "Windows" section, look for the toggle called "Tiled windows have margins."
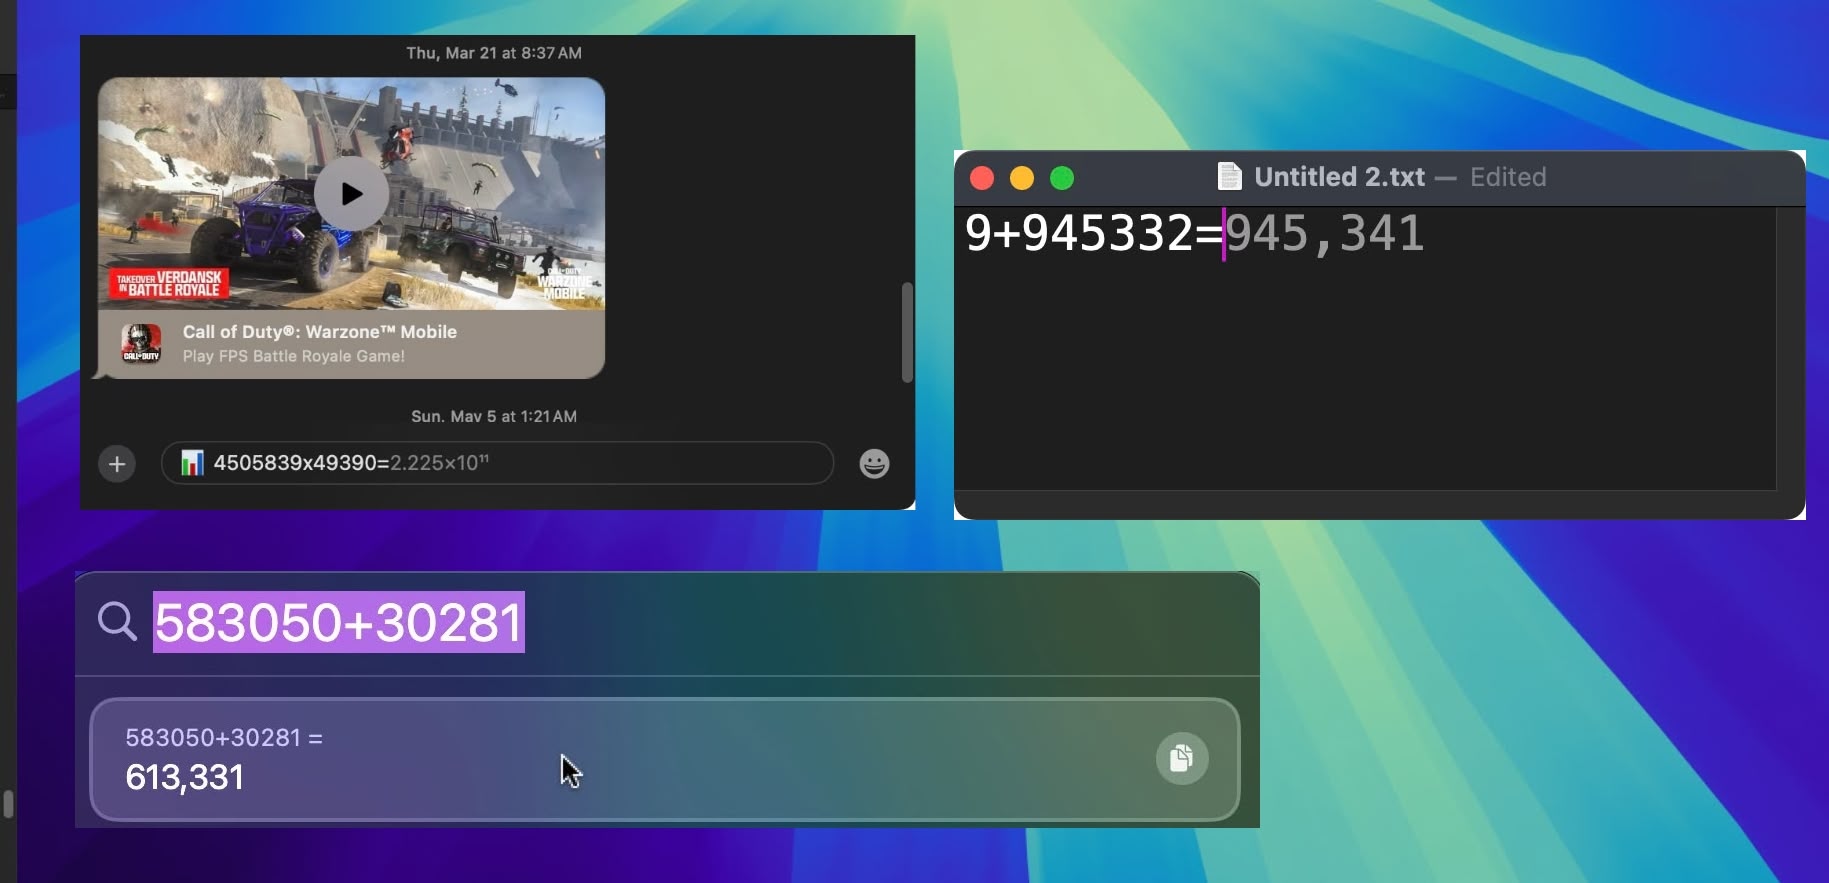
21. Math Notes


Apple has added a powerful new feature to your Mac's Calculator app: Math Notes. This integration between Calculator and Notes offers a versatile tool for all your calculation needs. It's particularly handy for splitting bills, calculating group expenses, or working through more complex mathematical problems.

Math Notes allows you to type equations directly into a note, with automatic solving when you add an equals sign. You can perform a wide range of calculations, including defining variables for more complex math. For example, if you're planning a night out, you could write "dinner = $57" and "movies = $24" in a note, then simply type "dinner + movies =" to get the total cost. To access the feature, click the calculator symbol at the bottom left of the calculator window and select Math Notes.

You're not limited to accessing Math Notes through the Calculator app – you can also use the feature directly within the Notes app using any new or existing note. In fact, you can get Math results almost anywhere in the operating system. If you type an equation into Spotlight, for example, you'll get a result, and the same goes for apps like Messages.

22. New AirDrop Interface


airdrop
Sequoia includes a new UI for AirDrop that shows you a progress bar and even gives you the option to show the file in Finder once the transfer is complete, making it a lot easier to find what you've received on your Mac.

23. iPhone Mirroring Controls


mirroring
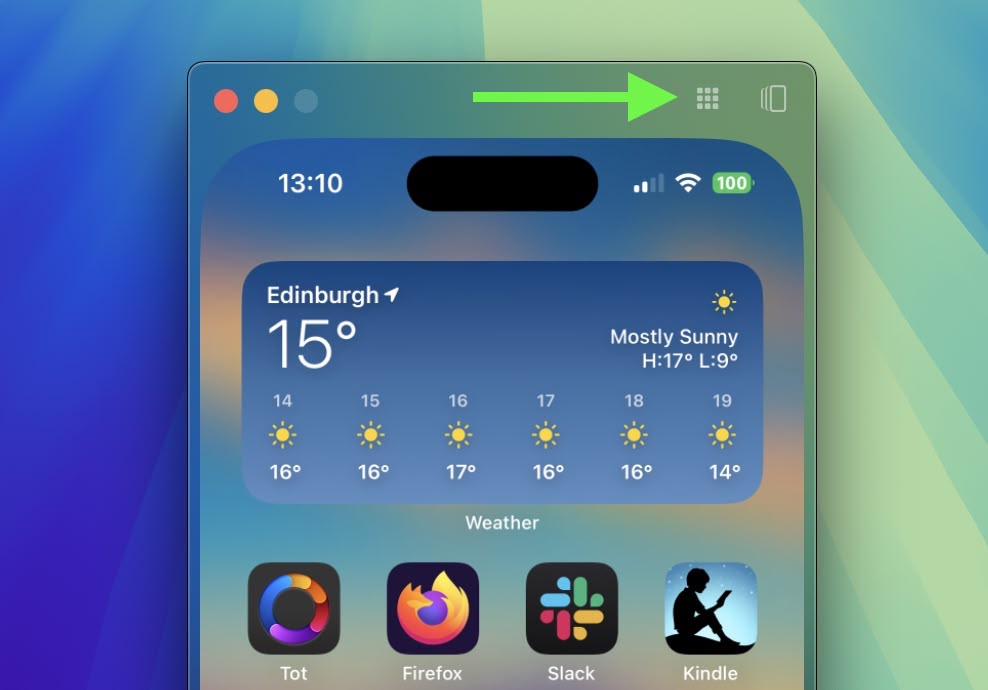
When using iPhone Mirroring, if you hover your pointer just above the iPhone screen it will reveal its window and two buttons to quickly access the Home Screen and the App Switcher. There are also keyboard shortcuts to access apps, while pressing Command and the +/- keys increases and decreases the size of the mirroring window.

24. New Window Sharing Options


sharing
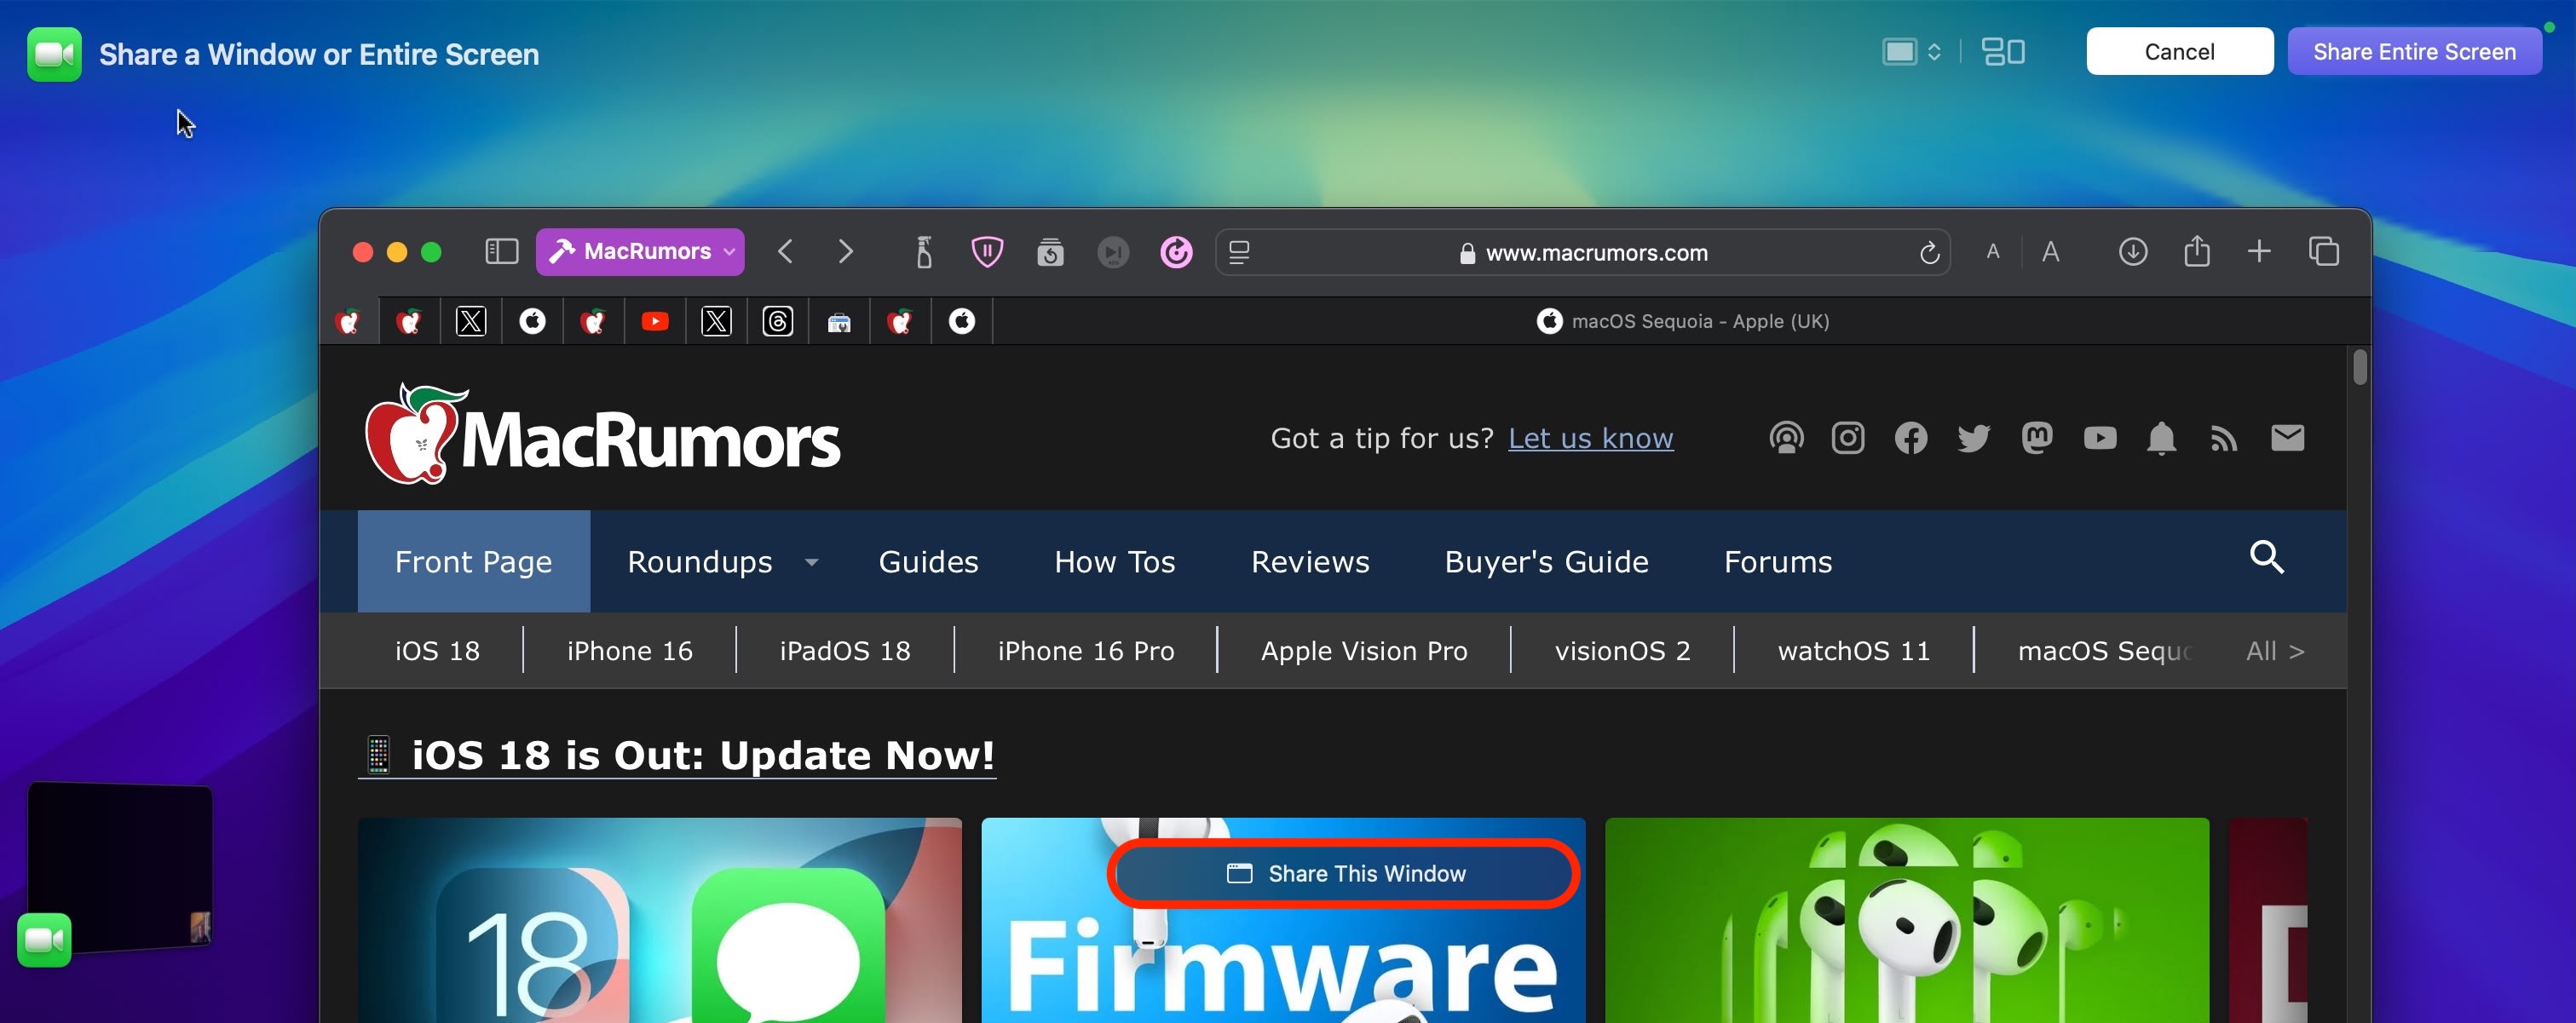
macOS Sequoia's Presenter Preview feature improves screen sharing by allowing you to share specific apps or windows instead of the entire screen. You can adjust what's being shared during a call, adding or removing windows as needed. There are also buttons to show all windows and change the presenter overlay size, giving you more control over the content being presented.

preview
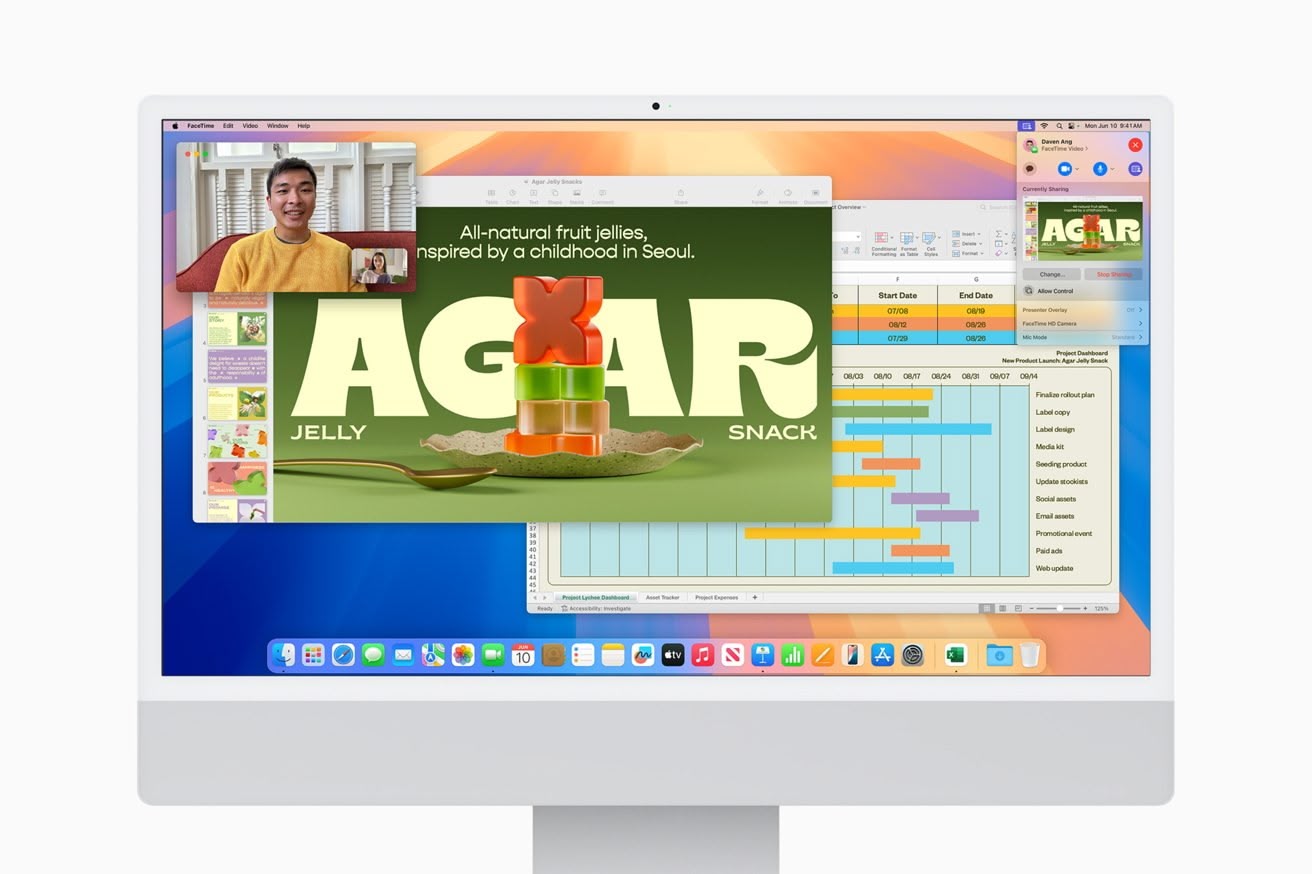
macOS uses a video controller at the top-right corner of the screen during video calls, which includes controls for webcam features when in use. This panel also now shows a preview of what's being shared, helping you stay aware of what others can see on your desktop during screen sharing sessions.

25. New FaceTime Backgrounds


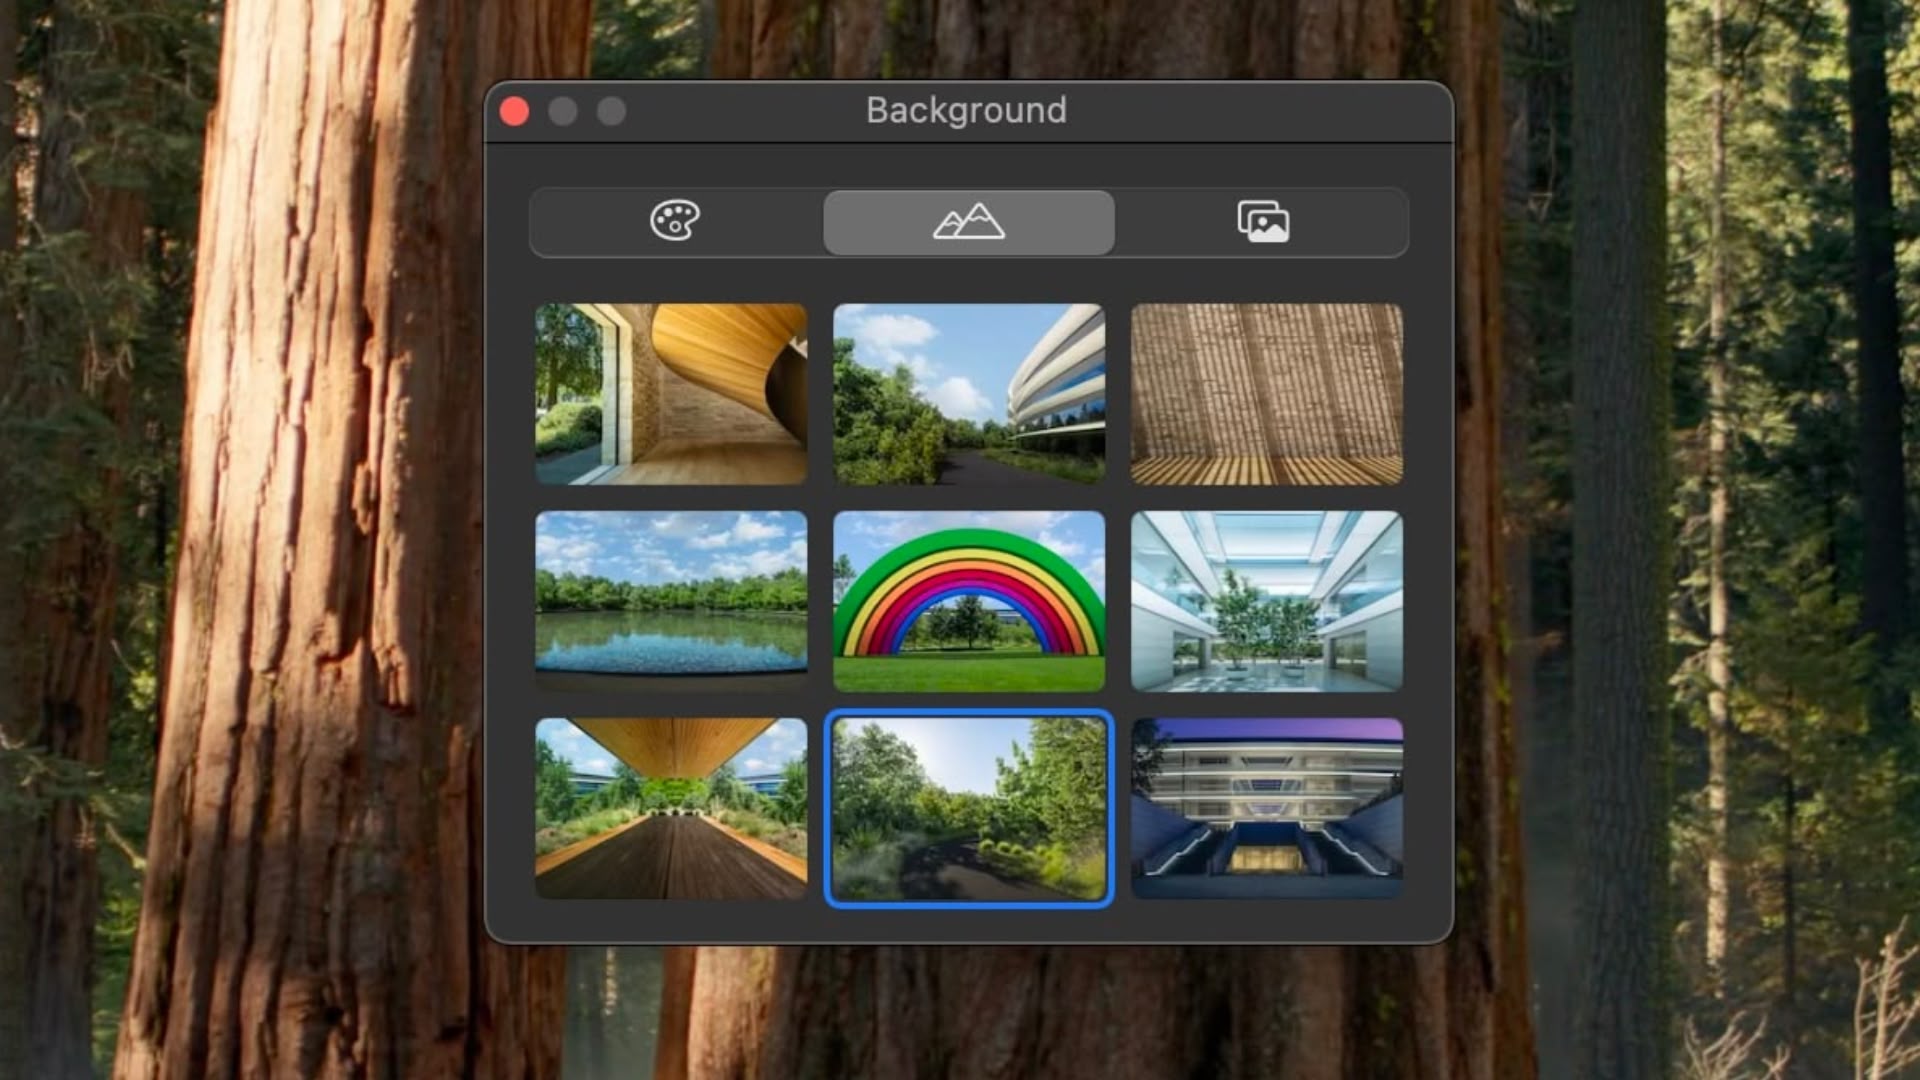
macOS Sequoia includes a set of new backgrounds for FaceTime calls, including several that showcase features of Apple Park. There are nine backgrounds in all, featuring iconic locations around the company's circular headquarters in Cupertino, California.

Other new built-in backgrounds that can be used for ‌FaceTime‌ and other video calls to blur out and hide what's behind you include different color gradients, along with the ability to use photos from your photo library.

26. Private Wi-Fi Address Options


settings
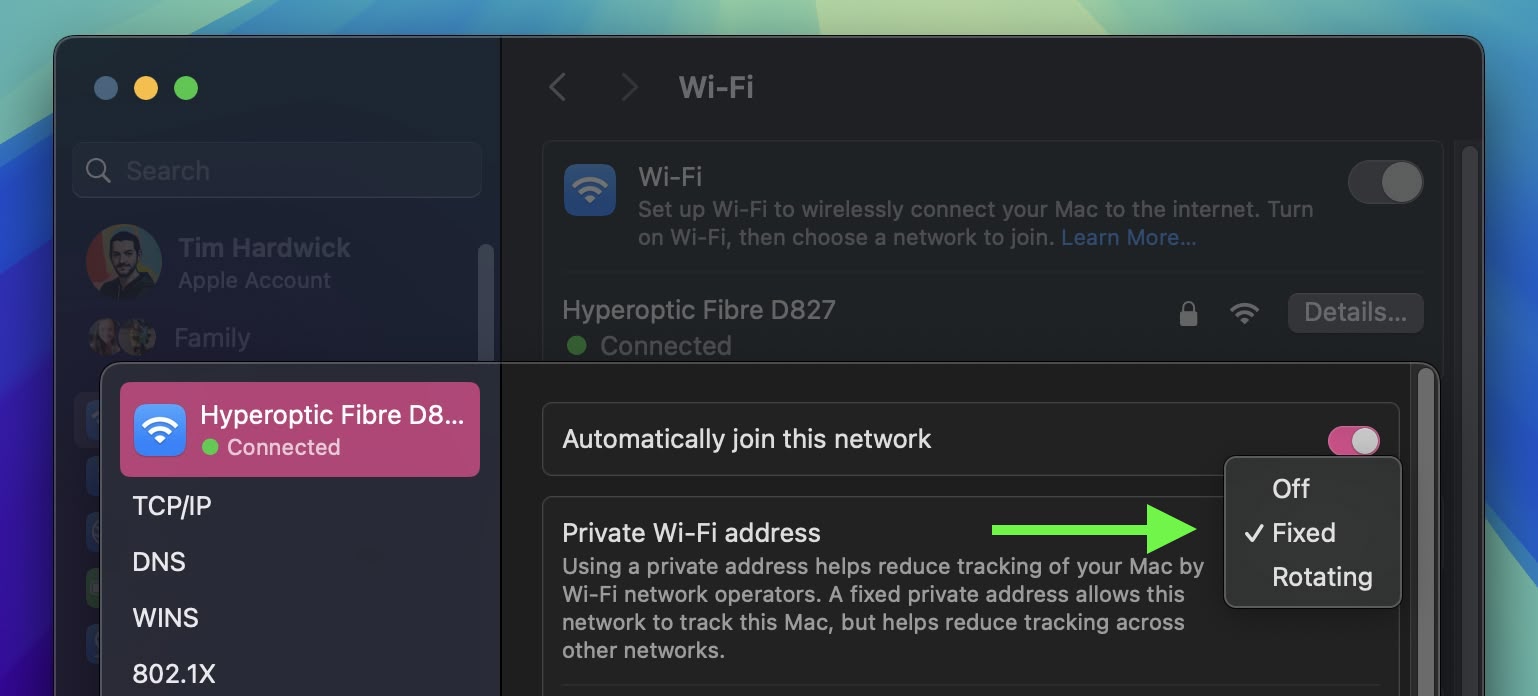
In System Settings ➝ Wi-Fi, if you click the Details button next to the currently connected network, there's a new Private Wi-Fi address option that may be familiar to users with iOS devices. A fixed private address reduces cross-network tracking by using a unique Wi-Fi address on the network. You can make it Fixed, Rotating, or turn off the option.

27. Record and Transcribe Voice Notes


notes
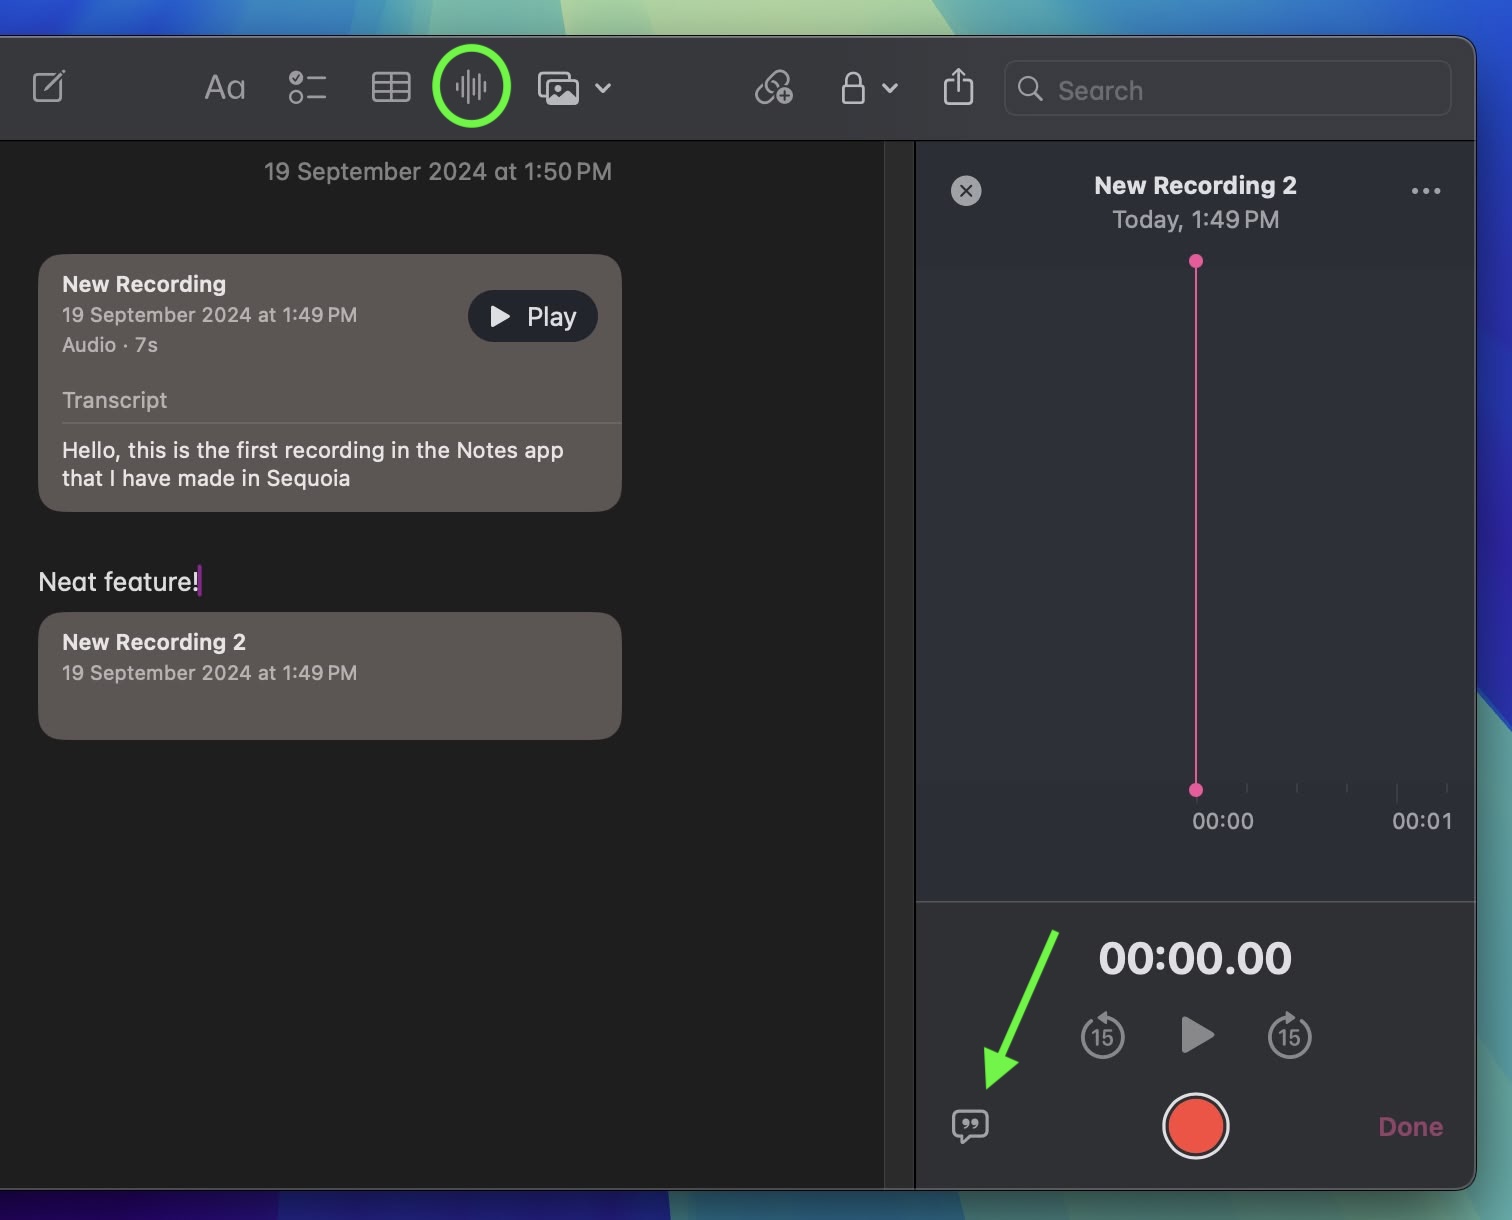
Apple has made a significant enhancement to the Notes app, introducing a built-in audio recording feature that streamlines the process of capturing and transcribing voice notes. The new audio recording tool in Notes offers more than just simple voice capture. As users record, the app automatically generates a real-time transcript, making it easier to review and search through recorded content.

To record a voice note, simply click the new waveform icon in the Notes toolbar. An interface will appear on the right showing the audio recording controls, as well as a speech bubble icon that you can use to view the transcript. When you've finished your recording, it will be saved in the note along with the accompanying transcription.

28. Web App Content Blocker Support


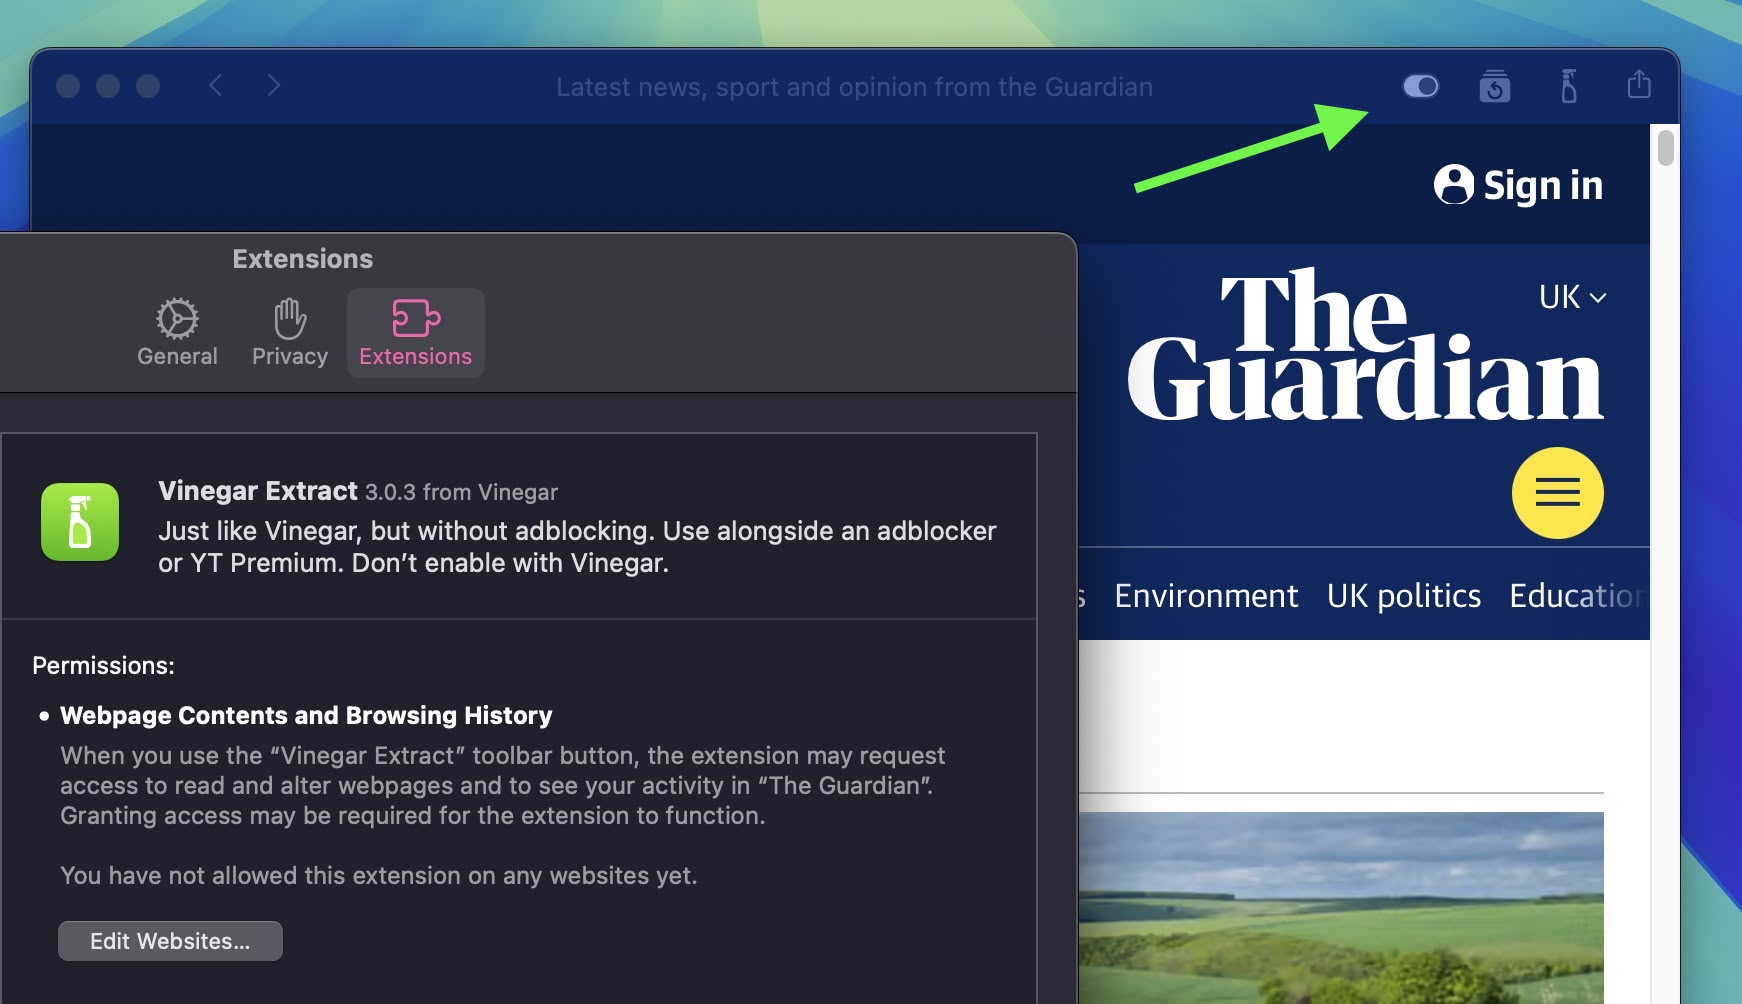
In Sequoia, web apps now support content blockers and Safari extensions, making the webpage content they present more customizable. You can control these settings by selecting Settings in the web app's menu bar, and clicking the Extensions tab.

29. Window Title Bar Double-Click Options


settings
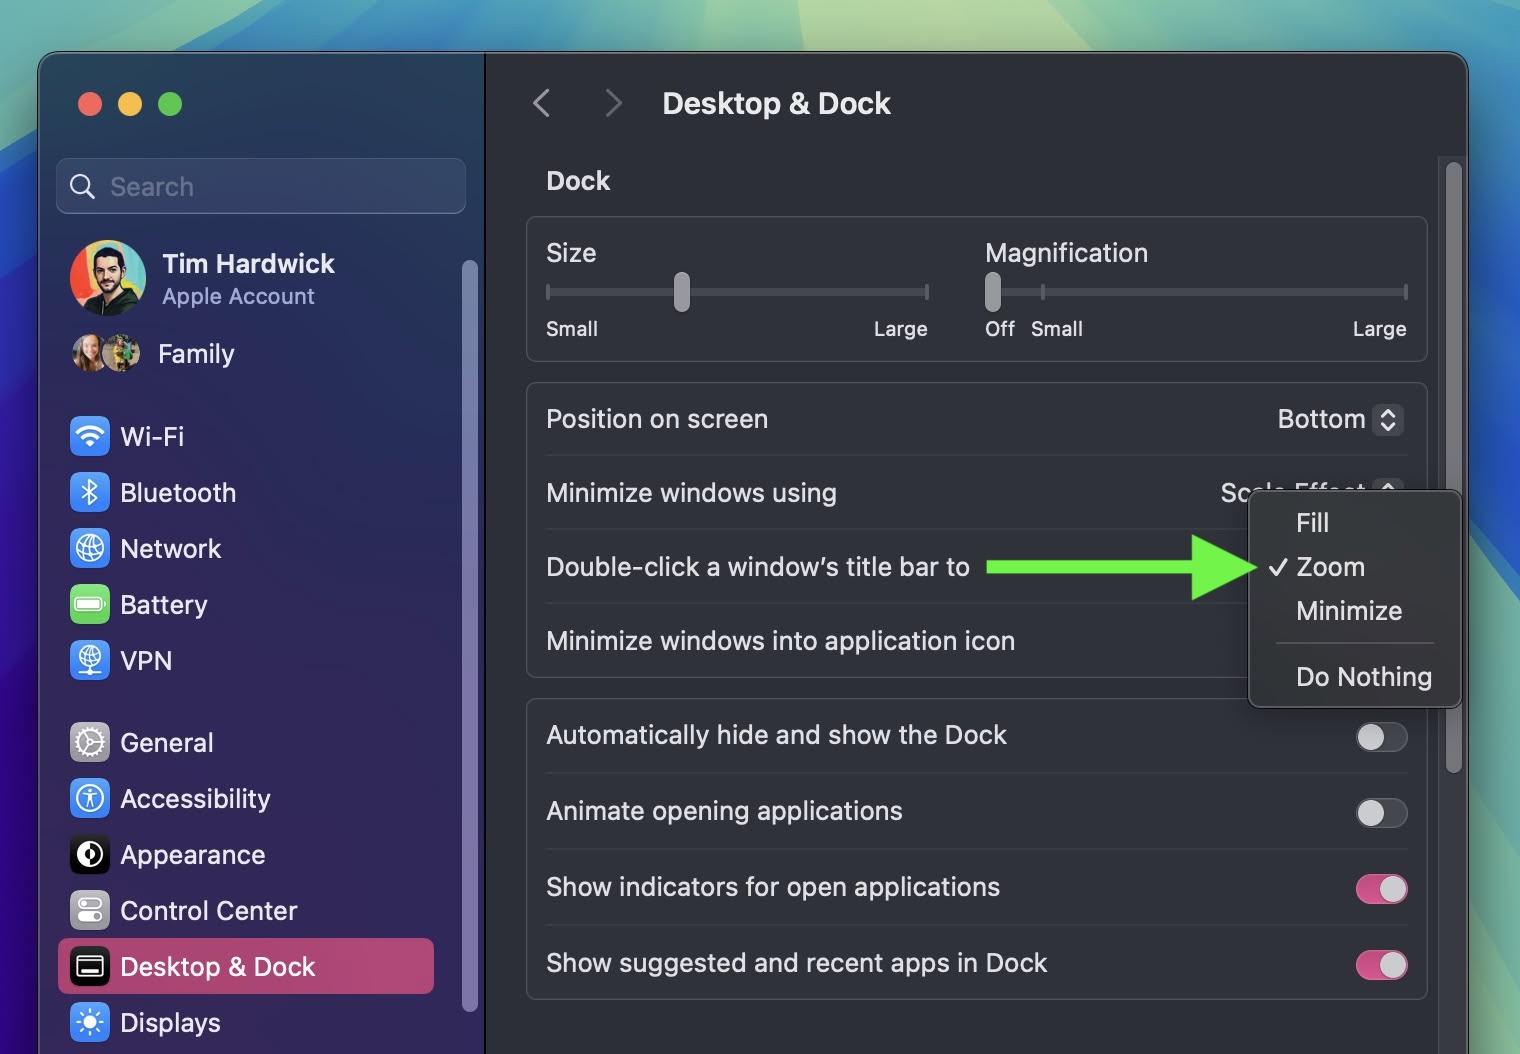
In System Settings ➝ Desktop & Dock, there's a new option to change the behavior of a window when you double-click its title bar. In Sonoma, the default behavior is to zoom the window, but in Sequoia you can change "Double-click a window's title bar to" Fill, Zoom, Minimize, or Do Nothing.

30. Hover Typing


settings
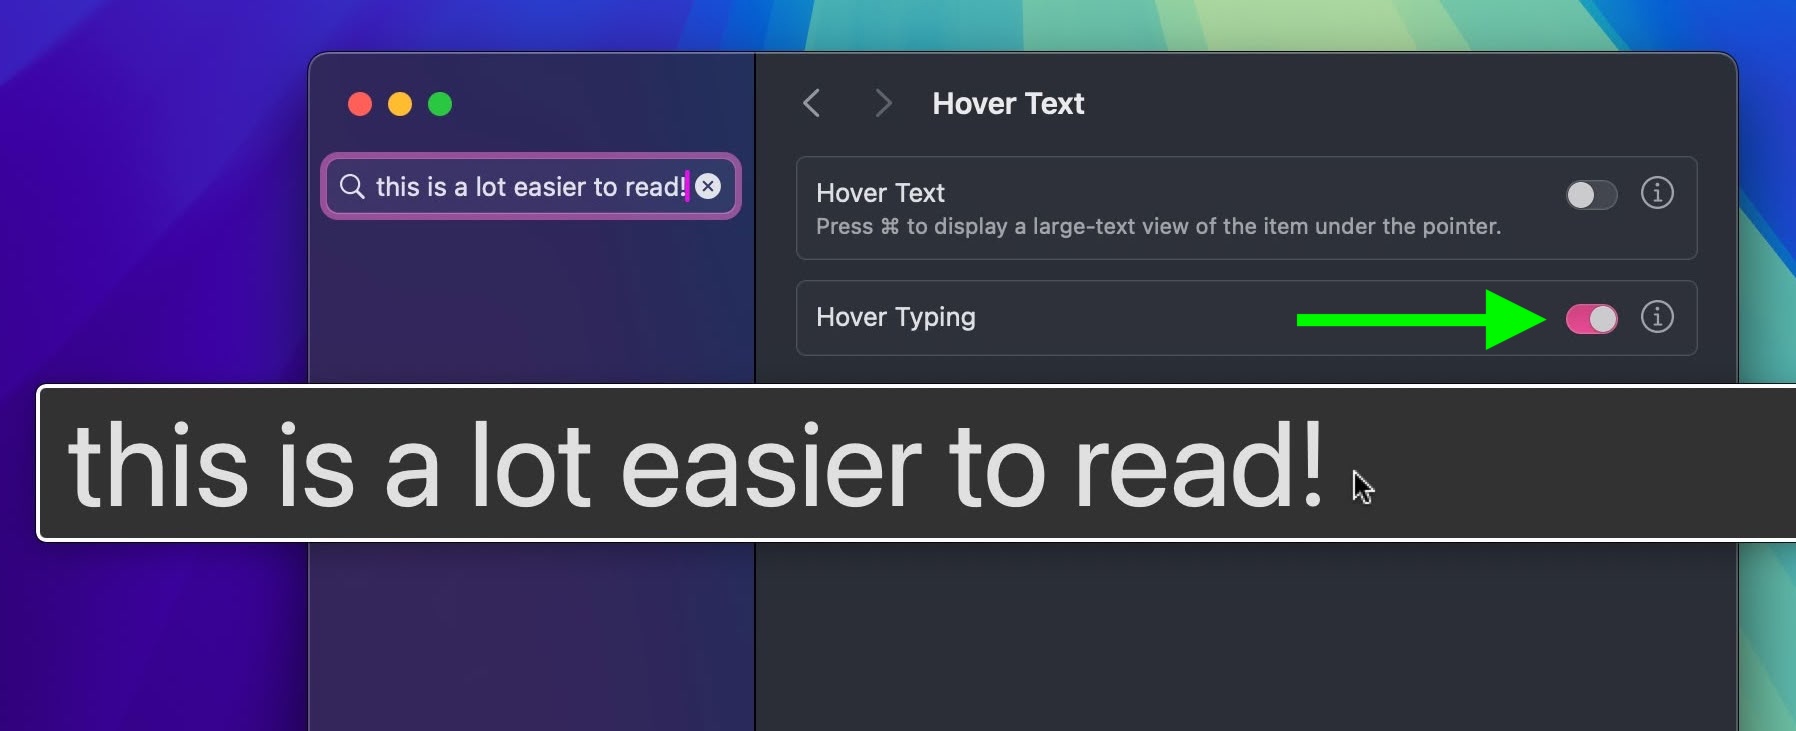
If you struggle to see what you're typing in a text field in macOS, this new feature should be very welcome. In System Settings ➝ Accessibility ➝ Hover Text, there's a new Hover Typing option that when enabled will enlarge any input field that you're typing into so that it's displayed more clearly across the center of the screen.

31. Calculator Changes


In line with iOS 18, the Calculator app for macOS has been updated, so that it now shows full expressions as you type them out. You can click on this display to undo the last thing you typed, or use the backspace button that appears when you begin pressing buttons.

calculator
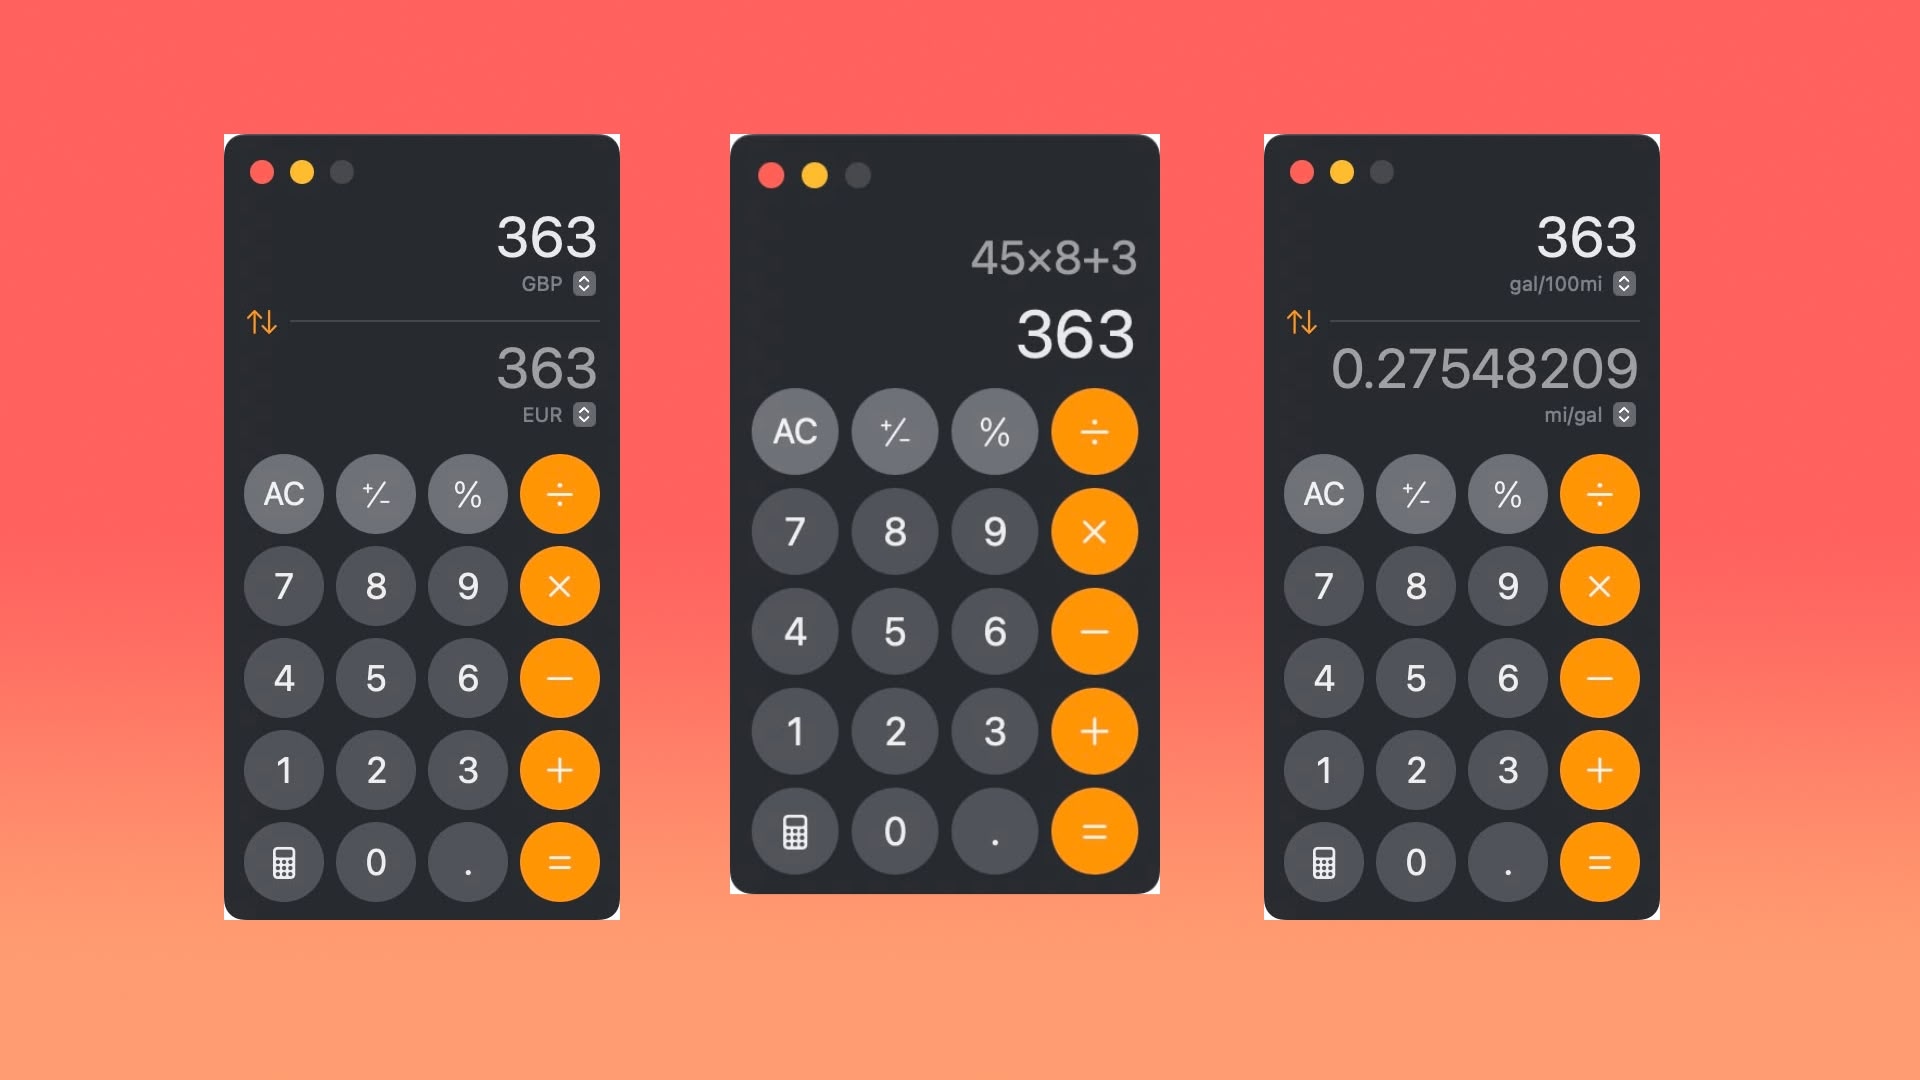
By clicking the button with the calculator icon, you can now also switch between Basic, Scientific, and Programmer calculators, open your Math Notes, or switch to a plethora of conversion options using Convert. The new Convert option supports unit conversions for length, weight, currencies, and more. Here's the full list of conversions that it supports:


  • Angle

  • Area

  • Currency

  • Data

  • Energy

  • Force

  • Fuel

  • Length


  • Power

  • Pressure

  • Speed

  • Temperature

  • Time

  • Volume

  • Weight


32. App Store Free Space Requirements


App downloads and installations from the Mac App Store will no longer require double the amount of local storage space available. Instead, the free space requirement now matches the final install size of the app, plus a small buffer.

Apple has told developers to update any messaging related to app size requirements to reflect the change, which should reduce confusion about how much free space is needed for new app installations. The new space requirement in macOS 15 should benefit users who download large games in particular.

33. RCS Messaging


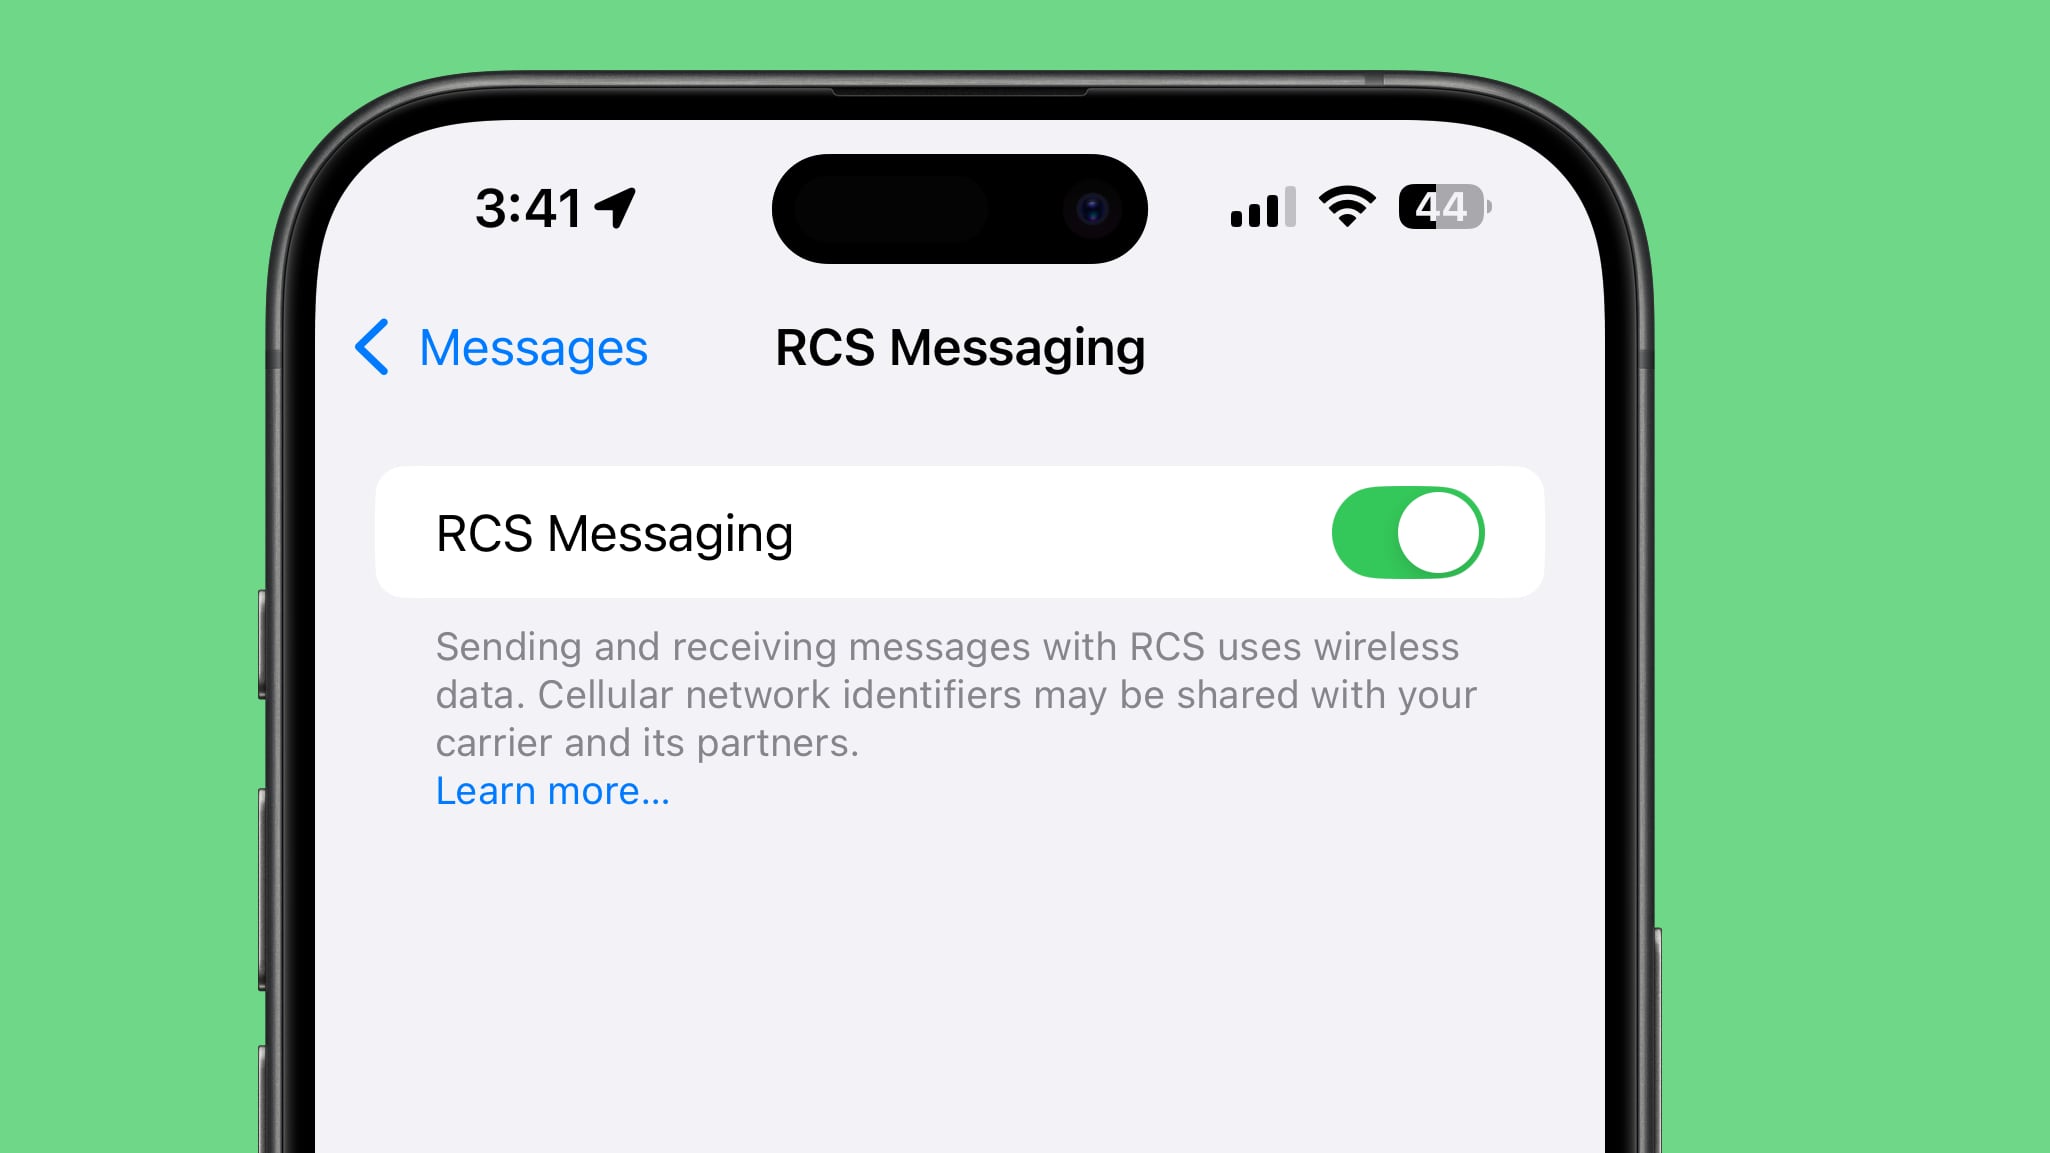
Rich Communication Services (RCS) is a messaging standard Apple has adopted in macOS Sequoia and iOS 18 to bridge the gap between green and blue bubbles. With RCS Messaging (Settings ➝ Messages ➝ RCS Messaging) and Text Message Forwarding enabled on your iPhone (Settings ➝ Messages ➝ Text Message Forwarding) for your Mac, you can enjoy all the capabilities RCS brings cross-platform conversations right on your desktop.

With RCS support, you can send texts, high resolution photos and videos, links, and more through the Messages app, just as if they were iMessages. RCS also supports delivery and read receipts and typing indicators. Note that RCS support must be enabled by each carrier. You can check if your network supports it by visiting Apple's Wireless carrier support webpage.

34. New iCloud Settings Panel


iCloud
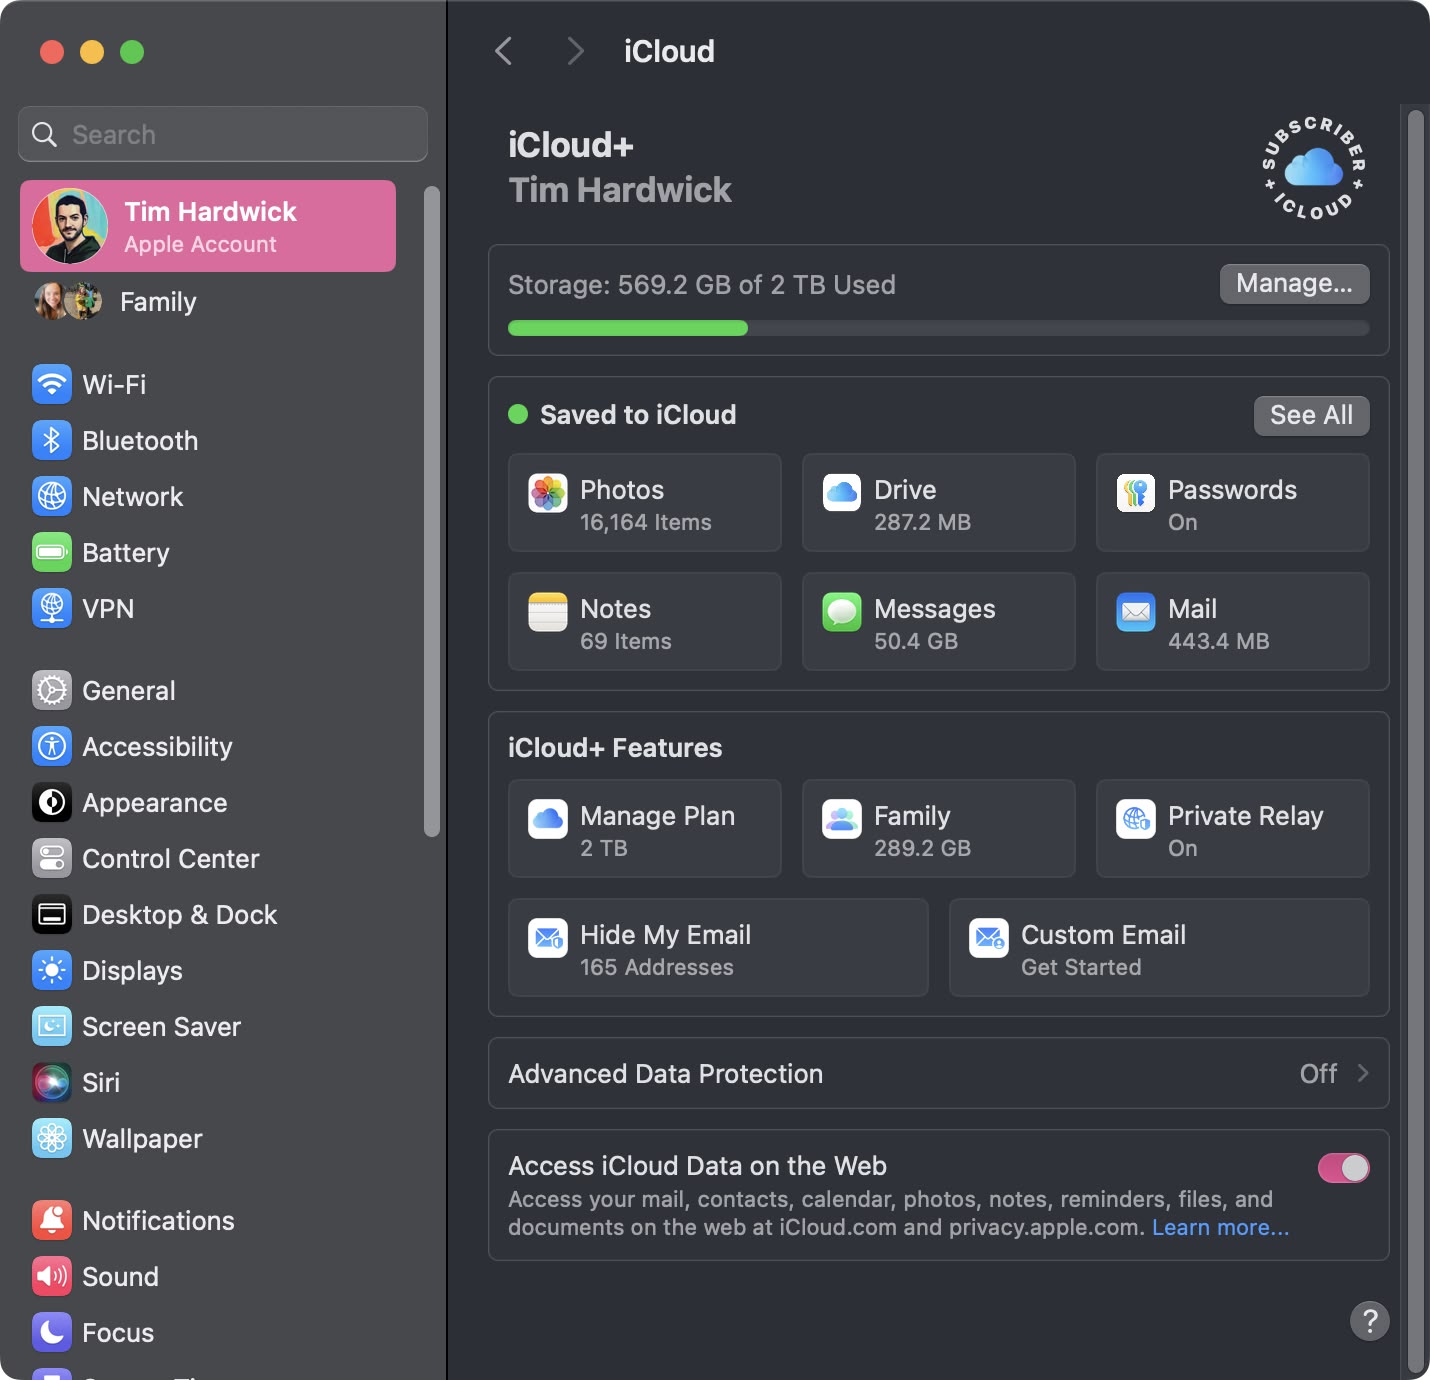
Just like on iPhone with iOS 18, the iCloud section in System Settings ➝ Apple Account has been completely redesigned for macOS Sequoia. The panel is divided into neater sections showing your storage, files saved to iCloud, and any iCloud+ features you may have, making everything just a little bit easier to comprehend. You can also manage how individual apps and features on your Mac sync with iCloud by clicking the See All button.

35. Vocal Shortcuts


settings
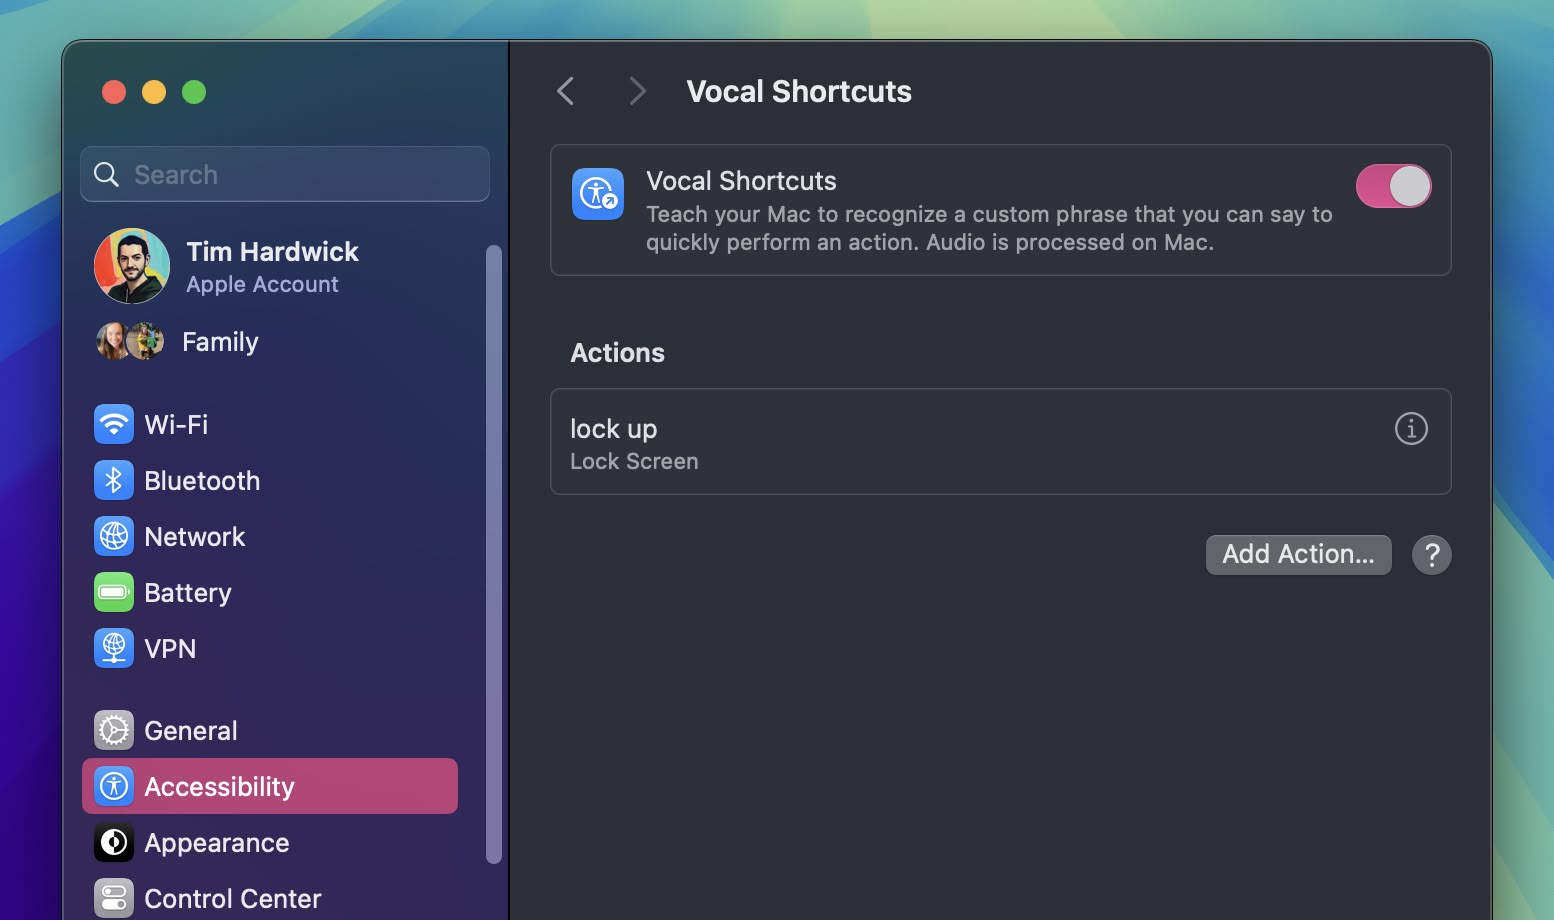
In System Settings ➝ Accessibility, there's an option to set up the new Vocal Shortcuts feature, which allows you to teach your Mac to recognize a custom phrase that you can say to quickly perform an action. These phrases can be used for anything from triggering Siri requests to shortcuts on your Mac.

36. Use Emoji as Messages Tapback Reactions


messages
Apple has introduced significant updates to its Messages app in macOS Sequoia, with a particular focus on enhancing the popular Tapback feature. Tapbacks, the quick reactions users can add to messages by long-pressing on them, have received a colorful makeover and expanded functionality.

messages
The six standard Tapback icons now feature more vibrant colors and intricate details. But perhaps the most notable change is the addition of emoji support for Tapbacks. While the classic six reactions remain, you now have the option to choose from a wide array of emoji characters, adding a new layer of personalization to your message responses.

37. Sign In With Apple Settings


settings
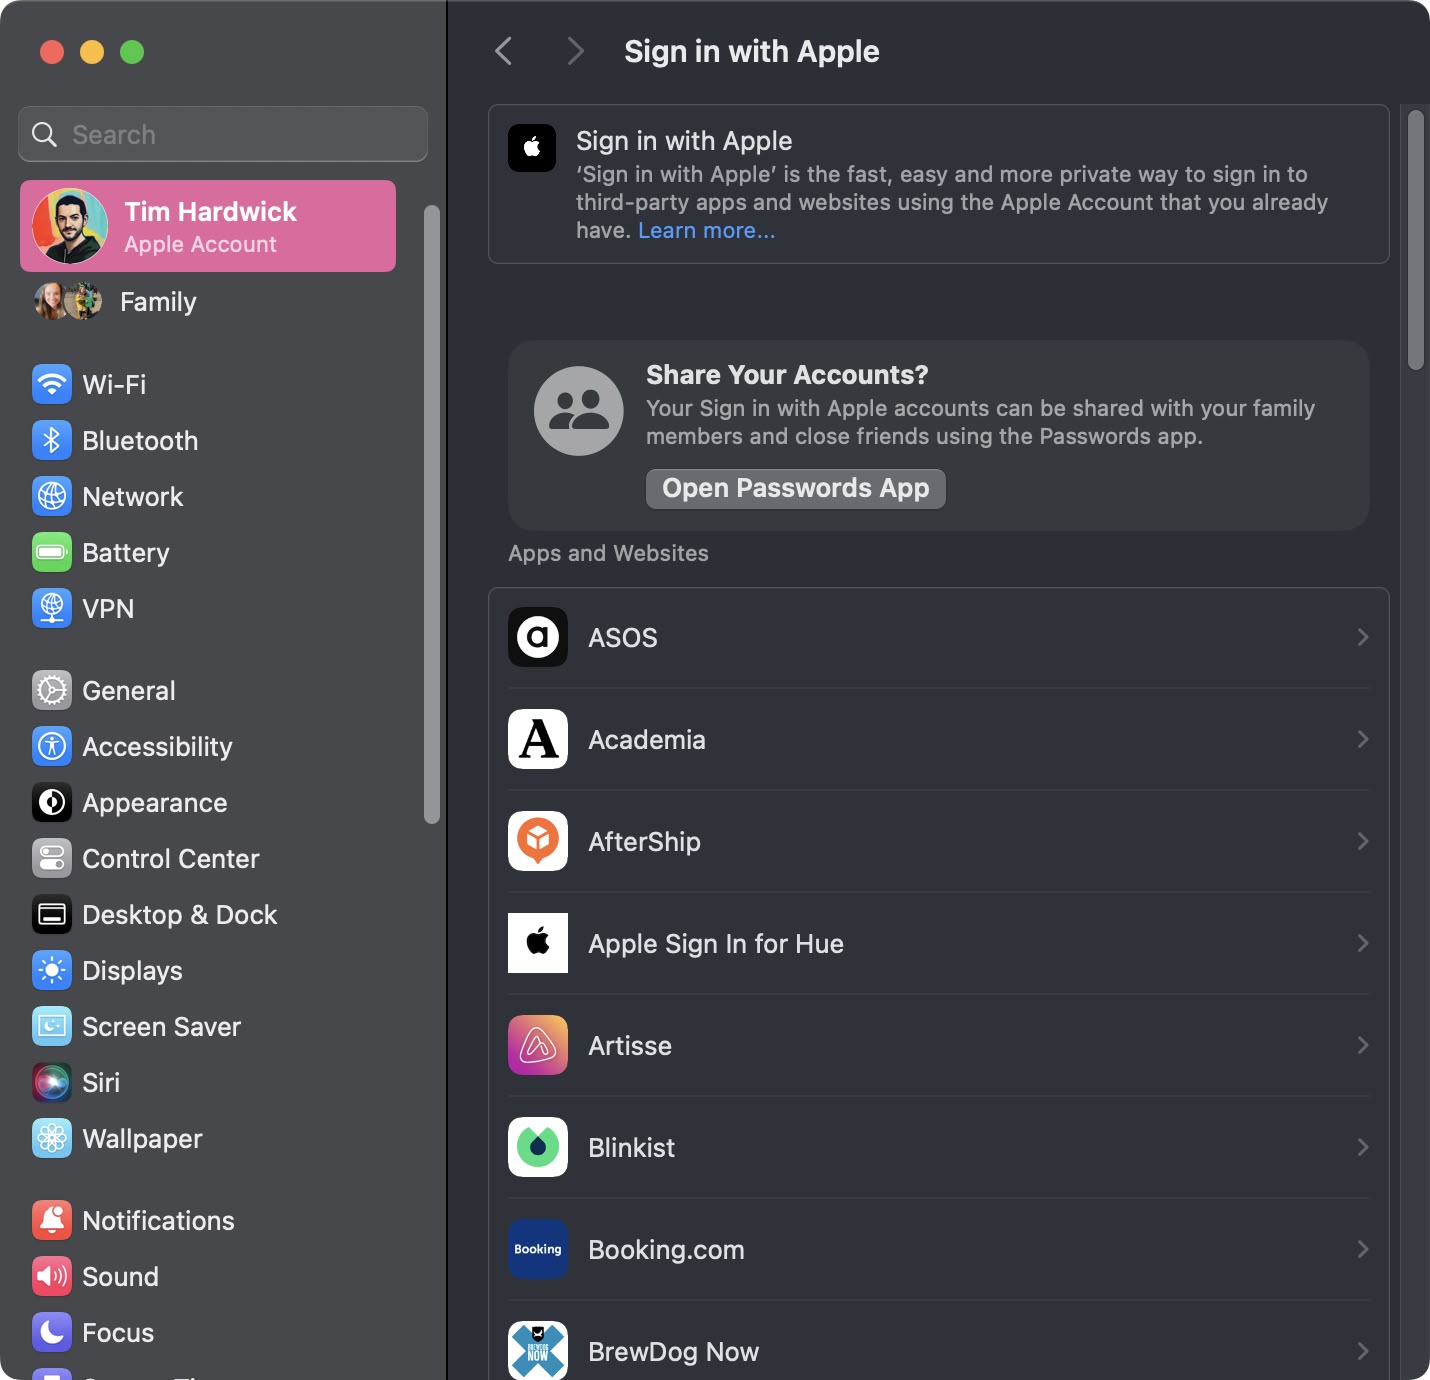
In the Apple Account (formerly Apple ID) section of System Settings, there's a new section called Sign in with Apple that shows you a list of all the websites and services where you use the sign-in with Apple service. From here, you can also opt to share your sign-ins with other members of your family members and close friends via the Passwords app.

38. Home and Work Locations in Weather


weather
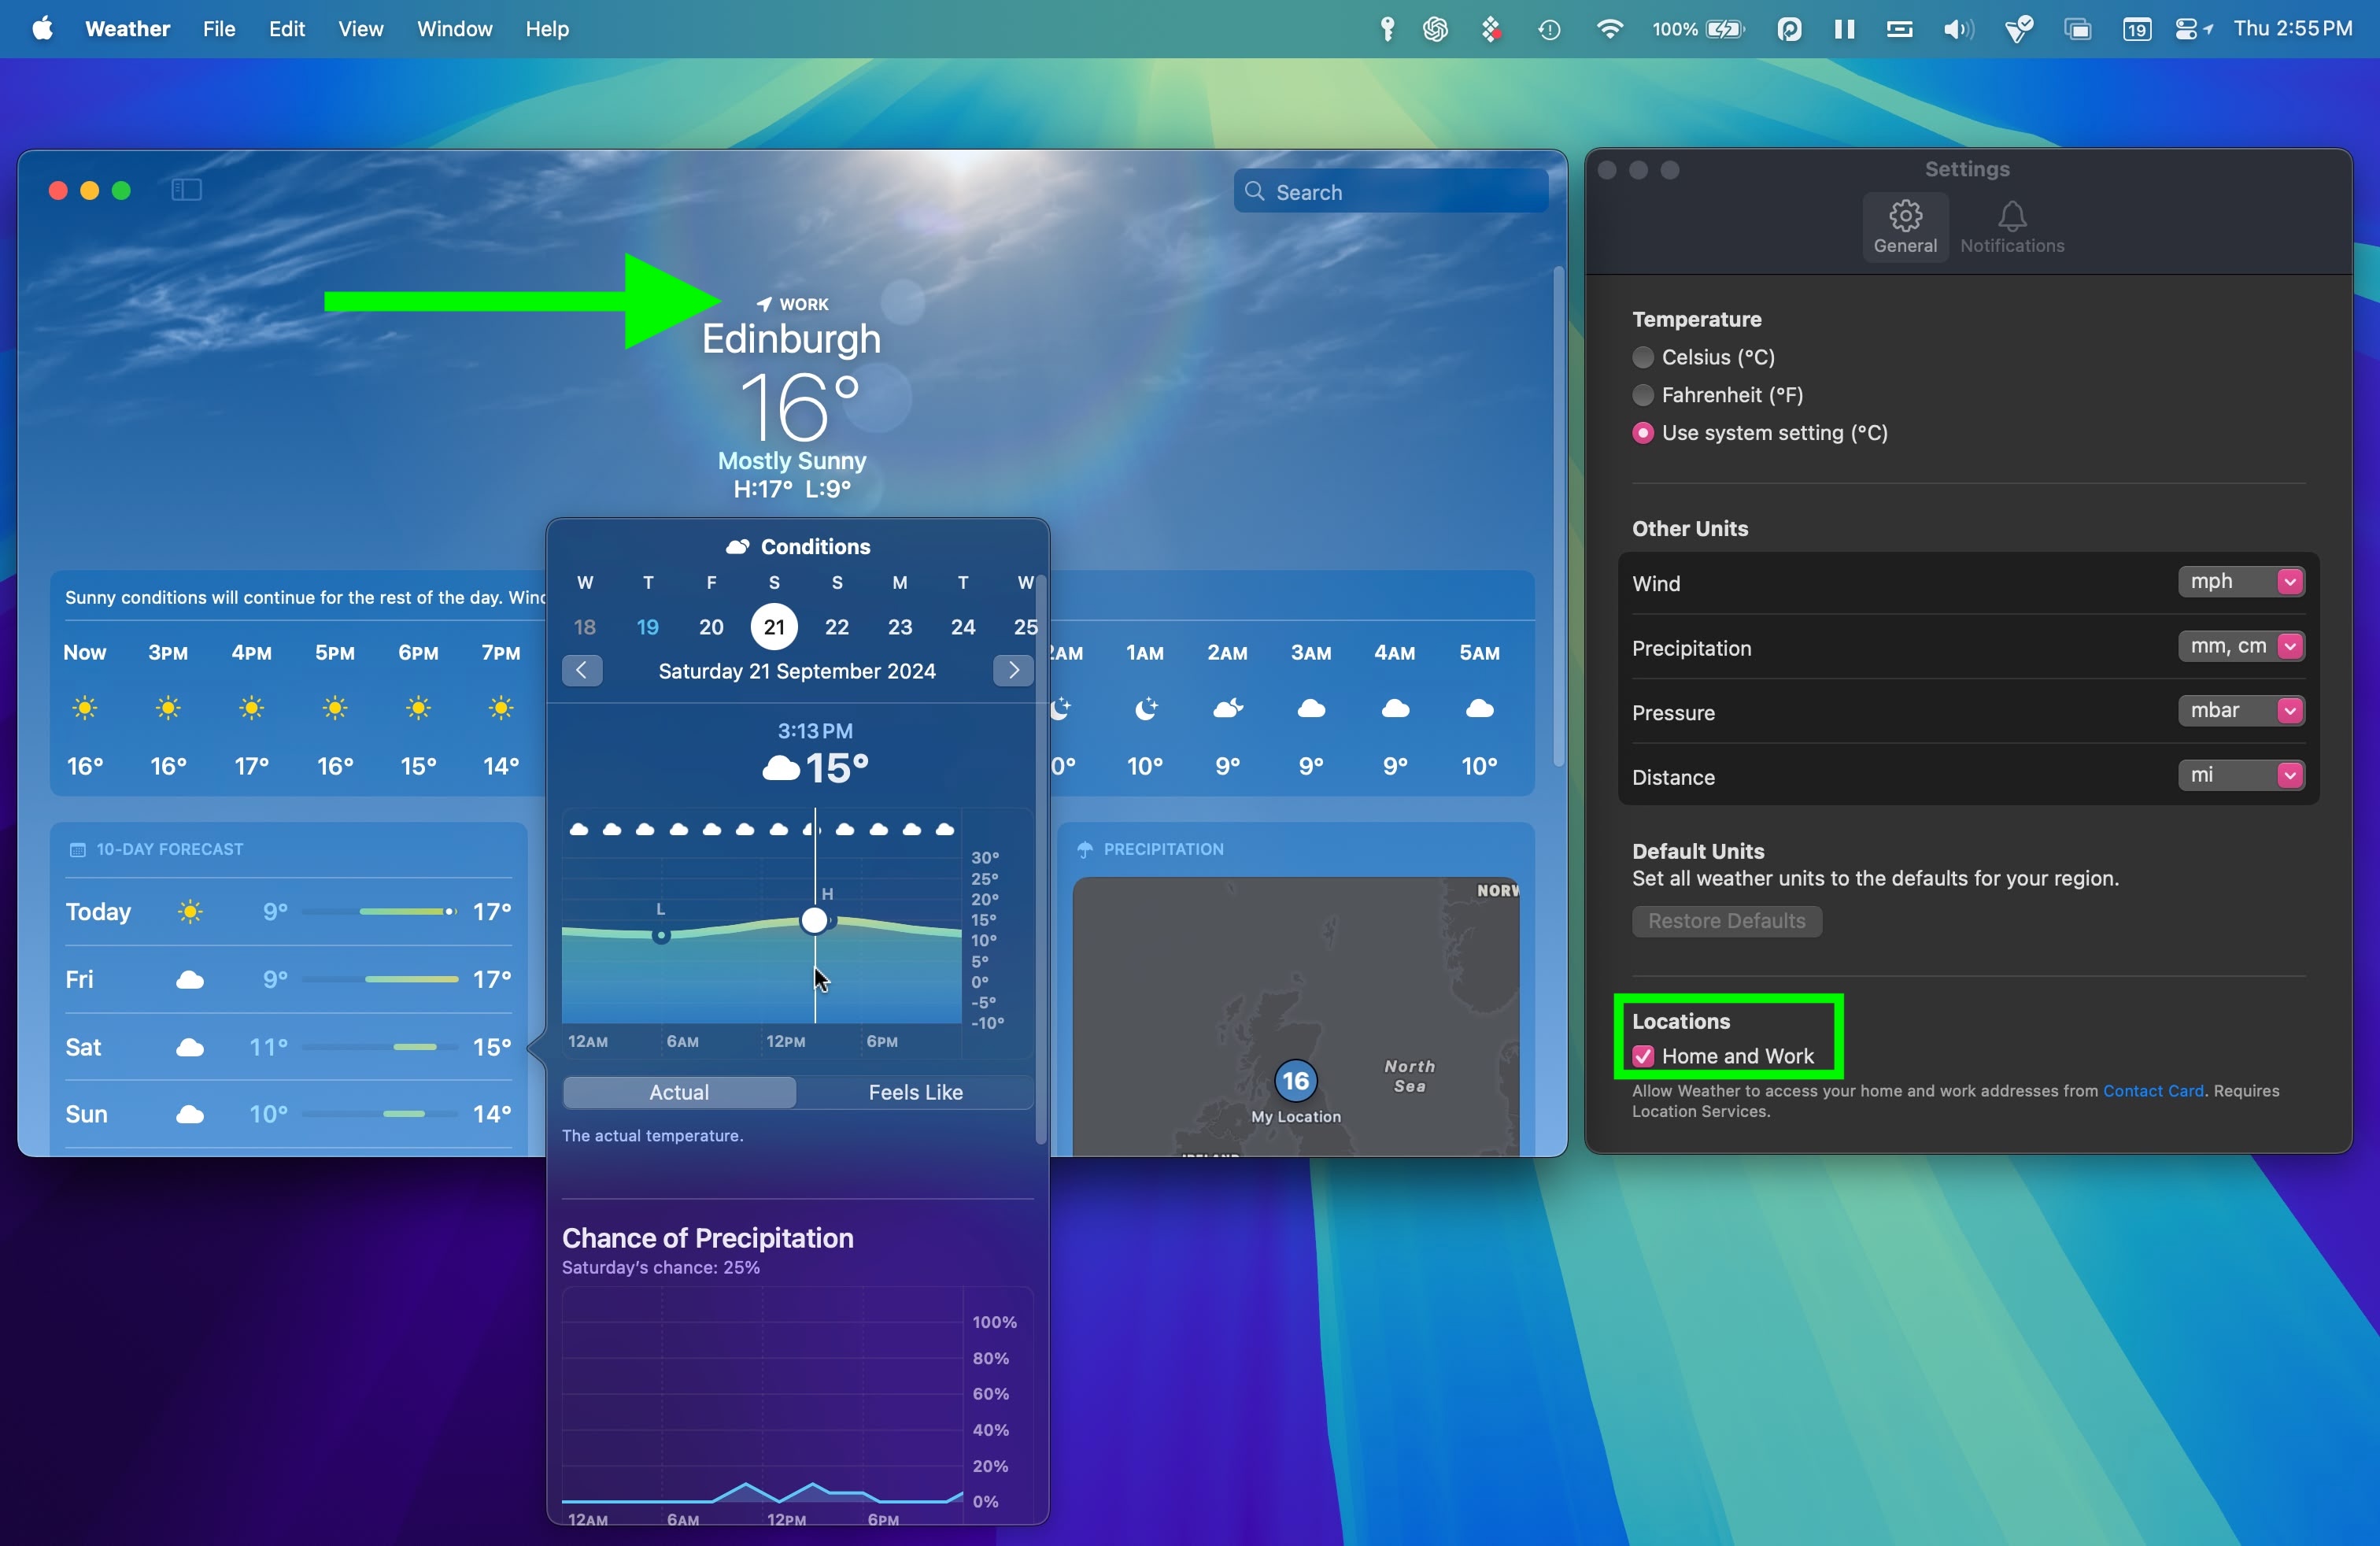
In the Weather app's Settings, there's a new Home and Work option under "Locations," so if you have two different places where you live and where you work, you can have them labeled as such in the app. Home and work locations can be updated by editing your Contacts card.

If you click on the daily forecasts in the main Weather screen, you'll also see a more comprehensive consolidation of weather conditions for that day.

39. Messages Text Effects and Formatting


messages
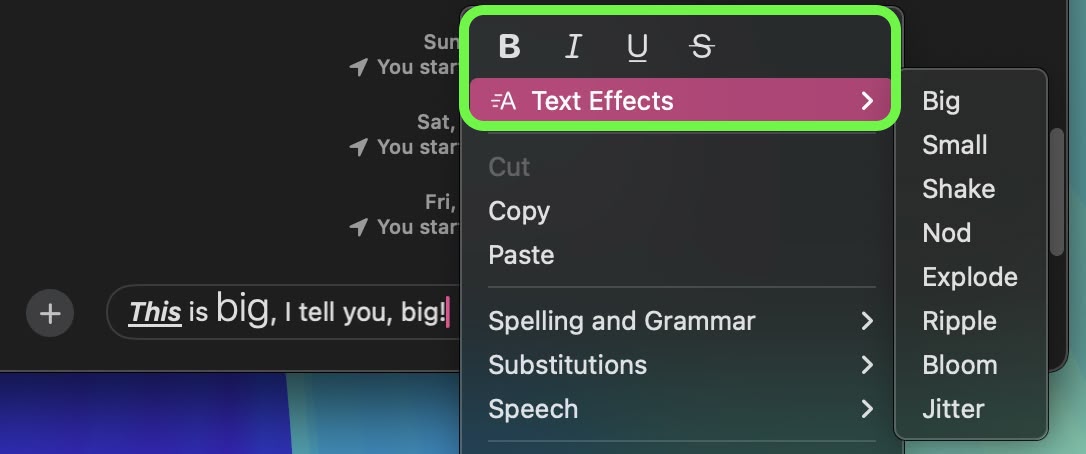
Among the new features in the Messages app, you can now add neat text effects to your messages to make them more expressive. The new animated text effects can be applied to your entire message, a single word, a phrase, or even an emoji or sticker. The options include Big, Small, Shake, Nod, Explode, Ripple, Bloom, and Jitter.

Using the same contextual menu, you can also now add emphasis to your text messages using bold, italic, underline, and strikethrough formatting. You can now apply these formatting options to entire messages, individual words, or even specific letters, offering a higher degree of customization in how you communicate.

40. Make Siri Listen for Atypical Speech


settings
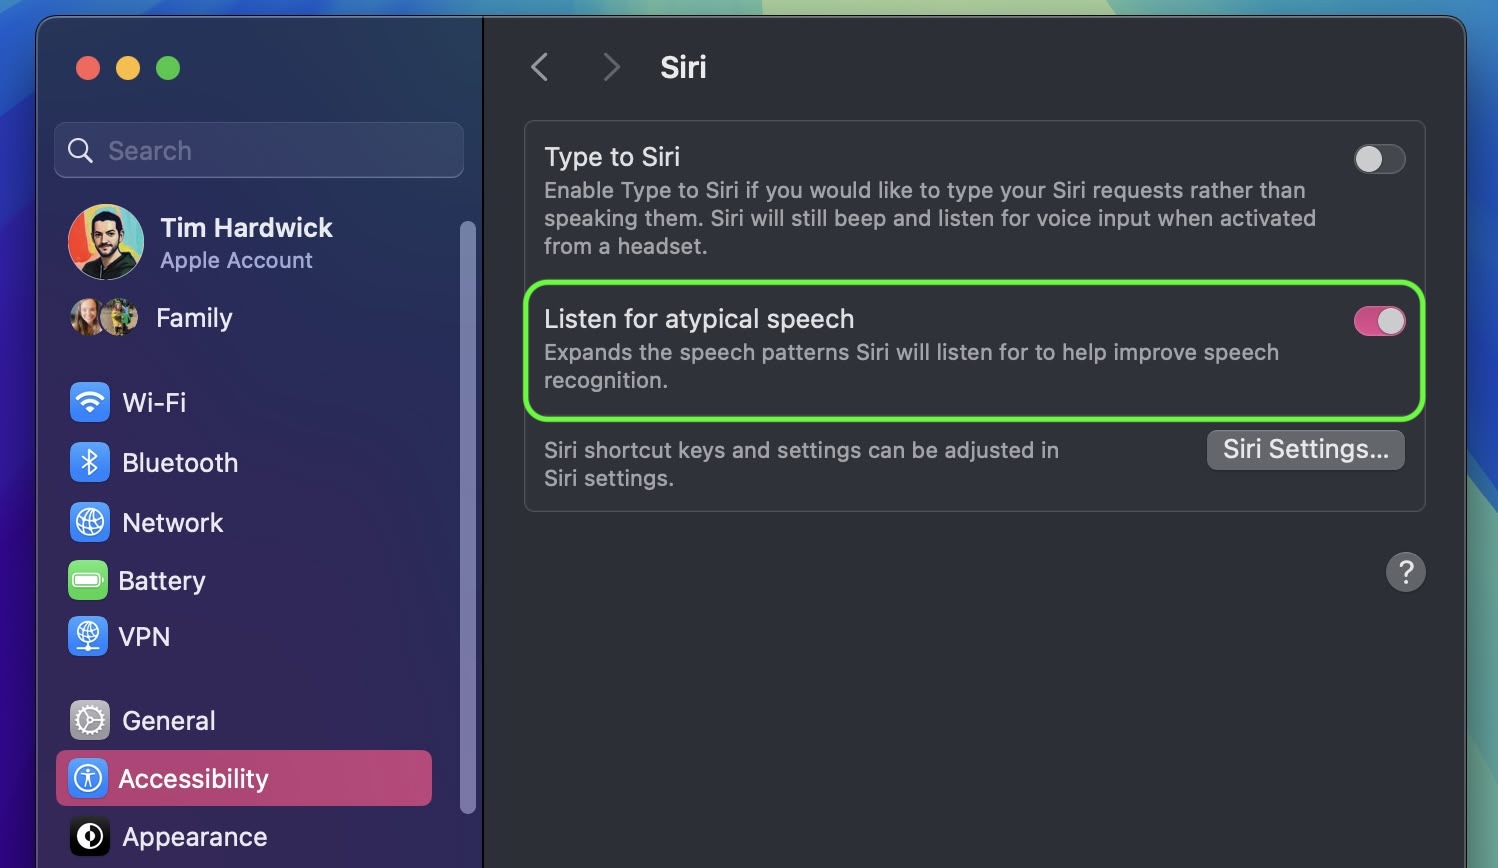
In System Settings ➝ Accessibility, under the "Siri" section, there's a new option to make Siri listen for atypical speech. This feature expands the speech patterns Siri will listen for to help improve speech recognition, according to Apple's description.

41. HDMI Passthrough Support


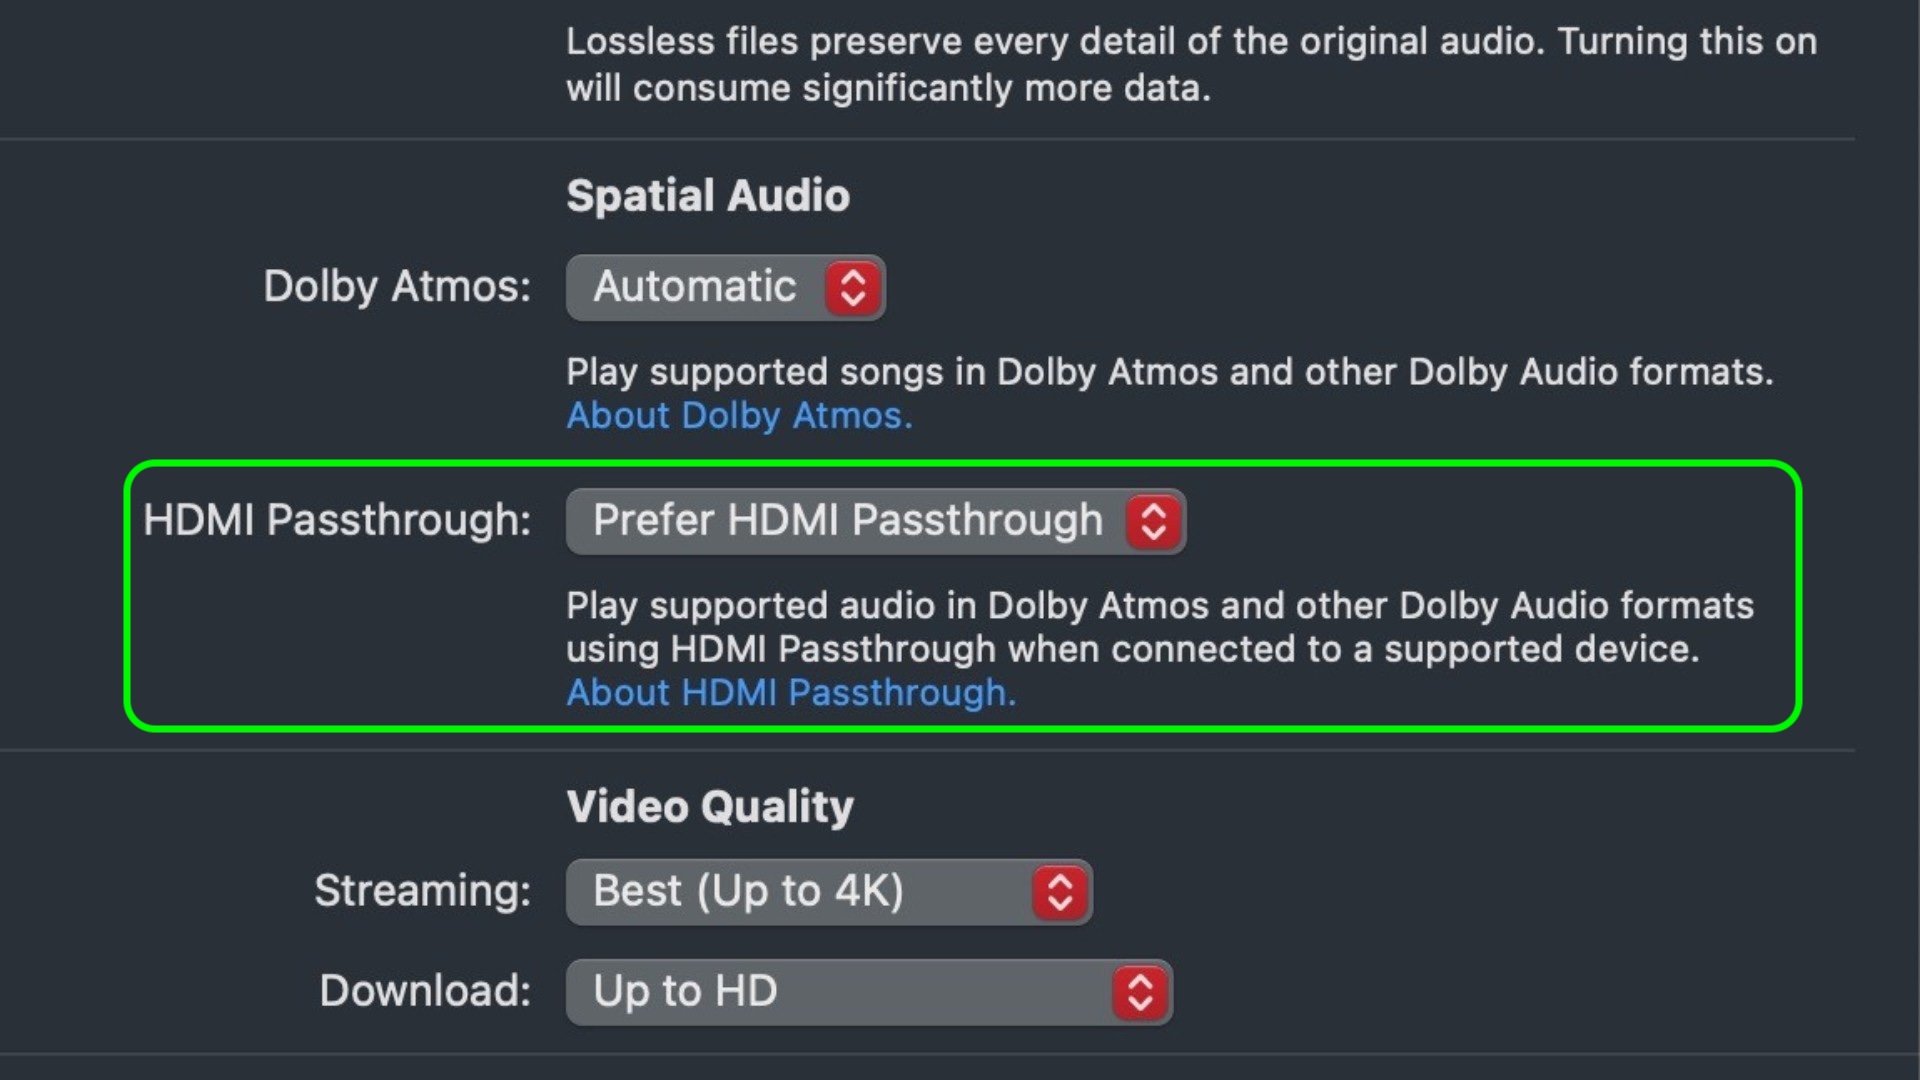
In macOS Sequoia, several Apple apps have gained a new HDMI Passthrough feature that enables a Mac to send an unaltered Dolby Atmos audio signal to a connected AV receiver or soundbar. The new functionality appears in various places in macOS 15, including Apple's TV, Music, and QuickTime Player apps. Apple says turning on the option lets users "Play supported audio in Dolby Atmos and other Dolby Audio formats using HDMI Passthrough when connected to a supported device."

This feature is likely to be welcomed by users who connect their Mac to an external device that supports Dolby Atmos, such as an AV receiver or soundbar. When conected via HDMI cable, the device will be able to decode and output the full immersive Dolby Atmos audio as it was meant to be experienced by the creators, while sending any accompanying video signal to a connected TV.

42. Reminders in Calendar


calendar
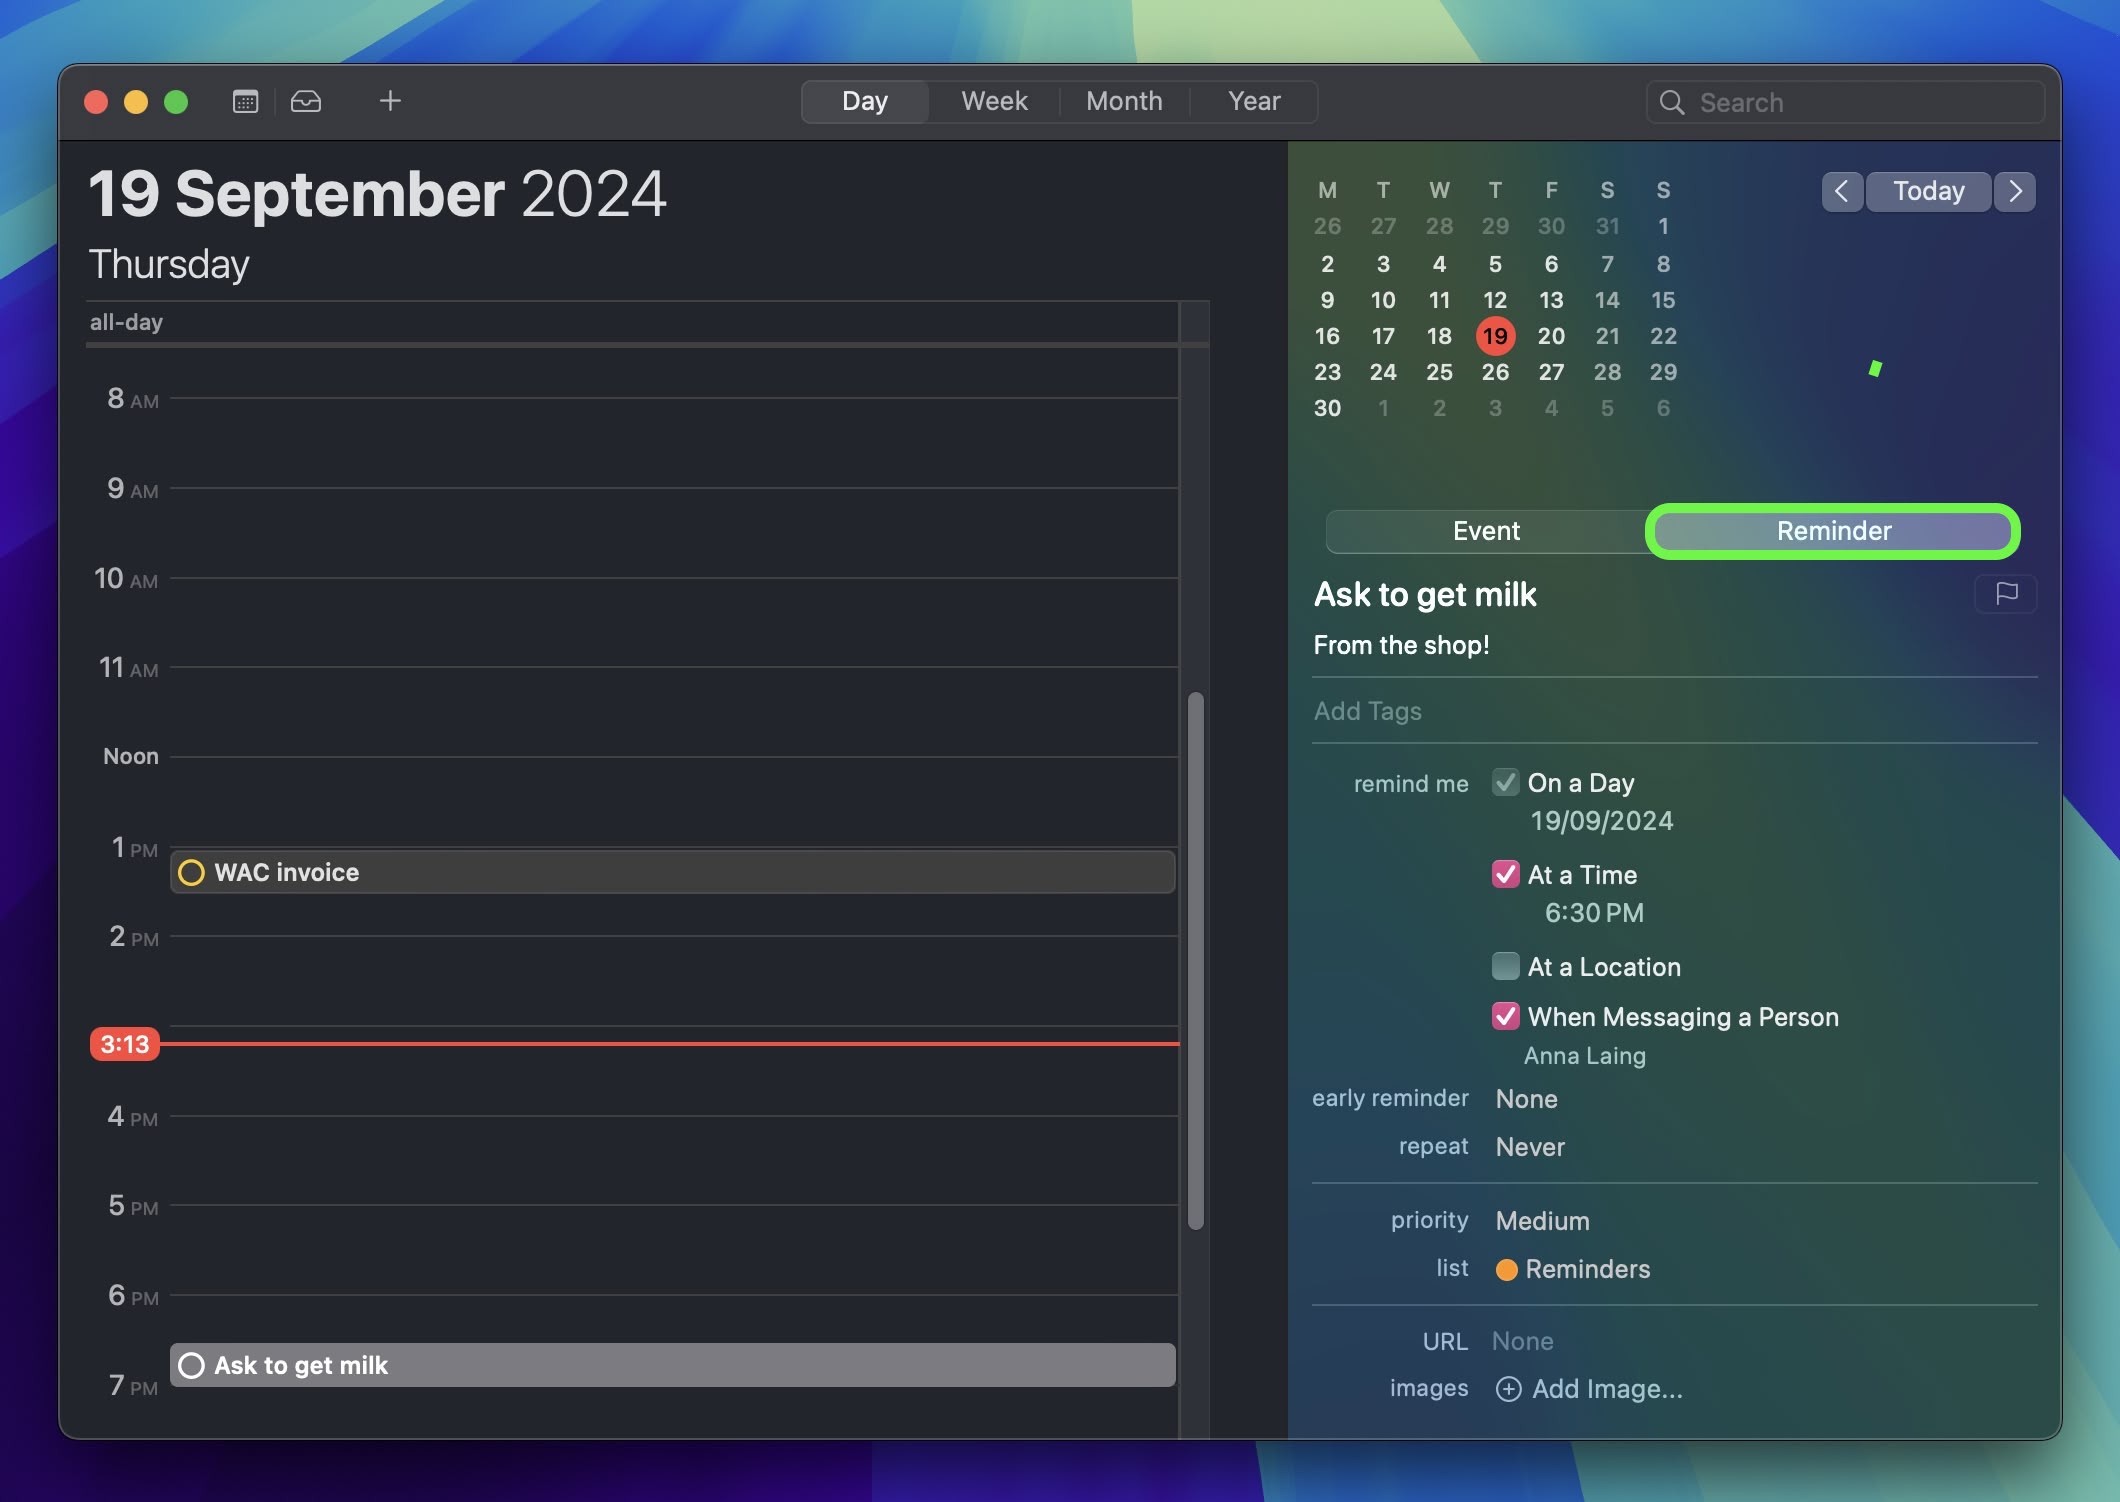
Like iOS 18, macOS Sequoia introduces long-awaited Calendar app integration with Reminders. Adding a reminder to a day or hour is as easy as right-clicking and selecting Add reminder. The Calendar interface includes all the reminder functions you'd want to have access to, without having to open the Reminders app.

43. Headphone Accommodations


settings
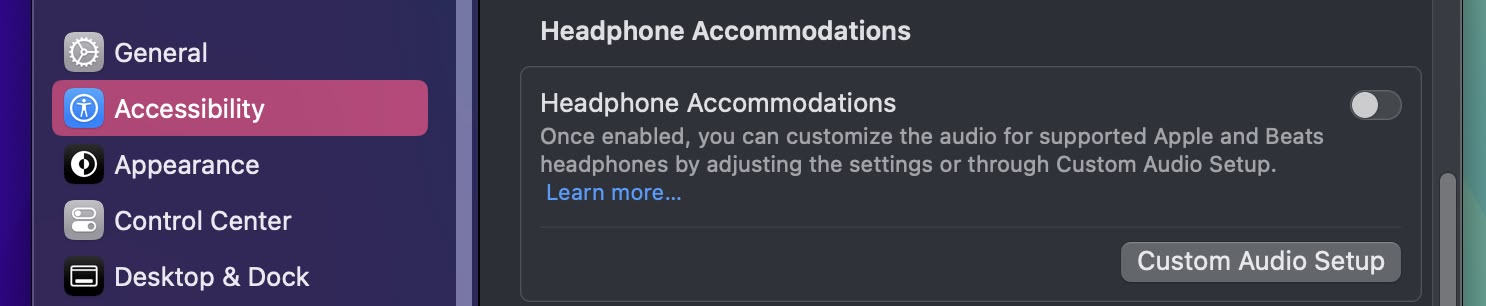
In System Settings ➝ Accessibility ➝ Audio, you'll now find Headphone Accommodations, a feature previously only available on iOS and iPadOS. This tool allows you to customize audio output for select Apple and Beats headphones to suit your hearing needs.

To use this feature, you engage in a "Custom Audio Setup" process. This involves resetting your EQ and Balance settings to their defaults, then listening to various audio samples, and selecting the sample that sounds best to you. Choosing "Use Custom Settings" will apply these preferences.

44. System Settings Default Behavior


settings
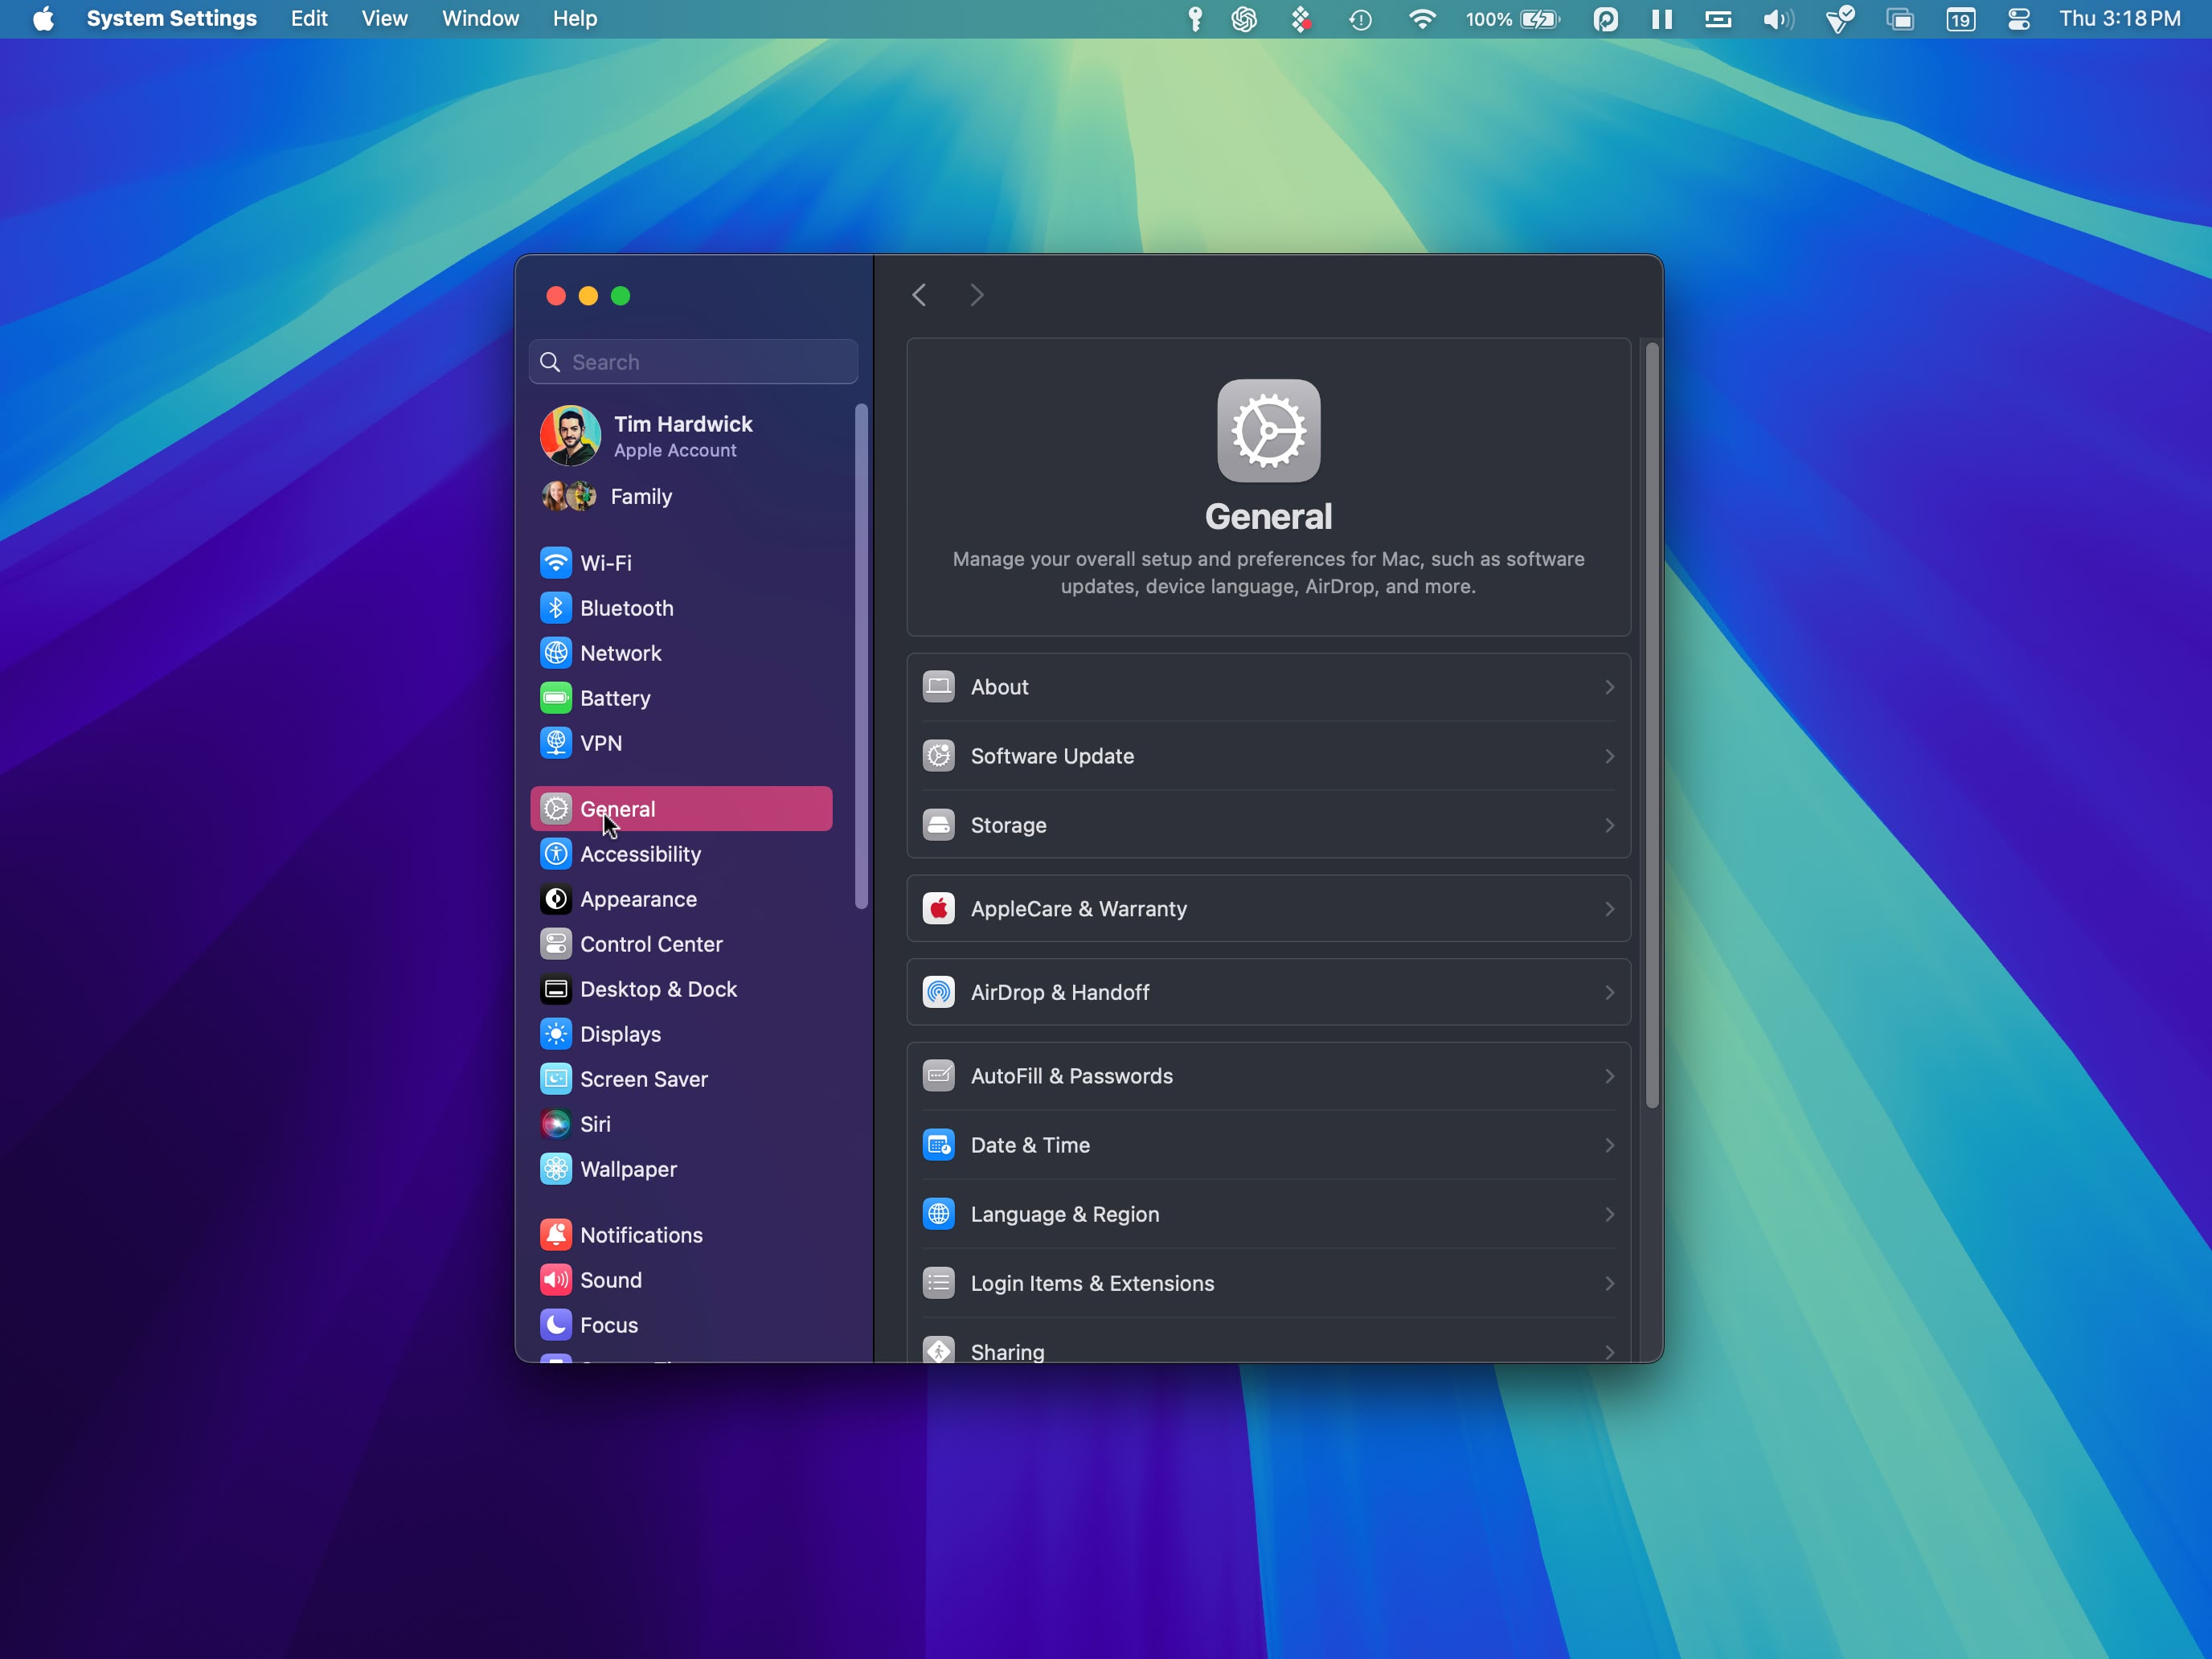
Apple has made changes to the System Settings interface to improve accessibility and navigation. A key modification is the new default view: Upon opening System Settings, you'll now see the General tab first, rather than the Appearance menu as in previous versions. This change places frequently used options in a more prominent position and reduces the number of steps required to access common settings.

45. Inline Math in Many Fields


calculations
You're not limited to accessing the new Math features through the Calculator – you can also use the feature directly within the Notes app using any new or existing note. In fact, you can get Math results almost anywhere in the operating system where you type. If you type a calculation into Spotlight, you'll still get a result, but the same now goes for apps like TextEdit and Messages.

46. Open Contextual Menu Shortcut


textedit
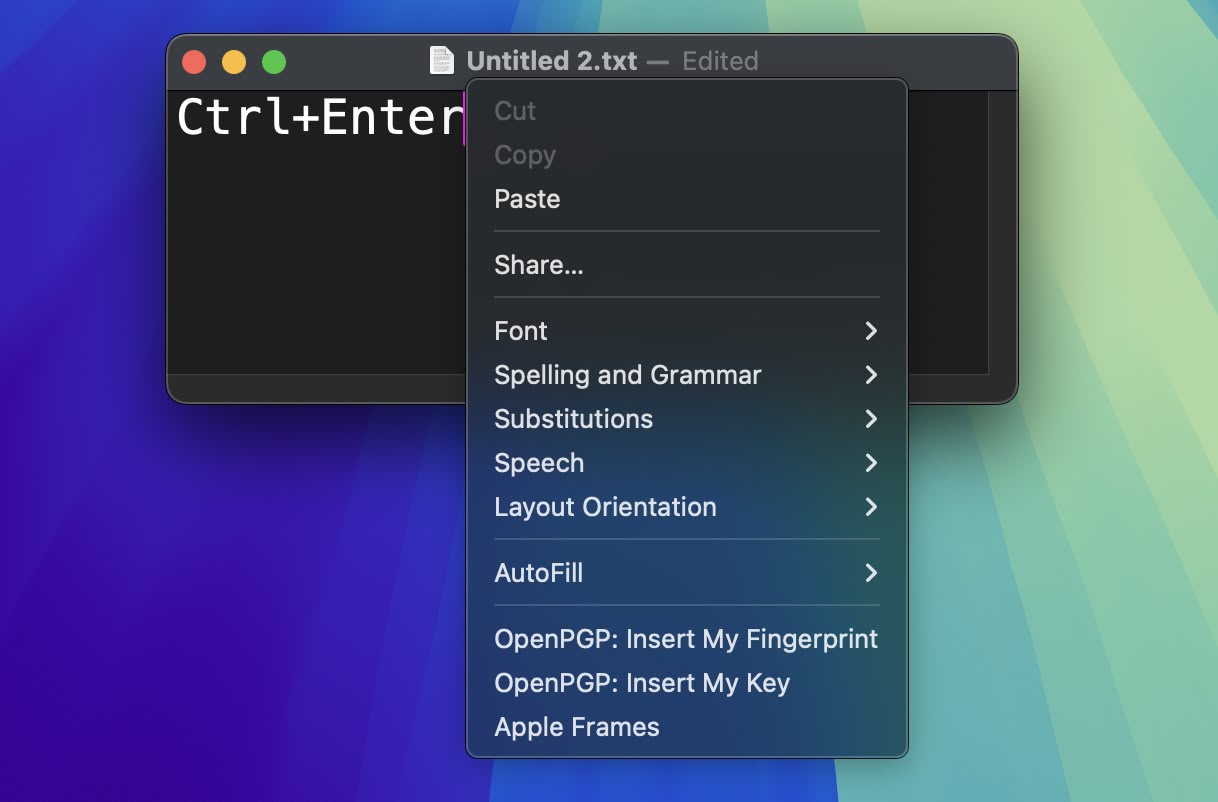
Windows has had this feature for ages, and finally it's come to Mac. In Sequoia, you can now open a contextual menu in text-based apps by pressing Control+Enter, so if you make a text selection or just want to choose a contextual option while you're typing away, your fingers no longer need to leave the keyboard.

47. iPhone Mirroring Touch ID Support


mirroring
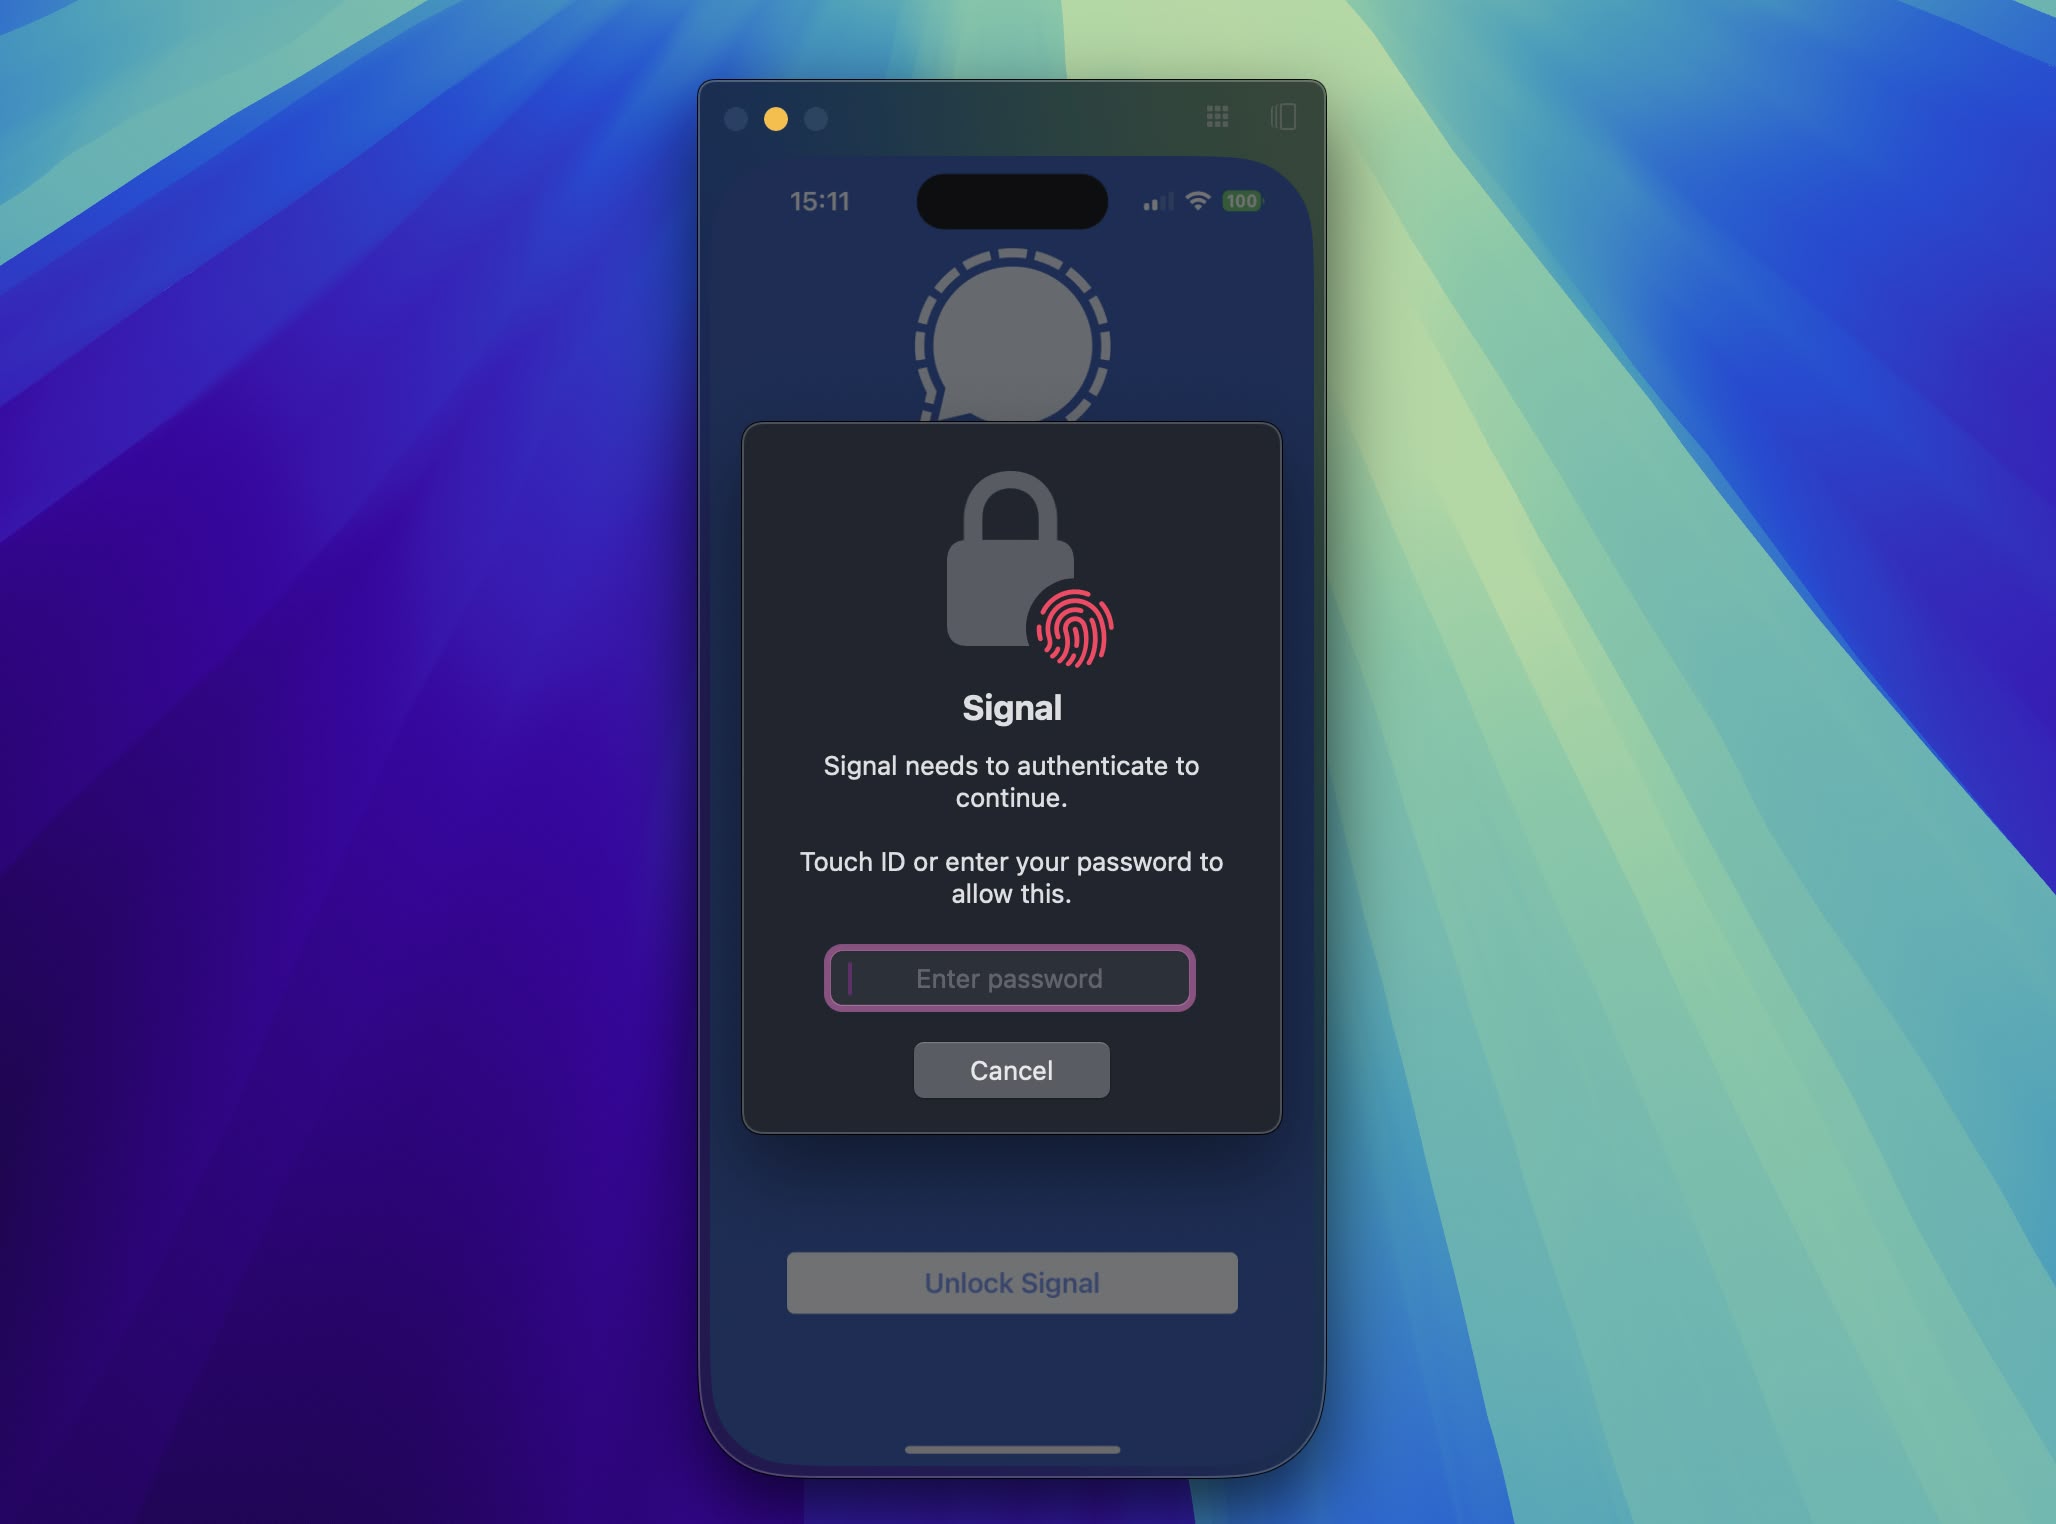
If you're mirroring your iPhone to your desktop and attempt to open an app that requires authentication, you don't need to pick up your iPhone or resign yourself to an inaccessible app – you can just use Touch ID on your Mac.

48. Redesigned Safari Reader View Options


safari
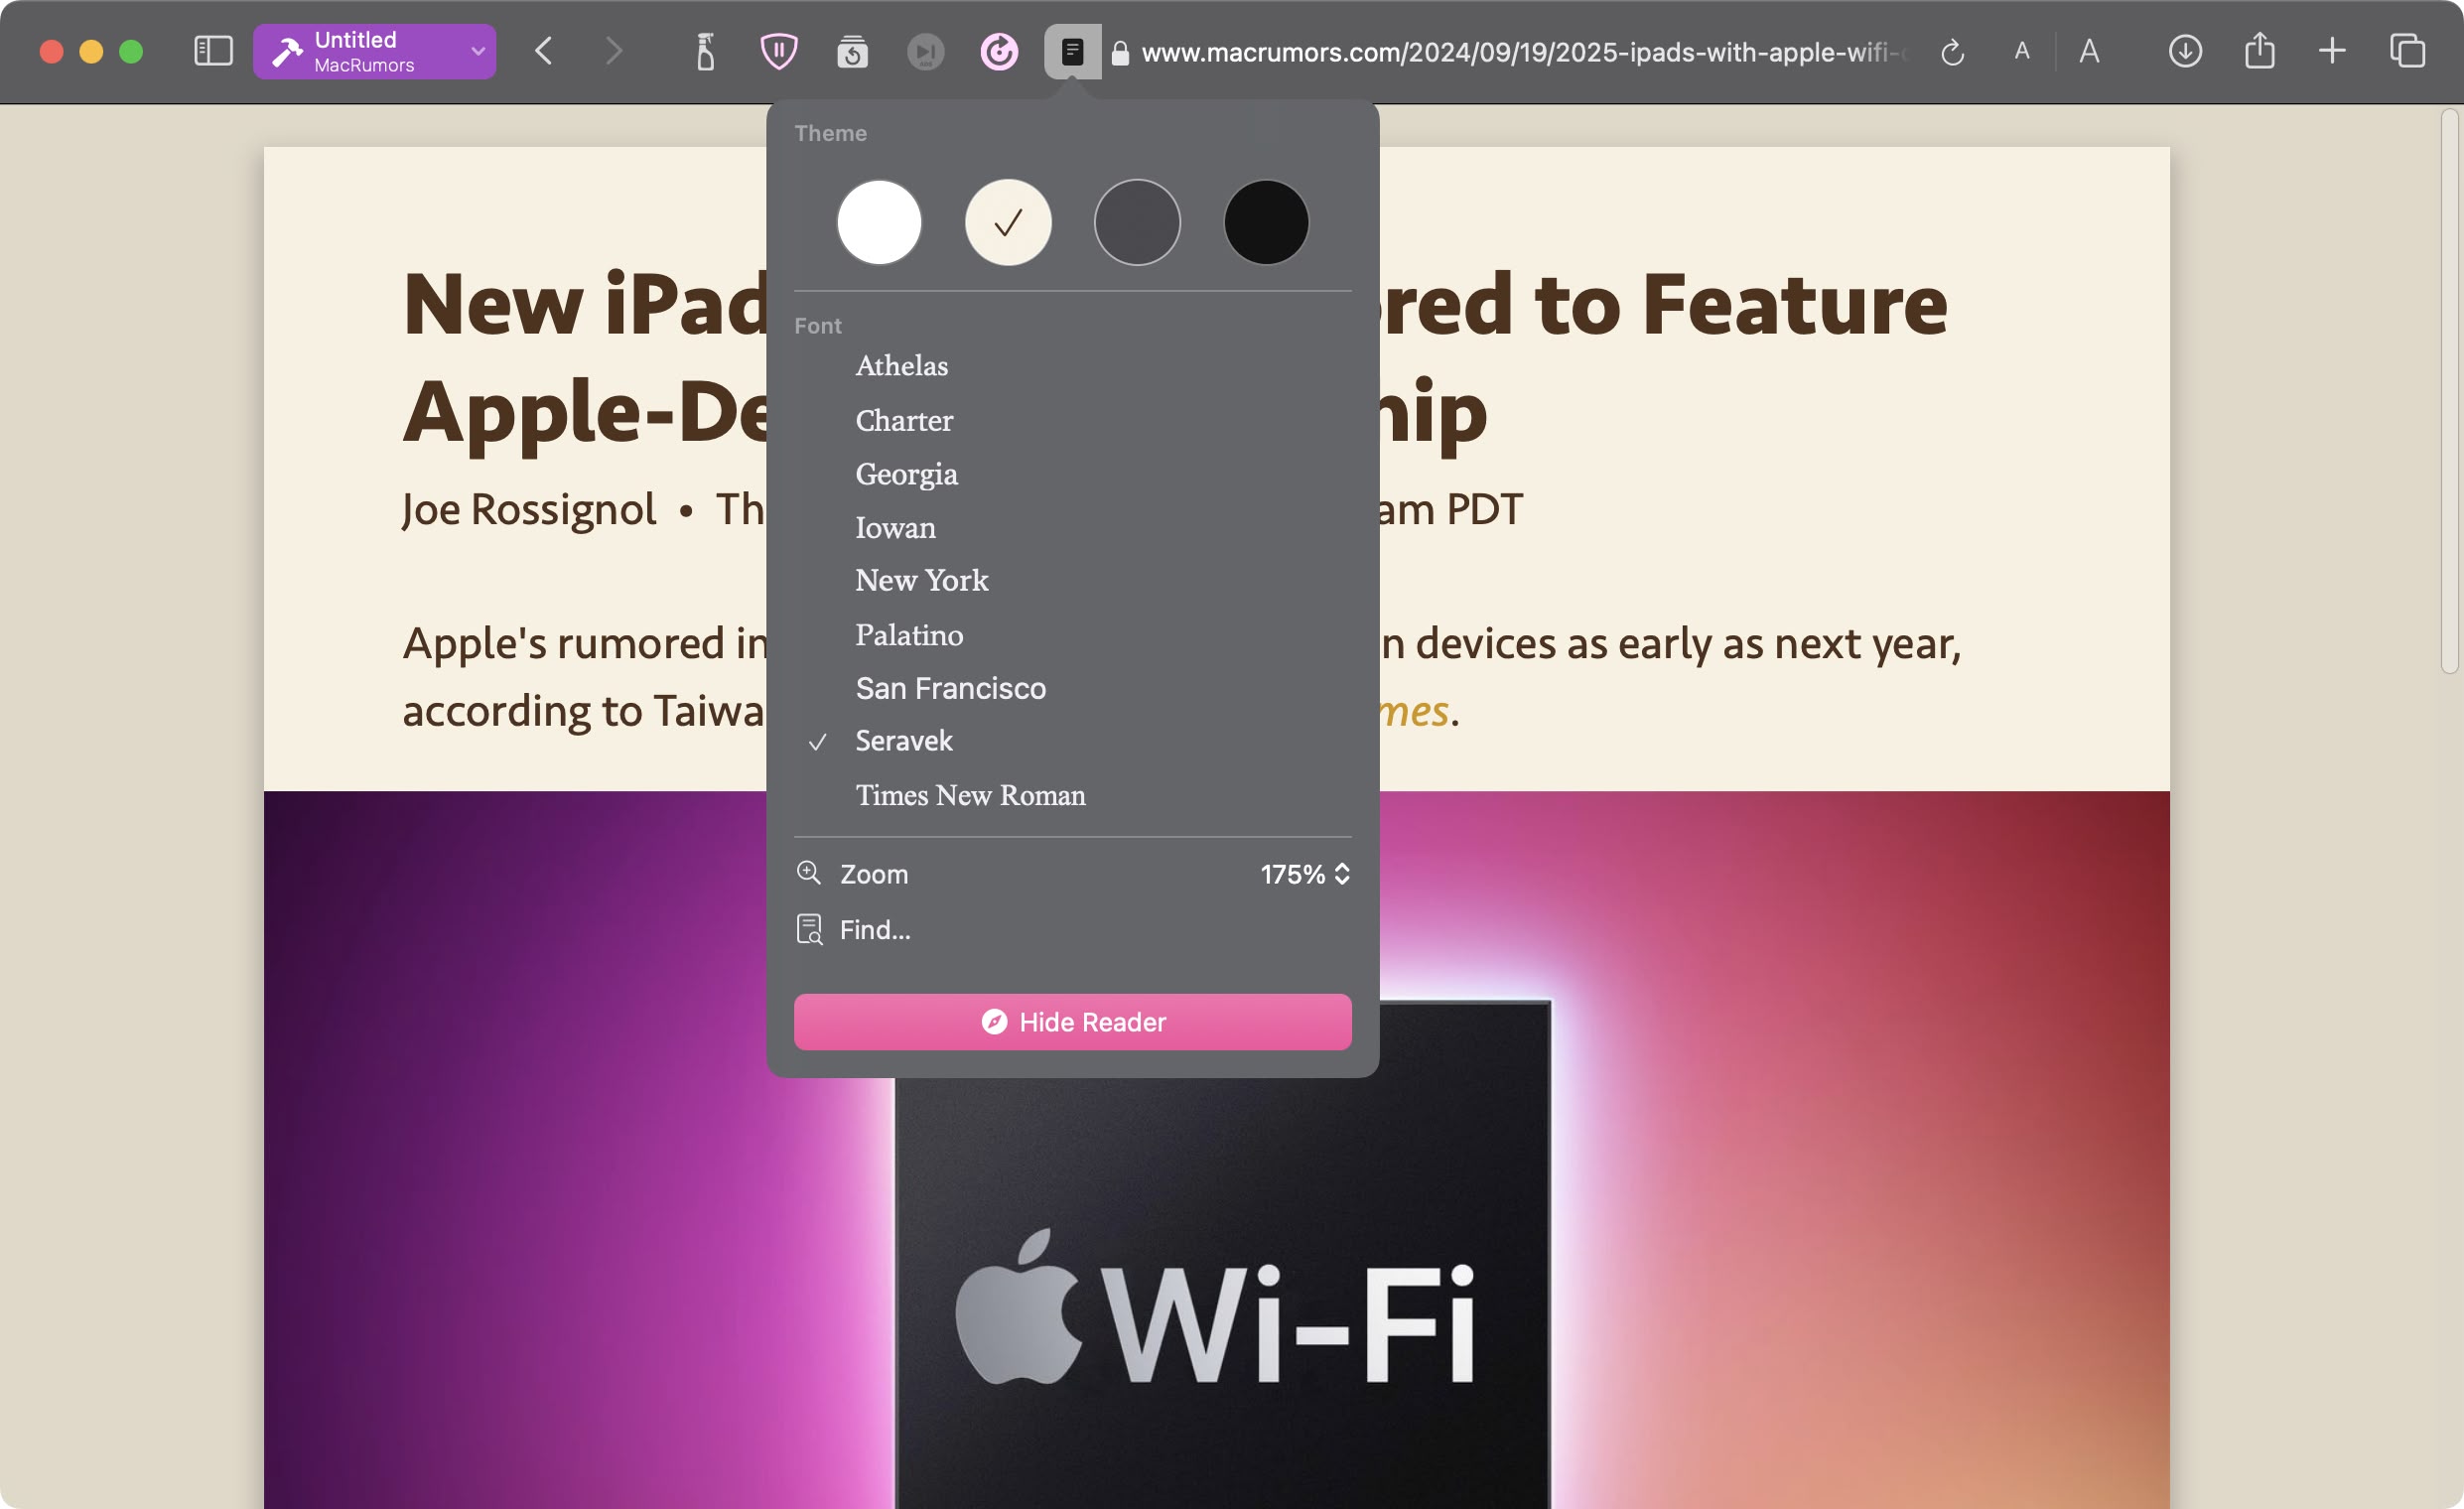
A longstanding feature in Safari, Reader Mode allows users to view web pages in a simplified format, stripping away ads, videos, and other distractions to focus solely on the text and images. This clean interface has been a favorite among users who prefer a more streamlined reading experience, especially for longer articles or text-heavy websites.

In macOS Sequoia, Apple has redesigned the Reader interface so that it's easier to define your readability and customization options, allowing you to quickly tailor your reading experience to your preferences.

49. Schedule Messages to Send Later


messages
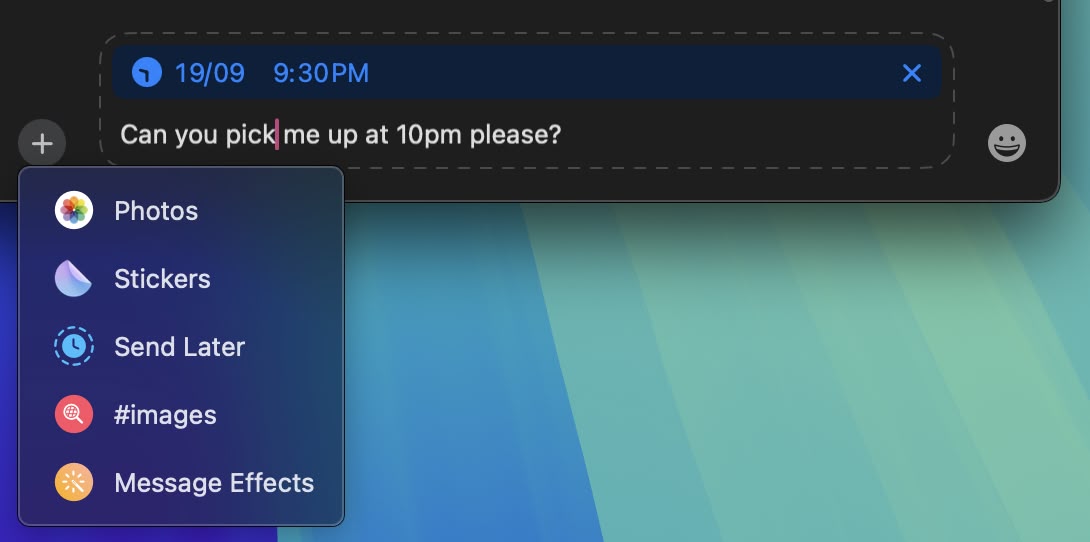
This addition to the Messages app now allows users to schedule text messages for future delivery. Available exclusively for iMessage conversations via the + button, the Send Later function enables you to compose messages in advance and set a specific time or date for them to be sent by editing the clock. This feature is particularly useful for remembering important dates or managing communication across different time zones.

The feature works for both individual and group chats, provided all participants are using Apple devices with iMessage enabled. Scheduled messages are displayed at the bottom of a conversation. If you want to cancel a scheduled message or edit, simply right-click it and select the desired option. Note that messages can be scheduled up to 14 days in advance.

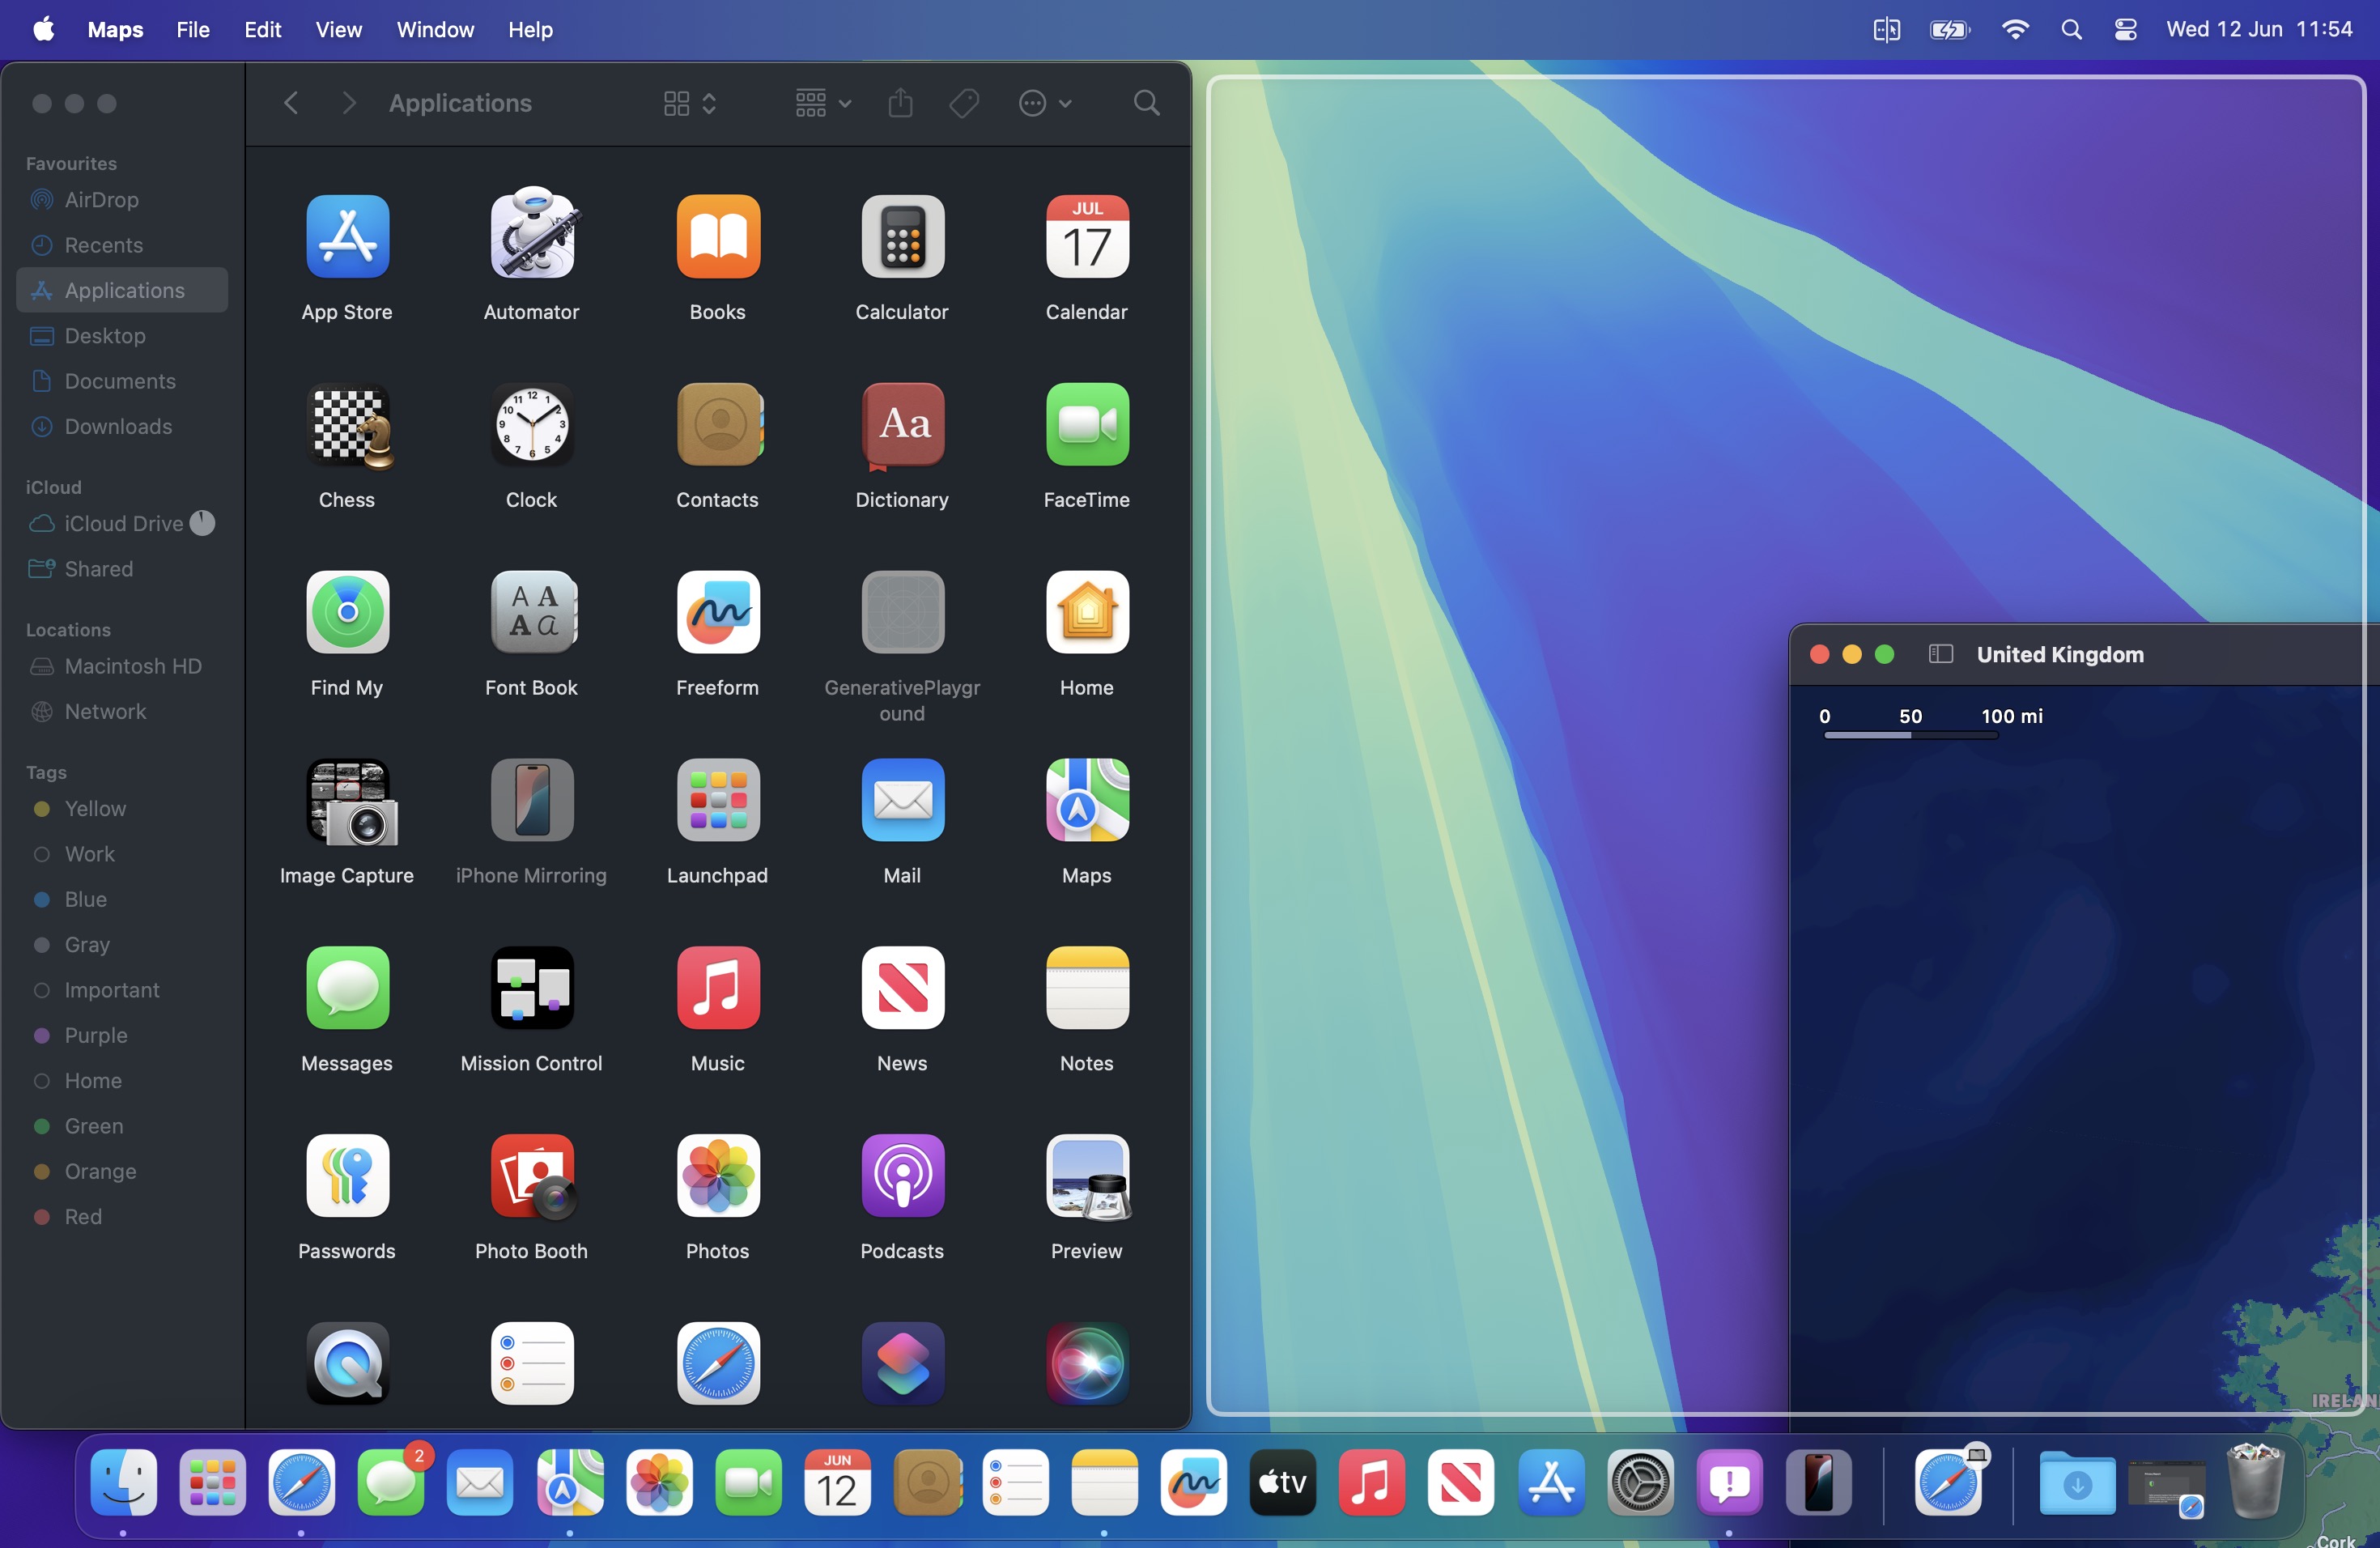
50. Hiking Trails in Maps


maps
The Maps app now features detailed trail networks and hikes, including all 63 U.S. national parks. You can do a search for "hikes" or "hiking routes" in the Maps app to see nearby trail options, with Apple including hike length, elevation, ratings, and other details where available. Hikes can be filtered by length, route type (loop, point to point, or out and back), and elevation, and can be saved for offline access. If you click on a trail, You can also see a full overview of the trail's path and get lengths for each section.

maps
Maps also supports custom routes, so you can plan out a specific hiking route that you want to take. At a trailhead, you can click on the "Create a Custom Route" option to initiate the custom routing experience. From there, click on the map to begin setting points for your route, and the Maps app will provide length and elevation details. You can also have the Maps app finish a route automatically by selecting the Reverse, Out and Back, or Close Loop options (shown in the image in the top-right corner).
Related Roundup: macOS Sequoia
Related Forum: macOS Sequoia

This article, "50 New macOS Sequoia Features and Changes Worth Checking Out" first appeared on MacRumors.com

Discuss this article in our forums

Read the whole story
· · · · · · · · · · · · · · · · · · · · · · · · · · · · · · · · · · · · · · · · · · · · · · · · · · · · · · · · · · · · · · · · · · · ·
ortwin
84 days ago
reply
interessant
Germany, Düsseldorf
Share this story
Delete

Let’s Make a Sandwich

1 Share

Guten Appetit!


(Direktlink)

Read the whole story
ortwin
87 days ago
reply
Germany, Düsseldorf
Share this story
Delete

Buckelwal schluckt Kajakfahrer – und spuckt ihn wieder aus

1 Share

Vor der chilenischen Küste Patagoniens hat ein Buckelwal kurzzeitig einen Kajakfahrer in seinem Maul, bevor er ihn schnell wieder unverletzt freiließ.

Ein Vater und sein Sohn waren gemeinsam Kajak fahren, als der riesige Wal plötzlich auftauchte und den jungen Mann samt gelbem Kajak für einige Sekunden in seinem Maul gefangen hielt, bevor er ihn recht fix wieder auspuckte. Der Vater filmte den Vorfall. Holy Moly!


(Direktlink, via MeFi)

Read the whole story
ortwin
87 days ago
reply
Germany, Düsseldorf
Share this story
Delete

Using Measurements from Foundation as values in Swift Charts

1 Share

Using Measurements from Foundation as values in Swift Charts

In this post we are going to build a bar chart, comparing durations of nature walks in the Christchurch area. We will be using the new Swift Charts framework introduced this year and will see how to plot data of types that don't conform to Plottable protocol by default such as Measurement<UnitDuration>.

# Define data for the chart

Let's start by defining the data to visualize in the chart.

We declare a Walk struct containing the title and the duration of the walk in hours. We use the Measurement type from Foundation framework with the unit type of UnitDuration to represent the duration of each walk.

struct Walk {
    let title: String
    let duration: Measurement<UnitDuration>
}

We store the walks to show in the chart in an array.

let walks = [
    Walk(
        title: "Taylors Mistake to Sumner Beach Coastal Walk",
        duration: Measurement(value: 3.1, unit: .hours)
    ),
    Walk(
        title: "Bottle Lake Forest",
        duration: Measurement(value: 2, unit: .hours)
    ),
    Walk(
        title: "Old Halswell Quarry Loop",
        duration: Measurement(value: 0.5, unit: .hours)
    ),
    ...
]

# Build a chart to visualize walk durations

Let's define a Chart and pass it the walks array for the data parameter. Since we know that our walk titles are unique, we can just use them as ids, but you can also conform your data model to Identifiable instead.

Chart(walks, id: \.title) { walk in
    BarMark(
        x: .value("Duration", walk.duration),
        y: .value("Walk", walk.title)
    )
}

Note, that because Measurement<UnitDuration> doesn't conform to Plottable protocol by default, we will get an error Initializer 'init(x:y:width:height:stacking:)' requires that 'Measurement<UnitDuration>' conform to 'Plottable'.

The BarkMark initializer expects to receive a PlottableValue for x and y parameters. And the value type of PlottableValue has to conform to Plottable protocol.

We have two options to fix the error. We can either extract the value of the measurement that is a Double and conforms to Plottable by default or we can extend Measurement<UnitDuration> with Plottable conformance.

If we simply extract the value from the measurement, we'll loose the context and won't know what units were used to create the measurement. This means that we won't be able to properly format the labels of the chart to represent the unit to the users. We could remember that we used hours when creating the measurement, but it's not ideal. We can decide to change the data model later to store the duration in minutes, for example, or the data could be coming from somewhere else, so manually reconstructing the units is not a perfect solution. We will look into how to make Measurement<UnitDuration> conform to Plottable instead.

# Extend Measurement type with Plottable conformance

Measurement is a generic type, so we need to specify the UnitType when extending it. Since we are using Measurement<UnitDuration> in our example, we will specify that UnitType equals UnitDuration, but you can adapt it to the measurements you are using in your own projects.

extension Measurement: Plottable where UnitType == UnitDuration {
    public var primitivePlottable: Double {
        self.converted(to: .minutes).value
    }

    public init?(primitivePlottable: Double) {
        self.init(value: primitivePlottable, unit: .minutes)
    }
}

Plottable protocol has two requirements: primitivePlottable property that has to return one of the primitive types such as Double, String or Date and a failable initializer that creates a value from a primitive plottable type.

I decided to convert the measurement to and from minutes, but you can choose any other unit that suits your needs. It's just important to use the same unit when converting to and from the primitive value.

With the Plottable conformance added, we can now check our chart. It works, but the labels on the x-axis are not formatted and don't show the units of measurements to the users. We are going to fix that next.

Screenshot of the bar chart of walk durations with labels on the x-axis showing numbers in minutes but no units

# Show formatted labels with measurement units

To customize the labels on the x-axis we will use chartXAxis(content:) modifier and reconstruct the axis marks with the values passed to us.

Chart(walks, id: \.title) { ... }
    .chartXAxis {
        AxisMarks { value in
            AxisGridLine()
            AxisValueLabel("""
            \(value.as(Measurement.self)!
                .converted(to: .hours),
            format: .measurement(
                width: .narrow,
                numberFormatStyle: .number.precision(
                    .fractionLength(0))
                )
            )
            """)
        }
    }

We first add the grid line and then reconstruct the label for a given value.

AxisValueLabel accepts a LocalizedStringKey in the initializer, that can be constructed by interpolating a measurement and indicating its format style.

The value we receive is created using the initializer we defined in the Plottable conformance, so in our case it is provided in minutes. But I believe it would be better to use hours for this particular chart. We can easily convert the measurement to the desired unit inside the interpolation. Here we are certain that the value is of type Measurement, so we can force unwrap the Measurement type cast.

I chose the narrow format and zero digits after the comma for the number style, but you can adjust these settings for your specific chart.

The final result displays formatted durations in hours on the x-axis.

Screenshot of the bar chart of walk durations with labels on the x-axis showing formatted numbers in hours

You can get the full sample code for the project used in this post from our GitHub repo.

Read the whole story
· · · · ·
ortwin
1019 days ago
reply
Germany, Düsseldorf
Share this story
Delete
Next Page of Stories
Loading...
Page 2

Corona-Warn-App: 15 Prozent der Bevölkerung erreicht, erste Infektionswarnungen

2 Comments

Fast 13 Millionen Menschen in Deutschland haben die Corona-Warn-App installiert. Experten hatten berechnet, dass sich nun erste positive Effekte zeigen dürften.

Read the whole story
ortwin
1783 days ago
reply
Covid-19 ist eine meldepflichtige Krankheit. Das Gesundheitsamt wird also immer deinen Namen und deine Adresse haben und mit dir telefonieren und dich in Quarantäne stecken und kontrollieren. Und sie werden versuchen alle deine Kontakte zu tracen. Auch alles mit Klarnamen und Adressen usw. So ist das nunmal bei meldepflichtigen Krankheiten.
Germany, Düsseldorf
jogi
1780 days ago
Alles gut, aber "benachbarte" Betriebe in benachbarten Kreisen befragen und einfach die Daten durch die Gegend schieben ist auch bei meldepflichtigen Erkrankungen nicht zulässig.
Share this story
Delete
1 public comment
jogi
1784 days ago
reply
Ich beteilige mich an den 15% die Abstand halten und sich die Flossen waschen. Wenn 80% der Germans die App installiert haben, steige ich ein um die fehlenden 5% zu erreichen... genau: nie.
Ahrensburg, Deutschland
ortwin
1784 days ago
sehr gute Verhaltensweise! Aber gegen die App spricht auch nichts.
radeldudel
1783 days ago
Ich muss gestehen, ich (als Programmierer) finde die App technisch echt gut gemacht. Installiert hab ich sie noch nicht, da ich privat ohnehin eher selten mein SmartPhone dabei hab, aber ich hätte keine Bedenken, sie zu installieren.
jogi
1783 days ago
Technisch sehe ich da auch keinerelei Bedenken. Ich fürchte nur die Menschen den Umgang mit den Daten eben nicht so nutzen wie gedacht. Fefe hat bspw. schon geschrieben, dass Gesundheitsämter Excel-Listen mit Klarnamen der Arbeiter*innen vom Fleischwerk an andere Institute gesendet haben. Wenn nun die Urlaubsgebiete Covid-19-Tests verlangen, ist der Schritt zu: „Sie müssen die WarnApp verwenden!“ nicht mehr weit, oder? Zudem ist die Erwartung von >80% Installationsdichte eine Wunschvorstellung.

Metal Mercredi auf ARTE Concert (Live videos)

1 Share

ARTE Concert verlängert die Sommerbriese in den Winter: Ab sofort veröffentlicht ARTE Concert jeden Mittwoch unter dem Stichwort „Metal Mercredi“ ein neues Konzert von der T-Stage. Zu sehen gibt’s das Ganze online auf arteconcert.com sowie auf den Facebook– und YouTube-Kanälen von ARTE Concert.

The post Metal Mercredi auf ARTE Concert (Live videos) appeared first on Summer Breeze.

Read the whole story
ortwin
2065 days ago
reply
Germany, Düsseldorf
Share this story
Delete

Der Homie von der Bullerei

1 Comment and 2 Shares

Die Berliner Polizei hat vor einigen Tagen ein Youtube-Video veröffentlicht. Ich verstehe nicht so ganz, ob es jetzt in erster Linie um Imagepflege in eigener Sache geht. Oder um ein (weiteres) Bekenntnis gegen Fremdenfeindlichkeit, also an sich um eine eine Selbstverständlichkeit bei der Polizei. Oder vielleicht ist das Ziel ja ein Ehrenplatz im Schwarzbuch des Bundes der Steuerzahler. Falls letzteres, dieser Plan geht garantiert auf.

Aber seht selbst:

Weil das Video völlig überraschend doch eher nur verhaltene Zustimmung erfährt, stilisiert sich die Berliner Polizei jetzt sogar als Opfer von „Hass“. In einem Twitter-Beitrag heißt es:

Mal in aller Deutlichkeit: Wer schweigt, der stimmt gar nichts zu. Dieser ganze verkorkste Pathos in dem Video und die nun auch noch zur Schau getragene Weinerlichkeit sind vielmehr an Peinlichkeit kaum zu überbieten. Ich jedenfalls wünsche mir eine Polizei, die in jeder Situation und unabhängig von der Herkunft der Beteiligten ihre Arbeit ruhig, sachlich und besonnen macht. Wenn das geschieht, muss man sich auch an nix und niemanden so ranzwanzen wie der sonnenbebrillte „Homie“ in Uniform, für mich bislang unangefochten die Witzfigur des Monats.

Read the whole story
ortwin
2394 days ago
reply
das ist wirklich schockierend
Germany, Düsseldorf
Share this story
Delete

Copyright-Reform: EU-Parlament weist Upload-Filter und Leistungsschutzrecht zurück

2 Comments
Copyright-Reform: EU-Parlament weist Upload-Filter und Leistungsschutzrecht zurück

Im Plenum haben die Abgeordneten die Vorlage aus dem Rechtsausschuss abgelehnt, wonach Plattformen hochgeladene Inhalte überwachen sollten.

Read the whole story
ortwin
2504 days ago
reply
Top!
Germany, Düsseldorf
Share this story
Delete
1 public comment
lioman
2504 days ago
reply
Das war eine gute Entscheidung
Karlsruhe

Clever: Mann dreht Deutschlandfahne um 90 Grad und fiebert jetzt für Belgien mit

1 Share
Aachen (dpo) - Das Vorrunden-Aus hat bei vielen Fußballfans für Entsetzen und Ratlosigkeit gesorgt – nicht jedoch bei Günther Rehfels aus Aachen. Der findige 37-Jährige hat sich eines simplen Tricks bedient, durch den das Turnier für ihn weiter spannend bleibt und er sich noch nicht einmal neue Fanartikel besorgen musste.
mehr...
Read the whole story
ortwin
2510 days ago
reply
Germany, Düsseldorf
Share this story
Delete

Alamofire Tutorial: Getting Started

1 Comment
Update note: This tutorial has been updated to Xcode 9.3, iOS 11.3, Swift 4.1 and Alamofire 4.7.0 by Ron Kliffer. The original tutorial was written by Aaron Douglas.
Get the lowdown on Alamofire!

Get the lowdown on Alamofire!

Alamofire is a Swift-based HTTP networking library for iOS and Mac OS X. It provides an elegant interface on top of Apple’s Foundation networking stack that simplifies a number of common networking tasks.

Alamofire provides chainable request/response methods, JSON parameter and response serialization, authentication, and many other features.

In this Alamofire tutorial, you’ll use Alamofire to perform basic networking tasks like uploading files and requesting data from a third-party RESTful API.

Alamofire’s elegance comes from the fact it was written from the ground up in Swift and does not inherit anything from its Objective-C counterpart, AFNetworking.

You should have a conceptual understanding of HTTP networking and some exposure to Apple’s networking classes such as URLSession.

While Alamofire does obscure some implementation details, it’s good to have some background knowledge if you ever need to troubleshoot your network requests.

Getting Started

Use the Download Materials button at the top or bottom of this tutorial to download the starter project.

Note: Alamofire is normally integrated using CocoaPods. It has already been installed for you in the downloaded projects.

The app for this Alamofire tutorial is named PhotoTagger. When complete, it will let you select an image from your library (or camera if you’re running on an actual device) and upload the image to a third-party service called Imagga. This service will perform some image recognition tasks to come up with a list of tags and primary colors for the image:

alamofire tutorial

This project uses CocoaPods, so open it using the PhotoTagger.xcworkspace file.

Note:To learn more about CocoaPods, check out this tutorial by Joshua Greene, published right here on the site.

Build and run the project. You’ll see the following:

alamofire tutorial

Click Select Photo and choose a photo. The background image will be replaced with the image you chose.

Open Main.storyboard and you’ll see the additional screens for displaying tags and colors have been added for you. All that remains is to upload the image and fetch the tags and colors.

The Imagga API

Imagga is an image recognition Platform-as-a-Service that provides image tagging APIs for developers and businesses to build scalable, image-intensive cloud apps. You can play around with a demo of their auto-tagging service here.

You’ll need to create a free developer account with Imagga for this Alamofire tutorial. Imagga requires an authorization header in each HTTP request so only people with an account can use their services. Go to https://imagga.com/auth/signup/hacker and fill out the form. After you create your account, check out the dashboard:

Listed down in the Authorization section is a secret token you’ll use later. You’ll need to include this information with every HTTP request as a header.

Note: Make sure you copy the whole secret token, be sure to scroll over to the right and verify you copied everything.

You’ll be using Imagga’s content endpoint to upload the photos, tagging endpoint for the image recognition and colors endpoint for color identification. You can read all about the Imagga API at http://docs.imagga.com.

REST, HTTP, JSON — What’s that?

If you’re coming to this tutorial with very little experience in using third-party services over the Internet, you might be wondering what all those acronyms mean! :]

HTTP is the application protocol, or set of rules, web sites use to transfer data from the web server to your screen. You’ve seen HTTP (or HTTPS) listed in the front of every URL you type into a web browser. You might have heard of other application protocols, such as FTP, Telnet, and SSH. HTTP defines several request methods, or verbs, the client (your web browser or app) use to indicate the desired action:

  • GET: Retrieves data, such as a web page, but doesn’t alter any data on the server.
  • HEAD: Identical to GET but only sends back the headers and none of the actual data.
  • POST: Sends data to the server, commonly used when filling a form and clicking submit.
  • PUT: Sends data to the specific location provided.
  • DELETE: Deletes data from the specific location provided.

REST, or REpresentational State Transfer, is a set of rules for designing consistent, easy-to-use and maintainable web APIs. REST has several architecture rules that enforce things such as not persisting states across requests, making requests cacheable, and providing uniform interfaces. This makes it easy for app developers like you to integrate the API into your app, without needing to track the state of data across requests.

JSON stands for JavaScript Object Notation. It provides a straightforward, human-readable and portable mechanism for transporting data between two systems. JSON has a limited number of data types: string, boolean, array, object/dictionary, null and number. There’s no distinction between integers and decimals.

There are a few native choices for converting your objects in memory to JSON and vice-versa: the good old JSONSerialization class and the newly-added JSONEncoder and JSONDecoder classes. In addition, there are numerous third party libraries that help with handling JSON. You’ll use one of them, SwiftyJSON in this tutorial.

The combination of HTTP, REST and JSON make up a good portion of the web services available to you as a developer. Trying to understand how every little piece works can be overwhelming. Libraries like Alamofire can help reduce the complexity of working with these services, and get you up and running faster than you could without their help.

What is Alamofire Good For?

Why do you need Alamofire at all? Apple already provides URLSession and other classes for downloading content via HTTP, so why complicate things with another third party library?

The short answer is Alamofire is based on URLSession, but it frees you from writing boilerplate code which makes writing networking code much easier. You can access data on the Internet with very little effort, and your code will be much cleaner and easier to read.

There are several major functions available with Alamofire:

  • Alamofire.upload: Upload files with multipart, stream, file or data methods.
  • Alamofire.download: Download files or resume a download already in progress.
  • Alamofire.request: Every other HTTP request not associated with file transfers.

These Alamofire methods are global within Alamofire so you don’t have to instantiate a class to use them. There are underlying pieces to Alamofire that are classes and structs, like SessionManager, DataRequest, and DataResponse; however, you don’t need to fully understand the entire structure of Alamofire to start using it.

Here’s an example of the same networking operation with both Apple’s URLSession and Alamofire’s request function:

// With URLSession
public func fetchAllRooms(completion: @escaping ([RemoteRoom]?) -> Void) {
  guard let url = URL(string: "http://localhost:5984/rooms/_all_docs?include_docs=true") else {
    completion(nil)
    return
  }

  var urlRequest = URLRequest(url: url,
                              cachePolicy: .reloadIgnoringLocalAndRemoteCacheData,
                              timeoutInterval: 10.0 * 1000)
  urlRequest.httpMethod = "GET"
  urlRequest.addValue("application/json", forHTTPHeaderField: "Accept")

  let task = urlSession.dataTask(with: urlRequest)
  { (data, response, error) -> Void in
    guard error == nil else {
      print("Error while fetching remote rooms: \(String(describing: error)")
      completion(nil)
      return
    }

    guard let data = data,
      let json = try? JSONSerialization.jsonObject(with: data) as? [String: Any] else {
        print("Nil data received from fetchAllRooms service")
        completion(nil)
        return
    }

    guard let rows = json?["rows"] as? [[String: Any]] else {
      print("Malformed data received from fetchAllRooms service")
      completion(nil)
      return
    }

    let rooms = rows.flatMap { roomDict in return RemoteRoom(jsonData: roomDict) }
    completion(rooms)
  }

  task.resume()
}

Versus:

// With Alamofire
func fetchAllRooms(completion: @escaping ([RemoteRoom]?) -> Void) {
  guard let url = URL(string: "http://localhost:5984/rooms/_all_docs?include_docs=true") else {
    completion(nil)
    return
  }
  Alamofire.request(url,
                    method: .get,
                    parameters: ["include_docs": "true"])
  .validate()
  .responseJSON { response in
    guard response.result.isSuccess else {
      print("Error while fetching remote rooms: \(String(describing: response.result.error)")
      completion(nil)
      return
    }

    guard let value = response.result.value as? [String: Any],
      let rows = value["rows"] as? [[String: Any]] else {
        print("Malformed data received from fetchAllRooms service")
        completion(nil)
        return
    }

    let rooms = rows.flatMap { roomDict in return RemoteRoom(jsonData: roomDict) }
    completion(rooms)
  }
}

You can see the required setup for Alamofire is shorter and it’s much clearer what the function does. You deserialize the response with responseJSON(options:completionHandler:) and calling validate() to verify the response status code is in the default acceptable range between 200 and 299 simplifies error condition handling.

Now the theory is out of the way, it’s time to start using Alamofire.

Uploading Files

Open ViewController.swift and add the following to the top, below import SwiftyJSON:

import Alamofire

This lets you use the functionality provided by the Alamofire module in your code, which you’ll be doing soon!

Next, go to imagePickerController(_:didFinishPickingMediaWithInfo:) and add the following to the end, right before the call to dismiss(animated:):

// 1
takePictureButton.isHidden = true
progressView.progress = 0.0
progressView.isHidden = false
activityIndicatorView.startAnimating()

upload(image: image,
       progressCompletion: { [weak self] percent in
        // 2
        self?.progressView.setProgress(percent, animated: true)
  },
       completion: { [weak self] tags, colors in
        // 3
        self?.takePictureButton.isHidden = false
        self?.progressView.isHidden = true
        self?.activityIndicatorView.stopAnimating()
            
        self?.tags = tags
        self?.colors = colors
            
        // 4
        self?.performSegue(withIdentifier: "ShowResults", sender: self)
})

Everything with Alamofire is asynchronous, which means you’ll update the UI in an asynchronous manner:

  1. Hide the upload button, and show the progress view and activity view.
  2. While the file uploads, you call the progress handler with an updated percent. This updates the progress indicator of the progress bar.
  3. The completion handler executes when the upload finishes. This sets the controls back to their original state.
  4. Finally the Storyboard advances to the results screen when the upload completes, successfully or not. The user interface doesn’t change based on the error condition.

Next, find upload(image:progressCompletion:completion:) at the bottom of the file. It is currently only a method stub, so give it the following implementation:

func upload(image: UIImage,
            progressCompletion: @escaping (_ percent: Float) -> Void,
            completion: @escaping (_ tags: [String]?, _ colors: [PhotoColor]?) -> Void) {
  // 1
  guard let imageData = UIImageJPEGRepresentation(image, 0.5) else {
    print("Could not get JPEG representation of UIImage")
    return
  }

  // 2
  Alamofire.upload(multipartFormData: { multipartFormData in
    multipartFormData.append(imageData,
                             withName: "imagefile",
                             fileName: "image.jpg",
                             mimeType: "image/jpeg")
  },
                   to: "http://api.imagga.com/v1/content",
                   headers: ["Authorization": "Basic xxx"],
                   encodingCompletion: { encodingResult in
  })
}

Here’s what’s happening:

  1. The image that’s being uploaded needs to be converted to a Data instance.
  2. Here you convert the JPEG data blob (imageData) into a MIME multipart request to send to the Imagga content endpoint.
Note: Make sure to replace Basic xxx with the actual authorization header taken from the Imagga dashboard.

Next, add the following to the encodingCompletion closure:

switch encodingResult {
case .success(let upload, _, _):
  upload.uploadProgress { progress in
    progressCompletion(Float(progress.fractionCompleted))
  }
  upload.validate()
  upload.responseJSON { response in
  }
case .failure(let encodingError):
  print(encodingError)
}

This chunk of code calls the Alamofire upload function and passes in a small calculation to update the progress bar as the file uploads. It then validates the response has a status code in the default acceptable range between 200 and 299.

Note: Prior to Alamofire 4 it was not guaranteed progress callbacks were called on the main queue. Beginning with Alamofire 4, the new progress callback API is always called on the main queue.

Next, add the following code to the upload.responseJSON closure:

// 1
guard response.result.isSuccess,
  let value = response.result.value else {
    print("Error while uploading file: \(String(describing: response.result.error))")
    completion(nil, nil)
    return
}
                        
// 2
let firstFileID = JSON(value)["uploaded"][0]["id"].stringValue
print("Content uploaded with ID: \(firstFileID)")
                        
//3
completion(nil, nil)

Here’s a step-by-step explanation of the above code:

  1. Check that the upload was successful, and the result has a value; if not, print the error and call the completion handler.
  2. Using SwiftyJSON, retrieve the firstFileID from the response.
  3. Call the completion handler to update the UI. At this point, you don’t have any downloaded tags or colors, so simply call this with no data.

Note: Every response has a Result enum with a value and type. Using automatic validation, the result is considered a success when it returns a valid HTTP Code between 200 and 299 and the Content Type is of a valid type specified in the Accept HTTP header field.

You can perform manual validation by adding .validate options as shown below:

Alamofire.request("https://httpbin.org/get", parameters: ["foo": "bar"])
  .validate(statusCode: 200..<300)
  .validate(contentType: ["application/json"])
  .response { response in
  // response handling code
}

The UI won't show an error if you hit an error during the upload; it merely returns no tags or colors to the user. This isn't the best user experience, but it's fine for this tutorial.

Build and run your project; select an image and watch the progress bar change as the file uploads. You should see a note like the following in your console when the upload completes:

ImaggaUploadConsole

Congratulations, you've successfully uploaded a file over the Interwebs!

Retrieving Data

The next step after uploading the image to Imagga is to fetch the tags Imagga produces after it analyzes the photo.

Add the following method to the ViewController extension below upload(image:progress:completion:):

func downloadTags(contentID: String, completion: @escaping ([String]?) -> Void) {
  // 1
  Alamofire.request("http://api.imagga.com/v1/tagging",
                    parameters: ["content": contentID],
                    headers: ["Authorization": "Basic xxx"])
     // 2
    .responseJSON { response in
      guard response.result.isSuccess,
        let value = response.result.value else {
          print("Error while fetching tags: \(String(describing: response.result.error))")
          completion(nil)
          return
      }
      
      // 3
      let tags = JSON(value)["results"][0]["tags"].array?.map { json in
        json["tag"].stringValue
      }
        
      // 4
      completion(tags)
  }
}

Here's a step-by-step explanation of the above code:

  1. Perform an HTTP GET request against the tagging endpoint, sending the URL parameter content with the ID you received after the upload. Again, be sure to replace Basic xxx with your actual authorization header.
  2. Check that the response was successful, and the result has a value; if not, print the error and call the completion handler.
  3. Using SwiftyJSON, retrieve the raw tags array from the response. Iterate over each dictionary object in the tags array, retrieving the value associated with the tag key.
  4. Call the completion handler passing in the tags received from the service.

Next, go back to upload(image:progress:completion:) and replace the call to the completion handler in the success condition with the following:

self.downloadTags(contentID: firstFileID) { tags in
  completion(tags, nil)
}

This simply sends along the tags to the completion handler.

Build and run your project; select a photo and you should see something similar to the following appear:

alamofire tutorial

Pretty slick! That Imagga is one smart API. :] Next, you'll fetch the colors of the image.

Add the following method to the ViewController extension below downloadTags(contentID:completion:):

func downloadColors(contentID: String, completion: @escaping ([PhotoColor]?) -> Void) {
  // 1.
  Alamofire.request("http://api.imagga.com/v1/colors",
                    parameters: ["content": contentID],
                    headers: ["Authorization": "Basic xxx"])
    .responseJSON { response in
      // 2
      guard response.result.isSuccess,
        let value = response.result.value else {
          print("Error while fetching colors: \(String(describing: response.result.error))")
          completion(nil)
          return
      }
        
      // 3
      let photoColors = JSON(value)["results"][0]["info"]["image_colors"].array?.map { json in
        PhotoColor(red: json["r"].intValue,
                   green: json["g"].intValue,
                   blue: json["b"].intValue,
                   colorName: json["closest_palette_color"].stringValue)
      }
        
      // 4
      completion(photoColors)
  }
}

Taking each numbered comment in turn:

  1. Perform an HTTP GET request against the colors endpoint, sending the URL parameter content with the ID you received after the upload. Again, be sure to replace Basic xxx with your actual authorization header.
  2. Check that the response was successful, and the result has a value; if not, print the error and call the completion handler.
  3. Using SwiftyJSON, retrieve the image_colors array from the response. Iterate over each dictionary object in the image_colors array, and transform it into a PhotoColor object. This object pairs colors in the RGB format with the color name as a string.
  4. Call the completion handler, passing in the photoColors from the service.

Finally, go back to upload(image:progress:completion:) and replace the call to downloadTags(contentID:) in the success condition with the following:

self.downloadTags(contentID: firstFileID) { tags in
  self.downloadColors(contentID: firstFileID) { colors in
    completion(tags, colors)
  }
}

This nests the operations of uploading the image, downloading tags and downloading colors.

Build and run your project again; this time, you should see the returned color tags when you select the Colors button:

alamofire tutorial

This uses the RGB colors you mapped to PhotoColor structs to change the background color of the view. You've now successfully uploaded an image to Imagga and fetched data from two different endpoints. You've come a long way, but there's some room for improvement in how you're using Alamofire in PhotoTagger.

Improving PhotoTagger

You probably noticed some repeated code in PhotoTagger. If Imagga released v2 of their API and deprecated v1, PhotoTagger would no longer function and you'd have to update the URL in each of the three methods. Similarly, if your authorization token changed you'd be updating it all over the place.

Alamofire provides a simple method to eliminate this code duplication and provide centralized configuration. The technique involves creating a struct conforming to URLRequestConvertible and updating your upload and request calls.

Create a new Swift file by clicking File\New\File... and selecting Swift file under iOS. Click Next, name the file ImaggaRouter.swift, select the Group PhotoTagger with the yellow folder icon and click Create.

Add the following to your new file:

import Alamofire

public enum ImaggaRouter: URLRequestConvertible {
  // 1
  enum Constants {
    static let baseURLPath = "http://api.imagga.com/v1"
    static let authenticationToken = "Basic xxx"
  }
  
  // 2
  case content
  case tags(String)
  case colors(String)
  
  // 3
  var method: HTTPMethod {
    switch self {
    case .content:
      return .post
    case .tags, .colors:
      return .get
    }
  }
  
  // 4
  var path: String {
    switch self {
    case .content:
      return "/content"
    case .tags:
      return "/tagging"
    case .colors:
      return "/colors"
    }
  }
  
  // 5
  var parameters: [String: Any] {
    switch self {
    case .tags(let contentID):
      return ["content": contentID]
    case .colors(let contentID):
      return ["content": contentID, "extract_object_colors": 0]
    default:
      return [:]
    }
  }
  
  // 6
  public func asURLRequest() throws -> URLRequest {
    let url = try Constants.baseURLPath.asURL()
    
    var request = URLRequest(url: url.appendingPathComponent(path))
    request.httpMethod = method.rawValue
    request.setValue(Constants.authenticationToken, forHTTPHeaderField: "Authorization")
    request.timeoutInterval = TimeInterval(10 * 1000)
    
    return try URLEncoding.default.encode(request, with: parameters)
  }
}

Here's a step-by-step explanation of the above code:

  1. Declare constants to hold the Imagga base URL and your Basic xxx with your actual authorization header.
  2. Declare the enum cases. Each case corresponds to an api endpoint.
  3. Return the HTTP method for each api endpoint.
  4. Return the path for each api endpoint.
  5. Return the parameters for each api endpoint.
  6. Use all of the above components to create a URLRequest for the requested endpoint.

Now all your boilerplate code is in single place, should you ever need to update it.

Go back to ViewController.swift and in upload(image:progress:completion:) replace:

Alamofire.upload(
  multipartFormData: { multipartFormData in
    multipartFormData.append(imageData,
                             withName: "imagefile",
                             fileName: "image.jpg",
                             mimeType: "image/jpeg")
  },
  to: "http://api.imagga.com/v1/content",
  headers: ["Authorization": "Basic xxx"],

with the following:

Alamofire.upload(multipartFormData: { multipartFormData in
  multipartFormData.append(imageData,
                           withName: "imagefile",
                           fileName: "image.jpg",
                           mimeType: "image/jpeg")
},
  with: ImaggaRouter.content,

Next replace the call for Alamofire.request in downloadTags(contentID:completion:) with:

Alamofire.request(ImaggaRouter.tags(contentID))

Finally, update the call to Alamofire.request in downloadColors(contentID:completion:) with:

Alamofire.request(ImaggaRouter.colors(contentID))
Note: Be sure to leave the responseJSON handlers in place for both of the previous edits.

Build and run for the final time; everything should function just as before, which means you've refactored everything without breaking your app. However, you don't have to go through your entire source code if anything on the Imagga integration ever changes: APIs, your authorization token, parameters, etc. Awesome job!

Where To Go From Here?

You can download the completed version of the project using the Download Materials button at the top or bottom of this tutorial. Don't forget to replace your authorization token as appropriate!

This tutorial covered the very basics. You can take a deeper dive by looking at the documentation on the Alamofire site at https://github.com/Alamofire/Alamofire.

Also, you can take some time to learn more about Apple's URLSession which Alamofire uses under the hood:

Please share any comments or questions about this tutorial in the forum discussion below!

The post Alamofire Tutorial: Getting Started appeared first on Ray Wenderlich.

Read the whole story
· · · · · · · · · · · · · · · · · · · · · · · · · · · · · · · · · ·
ortwin
2575 days ago
reply
Learn
Germany, Düsseldorf
Share this story
Delete
Next Page of Stories
Loading...
Page 3

POL-K: 180425-3-K Polizei Köln plant weitere Standorte für Videobeobachtung

1 Comment
Polizei Köln [Newsroom]
Köln (ots) - In einem Pressetermin hat Polizeipräsident Uwe Jacob am Mittwoch (25. April) die Pläne für die Ausweitung der Videobeobachtung auf vier weitere Kriminalitätsbrennpunkte vorgestellt. Nach ersten positiven Erfahrungen im Umfeld des Kölner ... Lesen Sie hier weiter...

Original-Content von: Polizei Köln, übermittelt durch news aktuell
Read the whole story
ortwin
2575 days ago
reply
Review
Germany, Düsseldorf
Share this story
Delete

Salina, die grüne Perle der Äolen

1 Share

Salina ist bestimmt die grünste der sieben Äolischen In

Der Beitrag Salina, die grüne Perle der Äolen erschien zuerst auf SegelnBlogs.


Read the whole story
ortwin
2598 days ago
reply
Germany, Düsseldorf
Share this story
Delete

Top 10 Apple TV Remote Tips and Tricks

1 Share
When Apple released the fourth-generation Apple TV in 2015, it also included a new Siri Remote with the set-top box (although in some regions Apple kept the original name "Apple TV Remote" due to Siri not working in those territories).


The redesigned remote features dual microphones for Siri support as well as a glass touch surface for navigating the tvOS interface by swiping, tapping, and scrubbing to fast forward/rewind content. The remote also has a Menu button, a Home button (with a TV icon on it), a Siri button, a Play/Pause button, and a Volume Up/Down button.

With the release of the Apple TV 4K in 2017, Apple tweaked the remote design to add a raised white ring around the Menu button, making it easier to identify the correct orientation of the remote by both touch and feel. The buttons and operation of the remote, however, remained unchanged, and the revised remote is also included with new units of the fourth-generation Apple TV.

In this guide, we've collected 10 of our favorite tips for controlling features of tvOS using the Apple TV Remote included with the fourth generation Apple TV and the latest fifth-generation Apple TV 4K. Keep reading and you might well discover a new trick or two.

1. Quickly Switch Between Open Apps


If you have an iOS device then you'll be familiar with this feature. To quickly switch between open Apple TV apps, click the Home button twice. This will bring up the App Switcher screen, which you can navigate by swiping sideways on the Apple TV Remote's touch surface. Tap the surface to open the selected app, or swipe up to force quit it.

2. Quickly Restart Your Apple TV


If you're troubleshooting your Apple TV and need to restart it several times, going through the settings screens to select Restart is quickly going to grate. Fortunately, you can perform the same action simply by holding down the Home and Menu buttons simultaneously for six seconds.

3. Sleep Your Apple TV


Similarly, if you're regularly digging into setting screens to select the sleep option when you're done using Apple TV, then this tip's for you. Simply hold the Home button for two seconds and the Sleep option will appear at the center of the screen where you can promptly select it.

4. Quick Switch to the Home Screen


Apple likes new Apple TV owners to associate the Apple TV Remote's Home button with the company's native TV app, but that shortcut can start to get annoying, especially if the things you tend to watch don't even show up there (Netflix content being just one example.) Thankfully, you can reinstate the Home button's original functionality by going into Settings and selecting Remotes and Devices -> Home Button.

5. Activate the Screen Saver


You can set your Apple TV's screen saver to come on after so many minutes have passed (Settings -> General -> Screen Saver -> Start After) but you can also activate it straight away by double-clicking the Menu button on the Apple TV Remote at any time.

6. Rearrange Your Apple TV Apps


Whenever you download an Apple TV app from the tvOS App Store it automatically appears at the bottom of the Home screen's grid. If you've installed quite a few apps, you might like to rearrange them. Select the app to move and then click and hold down on the Apple TV Remote's touch surface for a couple of seconds. The app icon will start jiggling, at which point you can swipe to place it where you want. Simply click the touch surface again once you have the app in your preferred location.

7. View Video Settings


When watching video on Apple TV, you can access a number of media playback settings with a quick swipe down on the Apple TV Remote's touch surface. The info overlay that slides into view from the top contains options to enable/disable subtitles, as well as audio settings for language, sound processing, and speaker. Simply navigate the menus using the touch surface and click down to select. A swipe up hides the overlay and returns you back to the video with your changes applied.

8. Quick-Switch Between Lowercase/Uppercase Keyboard


When using Apple TV's onscreen keyboard, you can avoid the hassle of navigating the cursor between the lowercase and uppercase layout, simply by pressing the Play/Pause button on your Apple TV Remote. This instantly switches the letters from lowercase to uppercase and vice versa, which makes entering passwords in particular less of a chore.

9. Quick Backspace and Access to Alternate Characters


This is another handy tip for using Apple TV's onscreen keyboard that makes navigating it a lot less frustrating.


Next time you need to correct a mistake, don't bother swiping all the way to the far right of the screen to select the backspace key. Instead, click down on the Apple TV Remote's touch surface and hold until the character overlay appears. A quick swipe left will now automatically delete the last letter you entered in the input field.

10. Change Audio Output Device on the Fly


There's a quick way to switch your Apple TV's audio output device right from the home screen. Hold down the Play/Pause button on the Apple TV Remote, and in the menu that comes up on the screen, simply select the device you want to link to by clicking the Remote's touch surface.

Got an Apple TV Remote tip we haven't covered here? Be sure to share it in the comments.

Related Roundup: Apple TV
Tag: tvOS
Buyer's Guide: Apple TV (Buy Now)

Discuss this article in our forums

Read the whole story
· · · · · · · · · · · · · · · ·
ortwin
2628 days ago
reply
Germany, Düsseldorf
Share this story
Delete

Seven Useful macOS Tricks You Might Not Know

1 Share
There are a lot of hidden features in both macOS and iOS that often go under the radar, either because they've not received much attention from Apple, or they've been forgotten after a period of time.

In the latest video over on our YouTube channel, we've rounded up some useful macOS tips and tricks that you might not know about.

Subscribe to the MacRumors YouTube channel for more videos.

  1. Universal Copy Paste - In iOS 10 and macOS Sierra, Apple introduced a universal copy paste feature. On devices where you're signed into your iCloud account, if you copy something on one device, you can paste it to another. So if you copy something on your iPhone, for example, you can swap over to your Mac to paste it.

  2. Menu Bar - If you hold down the Command key, you can use your mouse or trackpad to rearrange the icons of the menu bar at the top of your screen.

  3. Dragging Text - You can highlight text on your Mac and then hold down with the trackpad or a mouse to drag that text into another app. If you drag text to the desktop, it'll create a new text clip document.

  4. Split Screen - To quickly access the split-screen multitasking mode on your Mac, click and hold the mouse cursor over the green button in the upper left hand corner of any app window.

  5. Emoji - To insert an emoji into any document or message, hold down the Control and Command keys and then press the space bar to bring up an emoji menu interface where you can choose an emoji.

  6. Picture-in-Picture - When you watch a video on your Mac, like the YouTube video above, click on the Picture-in-Picture button that's in the bottom right of the video player (it looks like an arrow pointing at a separate screen). If there's no Picture-in-Picture button, you can hold down Control and then double-click inside the video to open up a shortcut menu. From there, you'll have a separate video window that can be moved and resized.

  7. Signing Documents - When viewing a PDF or document in an app like Preview, there are tools for inserting a signature. You can create a signature using a finger on the trackpad of your Mac, which is a handy way to sign digital documents.
For more of our how tos and guides, make sure to check out our How To and Guide roundup sections on the site. For more Mac specific tips, keep an eye on our macOS High Sierra roundup, where we highlight macOS High Sierra tips and tricks in addition to everything you need to know about the operating system.

Related Roundup: macOS High Sierra

Discuss this article in our forums

Read the whole story
· · ·
ortwin
2628 days ago
reply
Germany, Düsseldorf
Share this story
Delete

How to Update macOS Using a Simple Terminal Command

1 Share
If you're sick of waiting for the progress bar to complete every time you reboot after a macOS software update, then you'll be pleased to learn there's another way to update your Mac that could potentially reduce your downtime.

The process involves a simple Terminal command, and allows you to continue using your Mac as the update downloads and the initial software installation takes place in the background. In our tests, we found that this method was capable of shaving off several minutes of idle time during installation restarts, but that the time-saving depends on the machine and the update in question.

Users with older Macs in particular will likely appreciate this tip, as it saves having to fire up the Mac App Store altogether, which can be slow-going and sometimes even downright unresponsive. Read on to find out how it's done.

How to Update macOS From the Command Line


Before following these steps, ensure you have a full backup of your system, which should be par for the course when performing any update. Note that the following procedure only lists stock Apple system updates (iTunes, Photos, printer drivers the like), but not updates for other Apple apps that aren't installed with macOS (Xcode, for instance), and not third-party updates from the Mac App Store.

  1. To update macOS from the command line, first launch Terminal, which can be found in the Applications/Utilities folder. This will open a Terminal window and a command prompt for you to begin typing.

  2. Input the following command and press Enter: softwareupdate -l

  3. Wait as your Mac searches Apple's servers for any macOS software updates currently available for your system. If no updates are available, you'll be returned to the command prompt.
Now let's take a look at the command's output. Available updates always appear as items in a list. In our example, only one update is available at this time, but every item follows the same format, as shown:


The asterisked line denotes the individual software update package that's available for your Mac to download. This line is also known as the identifier.


The second line offers a more detailed description of the update, including the version number (usually in brackets) and the download file size in kilobytes. [Recommended] means the update is recommended for all users, and [restart] indicates that your Mac needs to reboot for installation to complete.

To download and install a specific update in the list, use the following format, but replacing NAME with the update's identifier:

softwareupdate -i NAME

Or:

softwareupdate --install NAME

Note that if the package name you’re trying to install has spaces in it, you'll need to enclose the whole thing in single quotes. So for example:

softwareupdate --install 'macOS High Sierra 10.13.3 Supplemental Update-'

Also, be alert for spaces at the end of the package names. If present, they also need to be included within the quotes.

Moving on, to download a specific update for your system without also installing it then and there, you can use:

softwareupdate -d NAME

Updates downloaded in this way can be subsequently installed with the same -i or --install command above, or even through the Mac App Store. These updates are downloaded to a folder located in /Library/Updates, but they aren't designed to be installed by double-clicking the packages in that directory. You'll need to use the --install command or visit the Mac App Store to actually initiate the install.

Lastly, to download and install all available updates for your system, type the command:

softwareupdate -i -a

Using these commands, you'll be able to leave the update to download and continue to install in the background while you get on with other things. All being well, Terminal will eventually prompt you to restart your machine manually so that the full installation procedure can complete. (Note that the softwareupdate utility requires admin authentication for all commands except the -l or -list command. If you run softwareupdate as a normal admin user, you will be prompted for a password where required.)


As some users will no doubt be aware, there are several additional options that can be used in conjunction with the softwareupdate utility. For example, -schedule on/off enables/disables your Mac's scheduled background check for updates. More adventurous readers can use man softwareupdate and softwareupdate -h for a summary list of commands.

Related Roundup: macOS High Sierra

Discuss this article in our forums

Read the whole story
· · · · · · ·
ortwin
2630 days ago
reply
Germany, Düsseldorf
Share this story
Delete

A Prosumer’s Introduction to UniFi from Troy Hunt

1 Share

We are pleased to announce a new video series “Introduction to UniFi” is available on the UBNT YouTube channel.

Read the whole story
ortwin
2677 days ago
reply
Germany, Düsseldorf
Share this story
Delete
Next Page of Stories